Introduction
This tutorial is going to be all about Django’s authentication system. We are going to implement the whole thing: registration, login, logout, password reset, and password change.
You are also going to get a brief introduction on how to protect some views from non-authorized users and how to access the information of the logged in user.
In the next section, you will find a few wireframes of authentication-related pages that we are going to implement in this tutorial. After that, you will find an initial setup of a new Django app. So far we have been working on an app named boards. But all the authentication related stuff can live in a different app, so to achieve a better organization of the code.

Wireframes
We have to update the wireframes of the application. First, we are going to add new options for the top menu. If the user is not authenticated, we should have two buttons: sign up and log in.
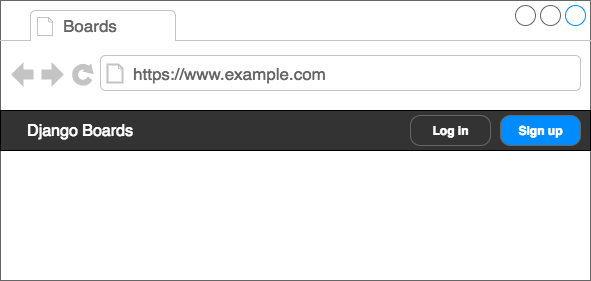
Figure 1: Top menu for not authenticated users.
If the user is authenticated, we should instead display their names along with a dropdown menu with three options: my account, change password and log out.
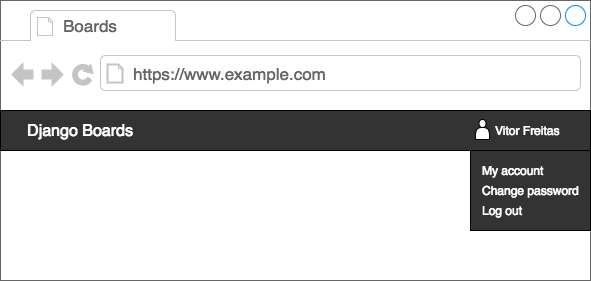
Figure 2: Top menu for authenticated users.
On the log in page, we need a form with username and password, a button with the main action (log in) and two alternative paths: sign up page and password reset page.
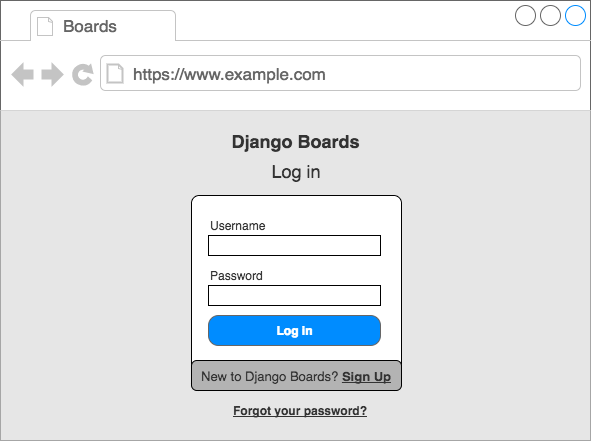
Figure 3: Log in page
On the sign up page, we should have a form with four fields: username, email address, password, and password confirmation. The user should also be able to reach the log in page.
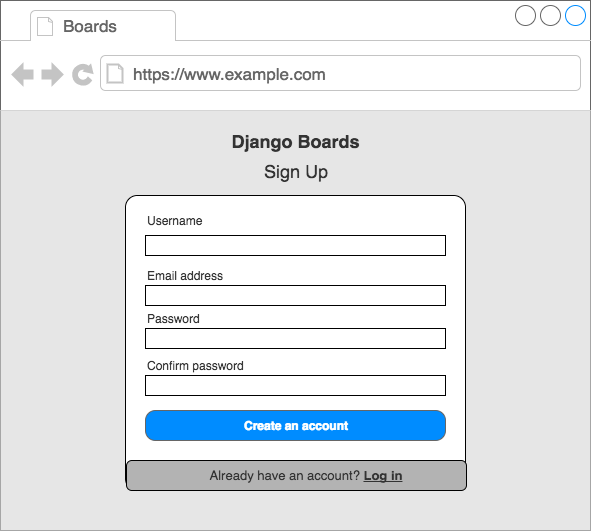
Figure 4: Sign up page
On the password reset page, we will have a form with just the email address.
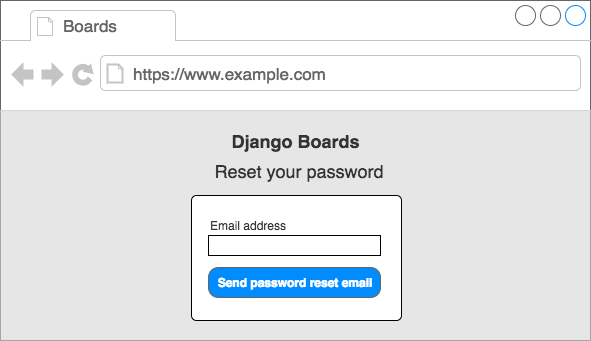
Figure 5: Password reset
Then, after clicking on a special token link, the user will be redirected to a page where they can set a new password:
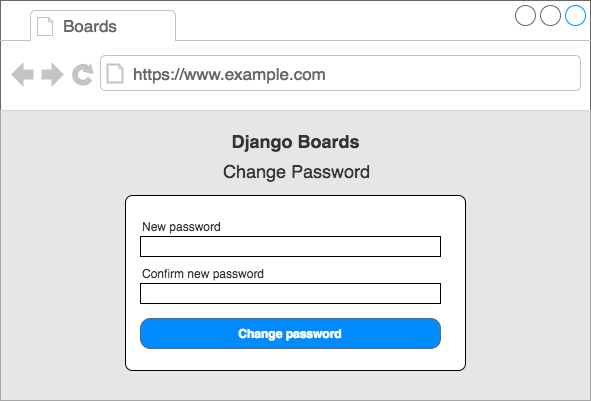
Figure 6: Change password
Initial Setup
To manage all this information, we can break it down in a different app. In the project root, in the same page where the manage.py script is, run the following command to start a new app:
django-admin startapp accountsThe project structure should like this right now:
myproject/
 |-- myproject/
 |    |-- accounts/     <-- our new django app!
 |    |-- boards/
 |    |-- myproject/
 |    |-- static/
 |    |-- templates/
 |    |-- db.sqlite3
 |    +-- manage.py
 +-- venv/
Next step, include the accounts app to the INSTALLED_APPS in the settings.py file:
INSTALLED_APPS = [
    'django.contrib.admin',
    'django.contrib.auth',
    'django.contrib.contenttypes',
    'django.contrib.sessions',
    'django.contrib.messages',
    'django.contrib.staticfiles',

    'widget_tweaks',

    'accounts',
    'boards',
]
From now on, we will be working on the accounts app.
Sign Up

Let’s start by creating the sign up view. First thing, create a new route in the urls.py file:
myproject/urls.py
from django.conf.urls import url
from django.contrib import admin

from accounts import views as accounts_views
from boards import views

urlpatterns = [
    url(r'^$', views.home, name='home'),
    url(r'^signup/$', accounts_views.signup, name='signup'),
    url(r'^boards/(?P<pk>\d+)/$', views.board_topics, name='board_topics'),
    url(r'^boards/(?P<pk>\d+)/new/$', views.new_topic, name='new_topic'),
    url(r'^admin/', admin.site.urls),
]
Notice how we are importing the views module from the accounts app in a different way:
from accounts import views as accounts_viewsWe are giving an alias because otherwise, it would clash with the boards’ views. We can improve the urls.py design later on. But for now, let’s focus on the authentication features.
Now edit the views.py inside the accounts app and create a new view named signup:
accounts/views.py
from django.shortcuts import render

def signup(request):
    return render(request, 'signup.html')
Create the new template, named signup.html:
templates/signup.html
{% extends 'base.html' %}

{% block content %}
  <h2>Sign up</h2>
{% endblock %}
Open the URL http://127.0.0.1:8000/signup/ in the browser, check if everything is working:

Time to write some tests:
accounts/tests.py
from django.core.urlresolvers import reverse
from django.urls import resolve
from django.test import TestCase
from .views import signup

class SignUpTests(TestCase):
    def test_signup_status_code(self):
        url = reverse('signup')
        response = self.client.get(url)
        self.assertEquals(response.status_code, 200)

    def test_signup_url_resolves_signup_view(self):
        view = resolve('/signup/')
        self.assertEquals(view.func, signup)
Testing the status code (200 = success) and if the URL /signup/ is returning the correct view function.
python manage.py testCreating test database for alias 'default'...
System check identified no issues (0 silenced).
..................
----------------------------------------------------------------------
Ran 18 tests in 0.652s
OK
Destroying test database for alias 'default'...For the authentication views (sign up, log in, password reset, etc.) we won’t use the top bar or the breadcrumb. We can still use the base.html template. It just needs some tweaks:
templates/base.html
{% load static %}<!DOCTYPE html>
<html>
  <head>
    <meta charset="utf-8">
    <title>{% block title %}Django Boards{% endblock %}</title>
    <link href="https://fonts.googleapis.com/css?family=Peralta" rel="stylesheet">
    <link rel="stylesheet" href="{% static 'css/bootstrap.min.css' %}">
    <link rel="stylesheet" href="{% static 'css/app.css' %}">
    {% block stylesheet %}{% endblock %}  <!-- HERE -->
  </head>
  <body>
    {% block body %}  <!-- HERE -->
      <nav class="navbar navbar-expand-lg navbar-dark bg-dark">
        <div class="container">
          <a class="navbar-brand" href="{% url 'home' %}">Django Boards</a>
        </div>
      </nav>
      <div class="container">
        <ol class="breadcrumb my-4">
          {% block breadcrumb %}
          {% endblock %}
        </ol>
        {% block content %}
        {% endblock %}
      </div>
    {% endblock body %}  <!-- AND HERE -->
  </body>
</html>
I marked with comments the new bits in the base.html template. The block
{% block stylesheet %}{% endblock %} will be used to add extra CSS, specific to some pages.
The block {% block body %} is wrapping the whole HTML document. We can use it to have an
empty document taking advantage of the head of the base.html. Notice how we named the end block
{% endblock body %}. In cases like this, it’s a good practice to name the closing tag, so it’s
easier to identify where it ends.
Now on the signup.html template, instead of using the {% block content %}, we can use the
{% block body %}.
templates/signup.html
{% extends 'base.html' %}

{% block body %}
  <h2>Sign up</h2>
{% endblock %}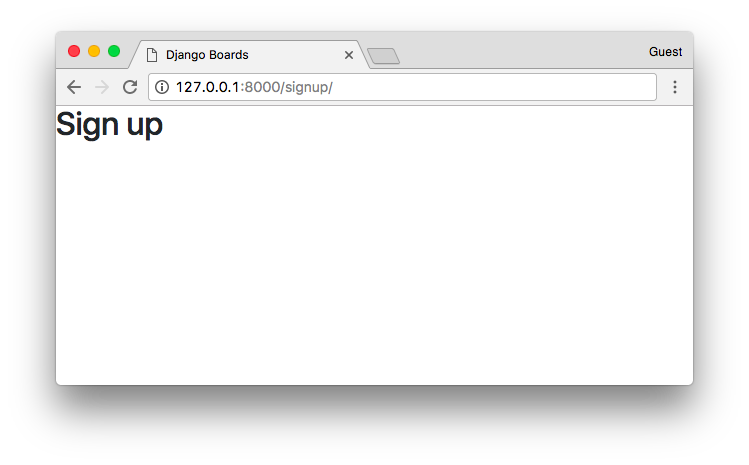

Time to create the sign up form. Django has a built-in form named UserCreationForm. Let’s use it:
accounts/views.py
from django.contrib.auth.forms import UserCreationForm
from django.shortcuts import render

def signup(request):
    form = UserCreationForm()
    return render(request, 'signup.html', {'form': form})
templates/signup.html
{% extends 'base.html' %}

{% block body %}
  <div class="container">
    <h2>Sign up</h2>
    <form method="post" novalidate>
      {% csrf_token %}
      {{ form.as_p }}
      <button type="submit" class="btn btn-primary">Create an account</button>
    </form>
  </div>
{% endblock %}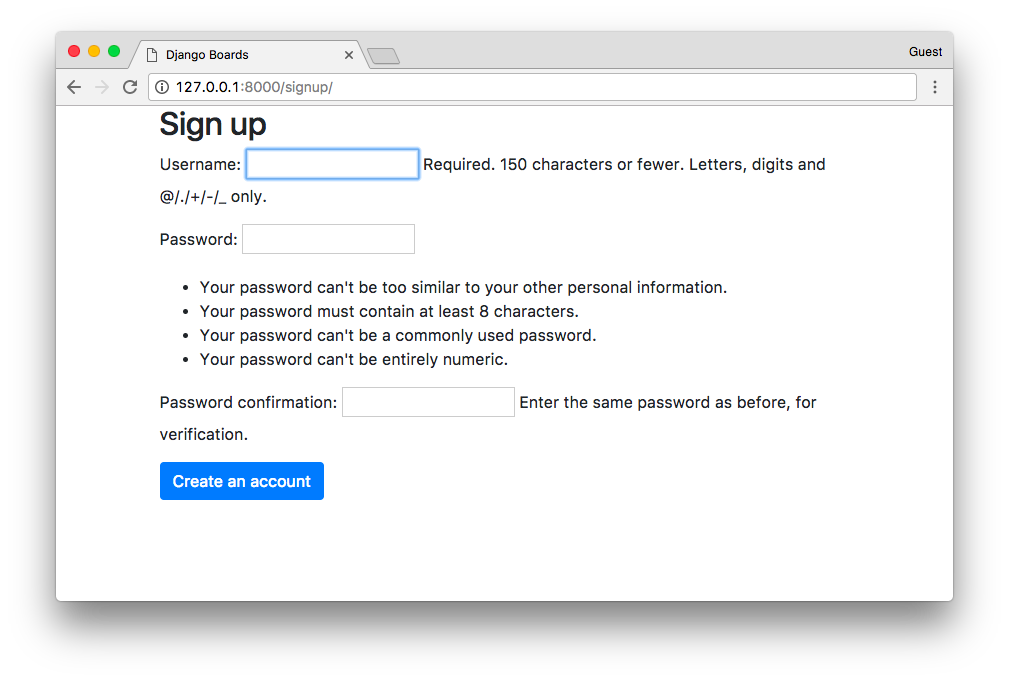
Looking a little bit messy, right? We can use our form.html template to make it look better:
templates/signup.html
{% extends 'base.html' %}

{% block body %}
  <div class="container">
    <h2>Sign up</h2>
    <form method="post" novalidate>
      {% csrf_token %}
      {% include 'includes/form.html' %}
      <button type="submit" class="btn btn-primary">Create an account</button>
    </form>
  </div>
{% endblock %}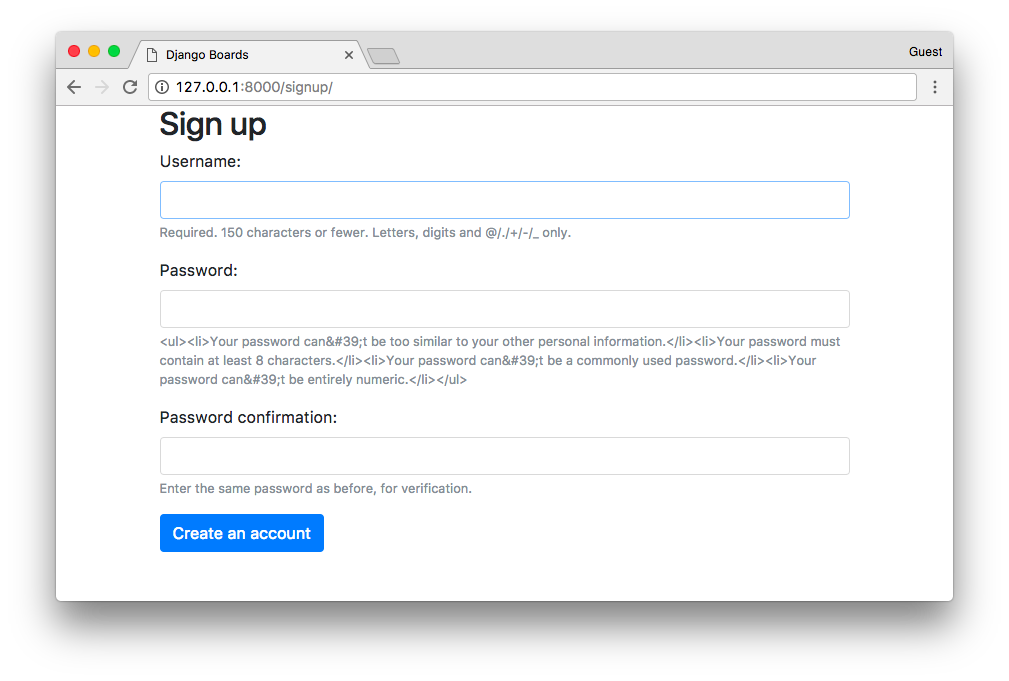
Uh, almost there. Currently, our form.html partial template is displaying some raw HTML. It’s a security feature. By default Django treats all strings as unsafe, escaping all the special characters that may cause trouble. But in this case, we can trust it.
templates/includes/form.html
{% load widget_tweaks %}

{% for field in form %}
  <div class="form-group">
    {{ field.label_tag }}

    <!-- code suppressed for brevity -->

    {% if field.help_text %}
      <small class="form-text text-muted">
        {{ field.help_text|safe }}  <!-- new code here -->
      </small>
    {% endif %}
  </div>
{% endfor %}
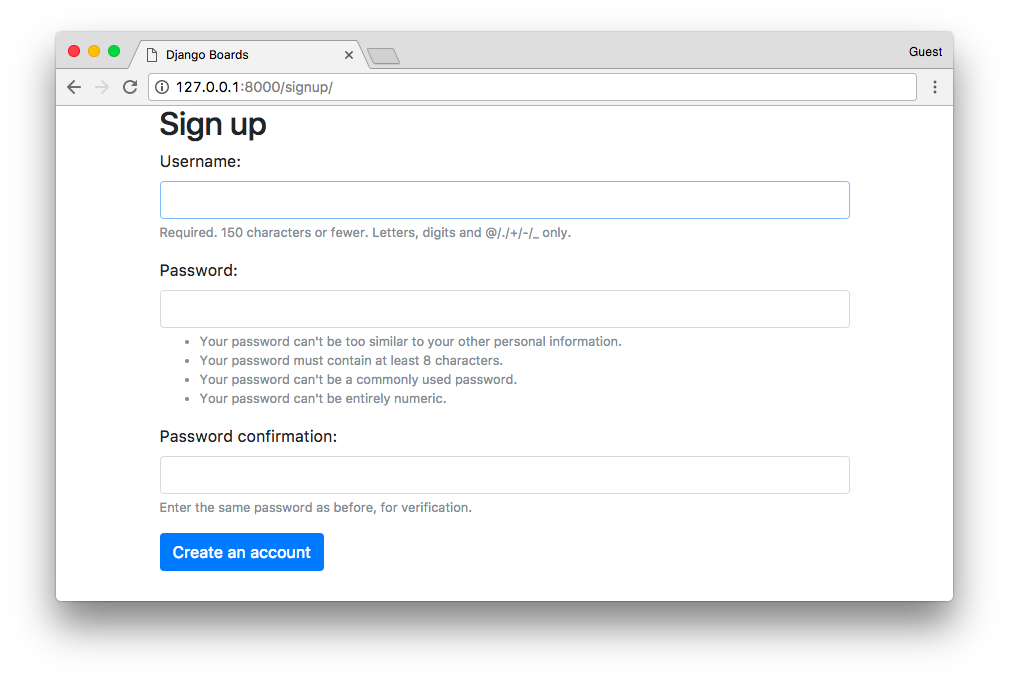
Basically, in the previous template we added the option safe to the field.help_text: {{ field.help_text|safe }}.
Save the form.html file, and check the sign up page again:
Now let’s implement the business logic in the signup view:
accounts/views.py
from django.contrib.auth import login as auth_login
from django.contrib.auth.forms import UserCreationForm
from django.shortcuts import render, redirect

def signup(request):
    if request.method == 'POST':
        form = UserCreationForm(request.POST)
        if form.is_valid():
            user = form.save()
            auth_login(request, user)
            return redirect('home')
    else:
        form = UserCreationForm()
    return render(request, 'signup.html', {'form': form})
A basic form processing with a small detail: the login function (renamed to auth_login to avoid clashing with the built-in login view).
Note:
I renamed the login function to auth_login, but later I realized that Django 1.11
has a class-based view for the login view, LoginView, so there was no risk of clashing the names.
On the older versions there was a auth.login and auth.view.login, which used to
cause some confusion, because one was the function that logs the user in, and the other was the view.
Long story short: you can import it just as login if you want, it will not cause any problem.
If the form is valid, a User instance is created with the user = form.save(). The created user is then passed
as an argument to the auth_login function, manually authenticating the user. After that, the view redirects the
user to the homepage, keeping the flow of the application.
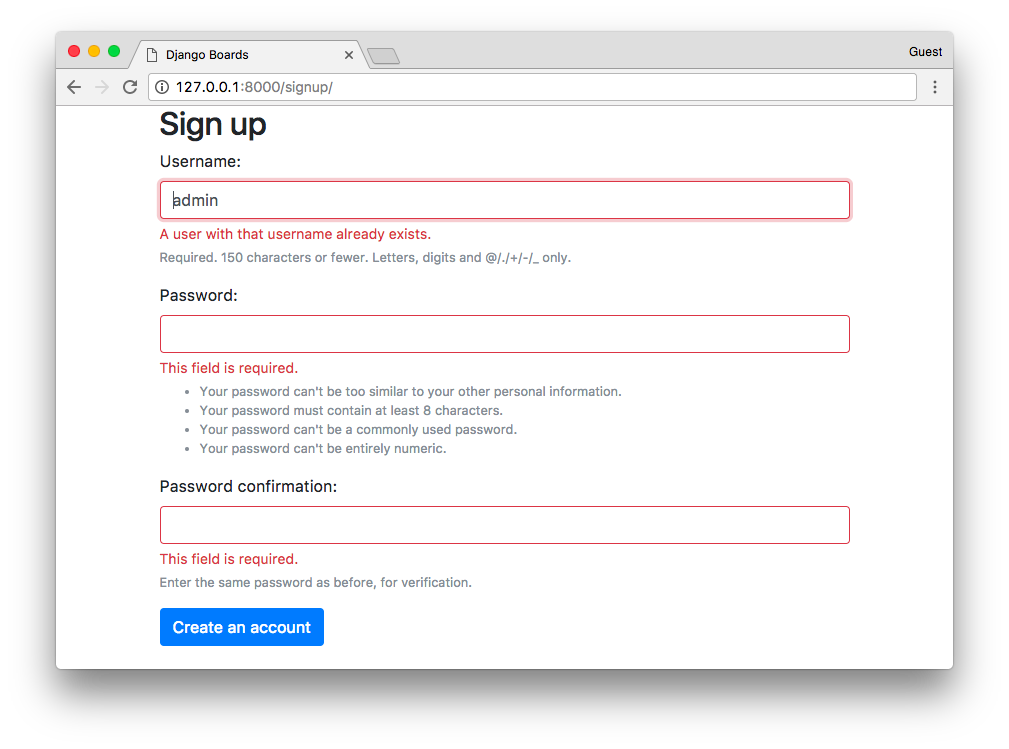
Let’s try it. First, submit some invalid data. Either an empty form, non-matching fields, or an existing username:
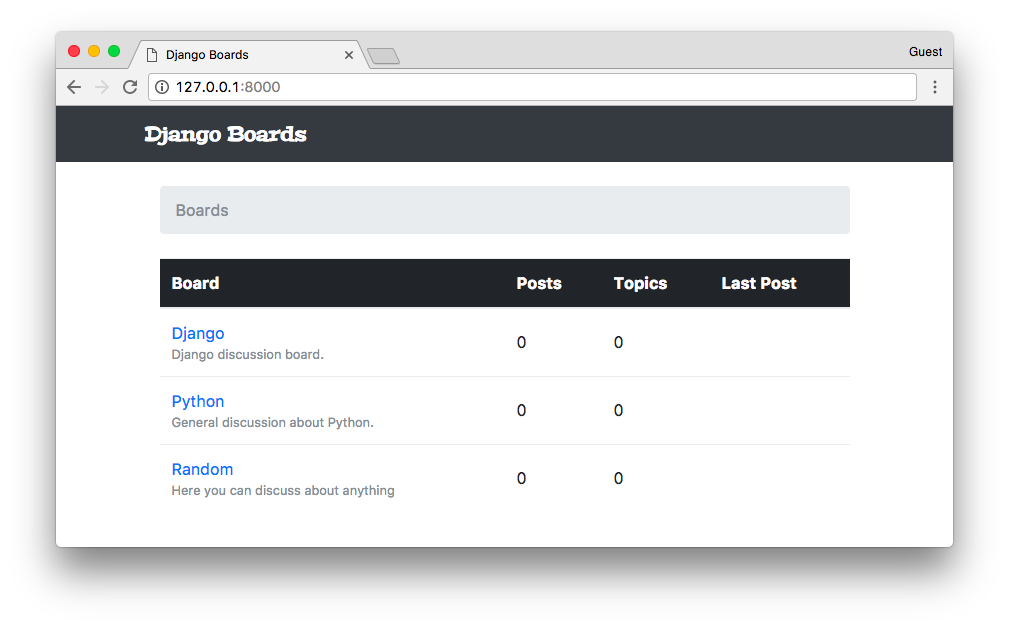
Now fill the form and submit it, check if the user is created and redirected to the homepage:
Referencing the Authenticated User in the Template
How can we know if it worked? Well, we can edit the base.html template to add the name of the user on the top bar:
templates/base.html
{% block body %}
  <nav class="navbar navbar-expand-sm navbar-dark bg-dark">
    <div class="container">
      <a class="navbar-brand" href="{% url 'home' %}">Django Boards</a>
      <button class="navbar-toggler" type="button" data-toggle="collapse" data-target="#mainMenu" aria-controls="mainMenu" aria-expanded="false" aria-label="Toggle navigation">
        <span class="navbar-toggler-icon"></span>
      </button>
      <div class="collapse navbar-collapse" id="mainMenu">
        <ul class="navbar-nav ml-auto">
          <li class="nav-item">
            <a class="nav-link" href="#">{{ user.username }}</a>
          </li>
        </ul>
      </div>
    </div>
  </nav>

  <div class="container">
    <ol class="breadcrumb my-4">
      {% block breadcrumb %}
      {% endblock %}
    </ol>
    {% block content %}
    {% endblock %}
  </div>
{% endblock body %}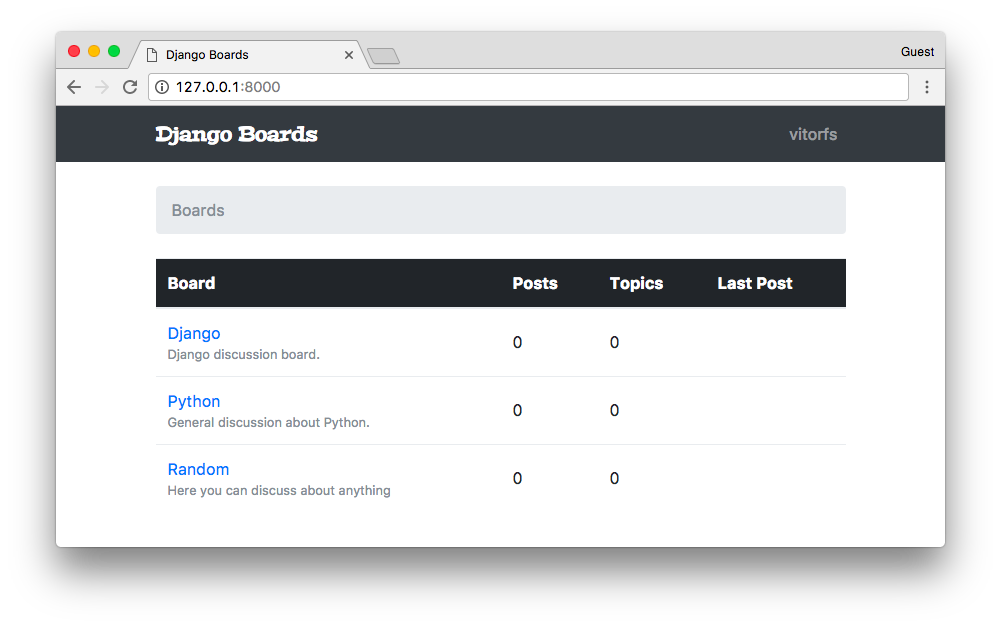
Testing the Sign Up View
Let’s now improve our test cases:
accounts/tests.py
from django.contrib.auth.forms import UserCreationForm
from django.core.urlresolvers import reverse
from django.urls import resolve
from django.test import TestCase
from .views import signup

class SignUpTests(TestCase):
    def setUp(self):
        url = reverse('signup')
        self.response = self.client.get(url)

    def test_signup_status_code(self):
        self.assertEquals(self.response.status_code, 200)

    def test_signup_url_resolves_signup_view(self):
        view = resolve('/signup/')
        self.assertEquals(view.func, signup)

    def test_csrf(self):
        self.assertContains(self.response, 'csrfmiddlewaretoken')

    def test_contains_form(self):
        form = self.response.context.get('form')
        self.assertIsInstance(form, UserCreationForm)
We changed a little bit the SignUpTests class. Defined a setUp method, moved the response object to there. Then now we are also testing if there are a form and the CSRF token in the response.
Now we are going to test a successful sign up. This time, let’s create a new class to organize better the tests:
accounts/tests.py
from django.contrib.auth.models import User
from django.contrib.auth.forms import UserCreationForm
from django.core.urlresolvers import reverse
from django.urls import resolve
from django.test import TestCase
from .views import signup

class SignUpTests(TestCase):
    # code suppressed...

class SuccessfulSignUpTests(TestCase):
    def setUp(self):
        url = reverse('signup')
        data = {
            'username': 'john',
            'password1': 'abcdef123456',
            'password2': 'abcdef123456'
        }
        self.response = self.client.post(url, data)
        self.home_url = reverse('home')

    def test_redirection(self):
        '''
        A valid form submission should redirect the user to the home page
        '''
        self.assertRedirects(self.response, self.home_url)

    def test_user_creation(self):
        self.assertTrue(User.objects.exists())

    def test_user_authentication(self):
        '''
        Create a new request to an arbitrary page.
        The resulting response should now have a `user` to its context,
        after a successful sign up.
        '''
        response = self.client.get(self.home_url)
        user = response.context.get('user')
        self.assertTrue(user.is_authenticated)
Run the tests.
Using a similar strategy, now let’s create a new class for sign up tests when the data is invalid:
from django.contrib.auth.models import User
from django.contrib.auth.forms import UserCreationForm
from django.core.urlresolvers import reverse
from django.urls import resolve
from django.test import TestCase
from .views import signup

class SignUpTests(TestCase):
    # code suppressed...

class SuccessfulSignUpTests(TestCase):
    # code suppressed...

class InvalidSignUpTests(TestCase):
    def setUp(self):
        url = reverse('signup')
        self.response = self.client.post(url, {})  # submit an empty dictionary

    def test_signup_status_code(self):
        '''
        An invalid form submission should return to the same page
        '''
        self.assertEquals(self.response.status_code, 200)

    def test_form_errors(self):
        form = self.response.context.get('form')
        self.assertTrue(form.errors)

    def test_dont_create_user(self):
        self.assertFalse(User.objects.exists())
Adding the Email Field to the Form
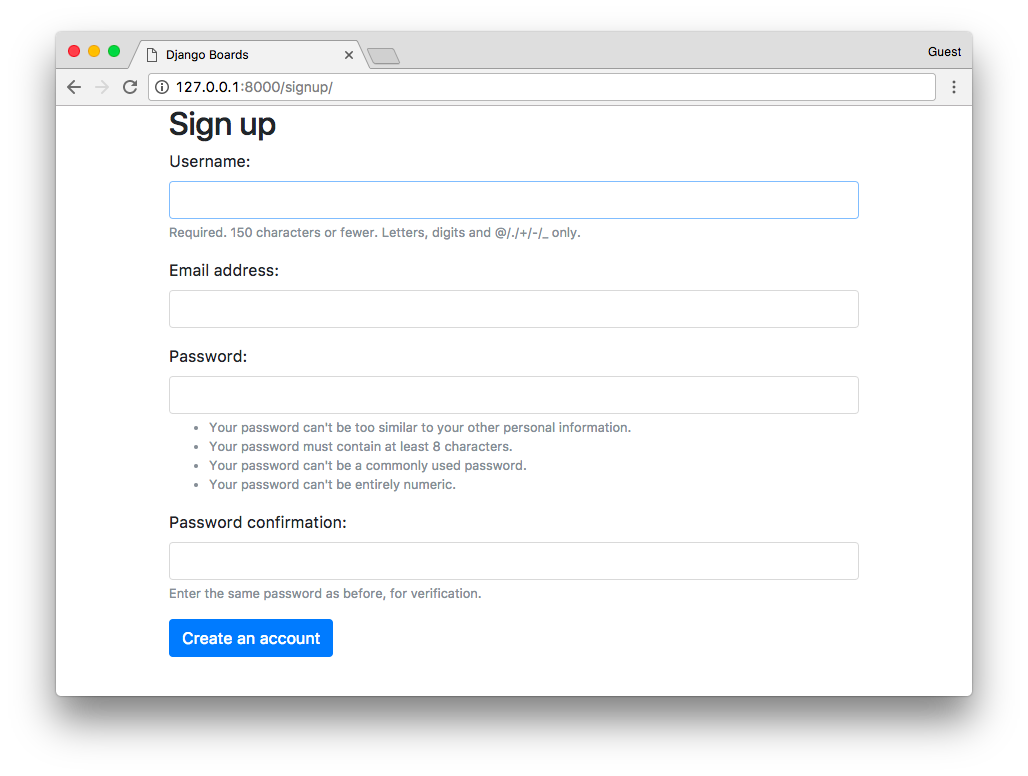
Everything is working, but… The email address field is missing. Well, the UserCreationForm does not provide an email field. But we can extend it.
Create a file named forms.py inside the accounts folder:
accounts/forms.py
from django import forms
from django.contrib.auth.forms import UserCreationForm
from django.contrib.auth.models import User

class SignUpForm(UserCreationForm):
    email = forms.CharField(max_length=254, required=True, widget=forms.EmailInput())
    class Meta:
        model = User
        fields = ('username', 'email', 'password1', 'password2')
Now, instead of using the UserCreationForm in our views.py, let’s import the new form, SignUpForm, and use it instead:
accounts/views.py
from django.contrib.auth import login as auth_login
from django.shortcuts import render, redirect

from .forms import SignUpForm

def signup(request):
    if request.method == 'POST':
        form = SignUpForm(request.POST)
        if form.is_valid():
            user = form.save()
            auth_login(request, user)
            return redirect('home')
    else:
        form = SignUpForm()
    return render(request, 'signup.html', {'form': form})
Just with this small change, everything is already working:
Remember to change the test case to use the SignUpForm instead of UserCreationForm:
from .forms import SignUpForm

class SignUpTests(TestCase):
    # ...

    def test_contains_form(self):
        form = self.response.context.get('form')
        self.assertIsInstance(form, SignUpForm)

class SuccessfulSignUpTests(TestCase):
    def setUp(self):
        url = reverse('signup')
        data = {
            'username': 'john',
            'email': 'john@doe.com',
            'password1': 'abcdef123456',
            'password2': 'abcdef123456'
        }
        self.response = self.client.post(url, data)
        self.home_url = reverse('home')

    # ...
The previous test case would still pass because since SignUpForm extends the UserCreationForm, it is an instance of UserCreationForm.
Now let’s think about what happened for a moment. We added a new form field:
fields = ('username', 'email', 'password1', 'password2')And it automatically reflected in the HTML template. It’s good, right? Well, depends. What if in the future, a new developer wanted to re-use the SignUpForm for something else, and add some extra fields to it. Then those new fields would also show up in the signup.html, which may not be the desired behavior. This change could pass unnoticed, and we don’t want any surprises.
So let’s create a new test, that verifies the HTML inputs in the template:
accounts/tests.py
class SignUpTests(TestCase):
    # ...

    def test_form_inputs(self):
        '''
        The view must contain five inputs: csrf, username, email,
        password1, password2
        '''
        self.assertContains(self.response, '<input', 5)
        self.assertContains(self.response, 'type="text"', 1)
        self.assertContains(self.response, 'type="email"', 1)
        self.assertContains(self.response, 'type="password"', 2)
Improving the Tests Layout
Alright, so we are testing the inputs and everything, but we still have to test the form itself. Instead of just keep adding tests to the accounts/tests.py file, let’s improve the project design a little bit.
Create a new folder named tests within the accounts folder. Then, inside the tests folder, create an empty file named __init__.py.
Now, move the tests.py file to inside the tests folder, and rename it to test_view_signup.py.
The final result should be the following:
myproject/
 |-- myproject/
 |    |-- accounts/
 |    |    |-- migrations/
 |    |    |-- tests/
 |    |    |    |-- __init__.py
 |    |    |    +-- test_view_signup.py
 |    |    |-- __init__.py
 |    |    |-- admin.py
 |    |    |-- apps.py
 |    |    |-- models.py
 |    |    +-- views.py
 |    |-- boards/
 |    |-- myproject/
 |    |-- static/
 |    |-- templates/
 |    |-- db.sqlite3
 |    +-- manage.py
 +-- venv/
Note that since we are using relative import within the context of the apps, we need to fix the imports in the new test_view_signup.py:
accounts/tests/test_view_signup.py
from django.contrib.auth.models import User
from django.core.urlresolvers import reverse
from django.urls import resolve
from django.test import TestCase

from ..views import signup
from ..forms import SignUpForm
We are using relative imports inside the app modules so we can have the freedom to rename the Django app later on, without having to fix all the absolute imports.
Now let’s create a new test file, to test the SignUpForm. Add a new test file named test_form_signup.py:
accounts/tests/test_form_signup.py
from django.test import TestCase
from ..forms import SignUpForm

class SignUpFormTest(TestCase):
    def test_form_has_fields(self):
        form = SignUpForm()
        expected = ['username', 'email', 'password1', 'password2',]
        actual = list(form.fields)
        self.assertSequenceEqual(expected, actual)
It looks very strict, right? For example, if in the future we have to change the SignUpForm, to include the user’s first and last name, we will probably end up having to fix a few test cases, even if we didn’t break anything.

Those alerts are useful because they help to bring awareness, especially for newcomers touching the code for the first time. It helps them code with confidence.
Improving the Sign Up Template
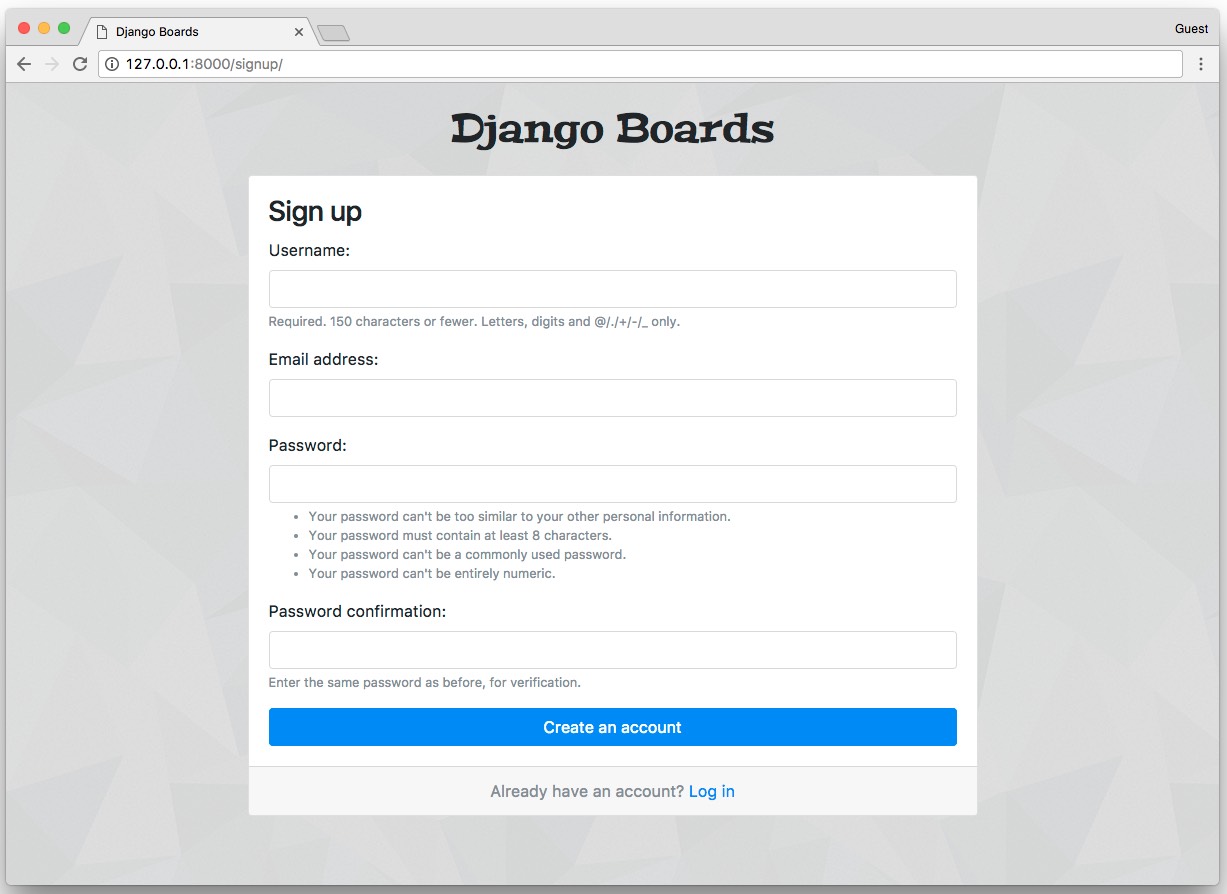
Let’s work a little bit on it. Here we can use Bootstrap 4 cards components to make it look good.
Go to https://www.toptal.com/designers/subtlepatterns/ and find a nice background pattern to use as a background of the accounts pages. Download it, create a new folder named img inside the static folder, and place the image there.
Then after that, create a new CSS file named accounts.css in the static/css. The result should be the following:
myproject/
 |-- myproject/
 |    |-- accounts/
 |    |-- boards/
 |    |-- myproject/
 |    |-- static/
 |    |    |-- css/
 |    |    |    |-- accounts.css  <-- here
 |    |    |    |-- app.css
 |    |    |    +-- bootstrap.min.css
 |    |    +-- img/
 |    |    |    +-- shattered.png  <-- here (the name may be different, depending on the patter you downloaded)
 |    |-- templates/
 |    |-- db.sqlite3
 |    +-- manage.py
 +-- venv/
Now edit the accounts.css file:
static/css/accounts.css
body {
  background-image: url(../img/shattered.png);
}

.logo {
  font-family: 'Peralta', cursive;
}

.logo a {
  color: rgba(0,0,0,.9);
}

.logo a:hover,
.logo a:active {
  text-decoration: none;
}
In the signup.html template, we can change it to make use of the new CSS and also take the Bootstrap 4 card components into use:
templates/signup.html
{% extends 'base.html' %}

{% load static %}

{% block stylesheet %}
  <link rel="stylesheet" href="{% static 'css/accounts.css' %}">
{% endblock %}

{% block body %}
  <div class="container">
    <h1 class="text-center logo my-4">
      <a href="{% url 'home' %}">Django Boards</a>
    </h1>
    <div class="row justify-content-center">
      <div class="col-lg-8 col-md-10 col-sm-12">
        <div class="card">
          <div class="card-body">
            <h3 class="card-title">Sign up</h3>
            <form method="post" novalidate>
              {% csrf_token %}
              {% include 'includes/form.html' %}
              <button type="submit" class="btn btn-primary btn-block">Create an account</button>
            </form>
          </div>
          <div class="card-footer text-muted text-center">
            Already have an account? <a href="#">Log in</a>
          </div>
        </div>
      </div>
    </div>
  </div>
{% endblock %}
With that, this should be our sign up page right now:
Logout
To keep a natural flow in the implementation, let’s add the log out view. First, edit the urls.py to add a new route:
myproject/urls.py
from django.conf.urls import url
from django.contrib import admin
from django.contrib.auth import views as auth_views

from accounts import views as accounts_views
from boards import views

urlpatterns = [
    url(r'^$', views.home, name='home'),
    url(r'^signup/$', accounts_views.signup, name='signup'),
    url(r'^logout/$', auth_views.LogoutView.as_view(), name='logout'),
    url(r'^boards/(?P<pk>\d+)/$', views.board_topics, name='board_topics'),
    url(r'^boards/(?P<pk>\d+)/new/$', views.new_topic, name='new_topic'),
    url(r'^admin/', admin.site.urls),
]
We imported the views from the Django’s contrib module. We renamed it to auth_views to avoid clashing
with the boards.views. Notice that this view is a little bit different: LogoutView.as_view(). It’s a Django’s
class-based view. So far we have only implemented views as Python functions. The class-based views provide a more
flexible way to extend and reuse views. We will discuss more that subject later on.
Open the settings.py file and add the LOGOUT_REDIRECT_URL variable to the bottom of the file:
myproject/settings.py
LOGOUT_REDIRECT_URL = 'home'Here we are passing the name of the URL pattern we want to redirect the user after the log out.
After that, it’s already done. Just access the URL 127.0.0.1:8000/logout/ and you will be logged out. But hold on a second. Before you log out, let’s create the dropdown menu for logged in users.
Displaying Menu For Authenticated Users
Now we will need to do some tweaks in our base.html template. We have to add a dropdown menu with the logout link.
The Bootstrap 4 dropdown component needs jQuery to work.
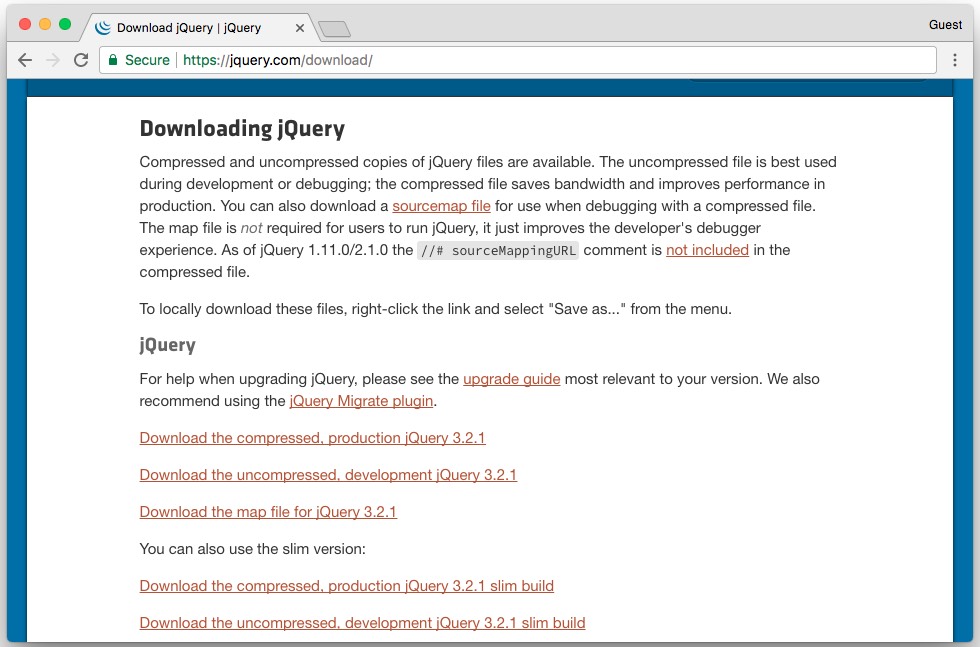
First, go to jquery.com/download/ and download the compressed, production jQuery 3.2.1 version.
Inside the static folder, create a new folder named js. Copy the jquery-3.2.1.min.js file to there.
Bootstrap 4 also needs a library called Popper to work. Go to popper.js.org and download the latest version.
Inside the popper.js-1.12.5 folder, go to dist/umd and copy the file popper.min.js to our js folder. Pay attention here; Bootstrap 4 will only work with the umd/popper.min.js. So make sure you are copying the right file.
If you no longer have all the Bootstrap 4 files, download it again from getbootstrap.com.
Similarly, copy the bootstrap.min.js file to our js folder as well.
The final result should be:
myproject/
 |-- myproject/
 |    |-- accounts/
 |    |-- boards/
 |    |-- myproject/
 |    |-- static/
 |    |    |-- css/
 |    |    +-- js/
 |    |         |-- bootstrap.min.js
 |    |         |-- jquery-3.2.1.min.js
 |    |         +-- popper.min.js
 |    |-- templates/
 |    |-- db.sqlite3
 |    +-- manage.py
 +-- venv/
In the bottom of the base.html file, add the scripts after the {% endblock body %}:
templates/base.html
{% load static %}<!DOCTYPE html>
<html>
  <head>
    <meta charset="utf-8">
    <title>{% block title %}Django Boards{% endblock %}</title>
    <link href="https://fonts.googleapis.com/css?family=Peralta" rel="stylesheet">
    <link rel="stylesheet" href="{% static 'css/bootstrap.min.css' %}">
    <link rel="stylesheet" href="{% static 'css/app.css' %}">
    {% block stylesheet %}{% endblock %}
  </head>
  <body>
    {% block body %}
    <!-- code suppressed for brevity -->
    {% endblock body %}
    <script src="{% static 'js/jquery-3.2.1.min.js' %}"></script>
    <script src="{% static 'js/popper.min.js' %}"></script>
    <script src="{% static 'js/bootstrap.min.js' %}"></script>
  </body>
</html>
If you found the instructions confusing, just download the files using the direct links below:
- https://code.jquery.com/jquery-3.2.1.min.js
- https://cdnjs.cloudflare.com/ajax/libs/popper.js/1.11.0/umd/popper.min.js
- https://maxcdn.bootstrapcdn.com/bootstrap/4.0.0-beta/js/bootstrap.min.js
Right-click and *Save link as….
Now we can add the Bootstrap 4 dropdown menu:
templates/base.html
<nav class="navbar navbar-expand-sm navbar-dark bg-dark">
  <div class="container">
    <a class="navbar-brand" href="{% url 'home' %}">Django Boards</a>
    <button class="navbar-toggler" type="button" data-toggle="collapse" data-target="#mainMenu" aria-controls="mainMenu" aria-expanded="false" aria-label="Toggle navigation">
      <span class="navbar-toggler-icon"></span>
    </button>
    <div class="collapse navbar-collapse" id="mainMenu">
      <ul class="navbar-nav ml-auto">
        <li class="nav-item dropdown">
          <a class="nav-link dropdown-toggle" href="#" id="userMenu" data-toggle="dropdown" aria-haspopup="true" aria-expanded="false">
            {{ user.username }}
          </a>
          <div class="dropdown-menu dropdown-menu-right" aria-labelledby="userMenu">
            <a class="dropdown-item" href="#">My account</a>
            <a class="dropdown-item" href="#">Change password</a>
            <div class="dropdown-divider"></div>
            <a class="dropdown-item" href="{% url 'logout' %}">Log out</a>
          </div>
        </li>
      </ul>
    </div>
  </div>
</nav>
Let’s try it. Click on logout:

It’s working. But the dropdown is showing regardless of the user being logged in or not. The difference is that now the username is empty, and we can only see an arrow.
We can improve it a little bit:
<nav class="navbar navbar-expand-sm navbar-dark bg-dark">
  <div class="container">
    <a class="navbar-brand" href="{% url 'home' %}">Django Boards</a>
    <button class="navbar-toggler" type="button" data-toggle="collapse" data-target="#mainMenu" aria-controls="mainMenu" aria-expanded="false" aria-label="Toggle navigation">
      <span class="navbar-toggler-icon"></span>
    </button>
    <div class="collapse navbar-collapse" id="mainMenu">
      {% if user.is_authenticated %}
        <ul class="navbar-nav ml-auto">
          <li class="nav-item dropdown">
            <a class="nav-link dropdown-toggle" href="#" id="userMenu" data-toggle="dropdown" aria-haspopup="true" aria-expanded="false">
              {{ user.username }}
            </a>
            <div class="dropdown-menu dropdown-menu-right" aria-labelledby="userMenu">
              <a class="dropdown-item" href="#">My account</a>
              <a class="dropdown-item" href="#">Change password</a>
              <div class="dropdown-divider"></div>
              <a class="dropdown-item" href="{% url 'logout' %}">Log out</a>
            </div>
          </li>
        </ul>
      {% else %}
        <form class="form-inline ml-auto">
          <a href="#" class="btn btn-outline-secondary">Log in</a>
          <a href="{% url 'signup' %}" class="btn btn-primary ml-2">Sign up</a>
        </form>
      {% endif %}
    </div>
  </div>
</nav>
Now we are telling Django to show the dropdown menu if the user is logged in, and if not, show the log in and sign up buttons:

Login
First thing, add a new URL route:
myproject/urls.py
from django.conf.urls import url
from django.contrib import admin
from django.contrib.auth import views as auth_views

from accounts import views as accounts_views
from boards import views

urlpatterns = [
    url(r'^$', views.home, name='home'),
    url(r'^signup/$', accounts_views.signup, name='signup'),
    url(r'^login/$', auth_views.LoginView.as_view(template_name='login.html'), name='login'),
    url(r'^logout/$', auth_views.LogoutView.as_view(), name='logout'),
    url(r'^boards/(?P<pk>\d+)/$', views.board_topics, name='board_topics'),
    url(r'^boards/(?P<pk>\d+)/new/$', views.new_topic, name='new_topic'),
    url(r'^admin/', admin.site.urls),
]
Inside the as_view() we can pass some extra parameters, so to override the defaults. In this case, we are instructing
the LoginView to look for a template at login.html.
Edit the settings.py and add the following configuration:
myproject/settings.py
LOGIN_REDIRECT_URL = 'home'This configuration is telling Django where to redirect the user after a successful login.
Finally, add the login URL to the base.html template:
templates/base.html
<a href="{% url 'login' %}" class="btn btn-outline-secondary">Log in</a>We can create a template similar to the sign up page. Create a new file named login.html:
templates/login.html
{% extends 'base.html' %}

{% load static %}

{% block stylesheet %}
  <link rel="stylesheet" href="{% static 'css/accounts.css' %}">
{% endblock %}

{% block body %}
  <div class="container">
    <h1 class="text-center logo my-4">
      <a href="{% url 'home' %}">Django Boards</a>
    </h1>
    <div class="row justify-content-center">
      <div class="col-lg-4 col-md-6 col-sm-8">
        <div class="card">
          <div class="card-body">
            <h3 class="card-title">Log in</h3>
            <form method="post" novalidate>
              {% csrf_token %}
              {% include 'includes/form.html' %}
              <button type="submit" class="btn btn-primary btn-block">Log in</button>
            </form>
          </div>
          <div class="card-footer text-muted text-center">
            New to Django Boards? <a href="{% url 'signup' %}">Sign up</a>
          </div>
        </div>
        <div class="text-center py-2">
          <small>
            <a href="#" class="text-muted">Forgot your password?</a>
          </small>
        </div>
      </div>
    </div>
  </div>
{% endblock %}
And we are repeating HTML templates. Let’s refactor it.
Create a new template named base_accounts.html:
templates/base_accounts.html
{% extends 'base.html' %}

{% load static %}

{% block stylesheet %}
  <link rel="stylesheet" href="{% static 'css/accounts.css' %}">
{% endblock %}

{% block body %}
  <div class="container">
    <h1 class="text-center logo my-4">
      <a href="{% url 'home' %}">Django Boards</a>
    </h1>
    {% block content %}
    {% endblock %}
  </div>
{% endblock %}
Now use it on both signup.html and login.html:
templates/login.html
{% extends 'base_accounts.html' %}

{% block title %}Log in to Django Boards{% endblock %}

{% block content %}
  <div class="row justify-content-center">
    <div class="col-lg-4 col-md-6 col-sm-8">
      <div class="card">
        <div class="card-body">
          <h3 class="card-title">Log in</h3>
          <form method="post" novalidate>
            {% csrf_token %}
            {% include 'includes/form.html' %}
            <button type="submit" class="btn btn-primary btn-block">Log in</button>
          </form>
        </div>
        <div class="card-footer text-muted text-center">
          New to Django Boards? <a href="{% url 'signup' %}">Sign up</a>
        </div>
      </div>
      <div class="text-center py-2">
        <small>
          <a href="#" class="text-muted">Forgot your password?</a>
        </small>
      </div>
    </div>
  </div>
{% endblock %}
We still don’t have the password reset URL, so let’s leave it as # for now.
templates/signup.html
{% extends 'base_accounts.html' %}

{% block title %}Sign up to Django Boards{% endblock %}

{% block content %}
  <div class="row justify-content-center">
    <div class="col-lg-8 col-md-10 col-sm-12">
      <div class="card">
        <div class="card-body">
          <h3 class="card-title">Sign up</h3>
          <form method="post" novalidate>
            {% csrf_token %}
            {% include 'includes/form.html' %}
            <button type="submit" class="btn btn-primary btn-block">Create an account</button>
          </form>
        </div>
        <div class="card-footer text-muted text-center">
          Already have an account? <a href="{% url 'login' %}">Log in</a>
        </div>
      </div>
    </div>
  </div>
{% endblock %}
Notice that we added the log in URL: <a href="{% url 'login' %}">Log in</a>.
Log In Non Field Errors
If we submit the log in form empty, we get some nice error messages:
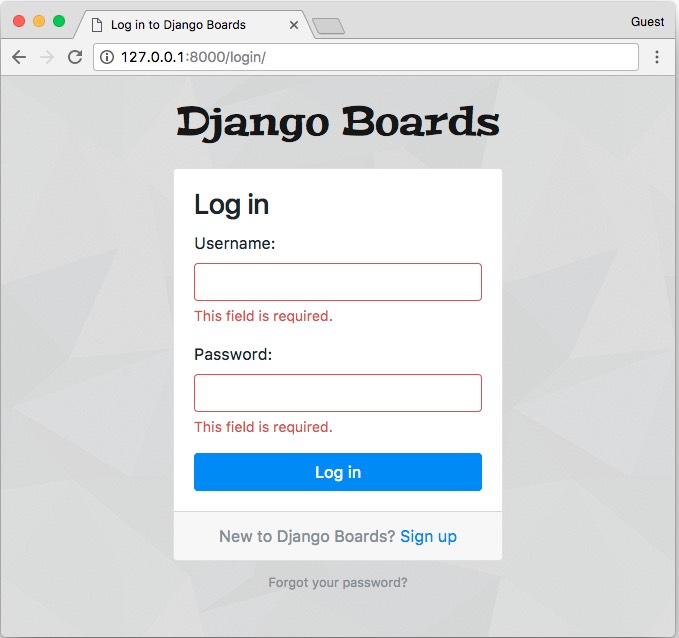
But if we submit an username that doesn’t exist or an invalid password, right now that’s what’s going to happen:
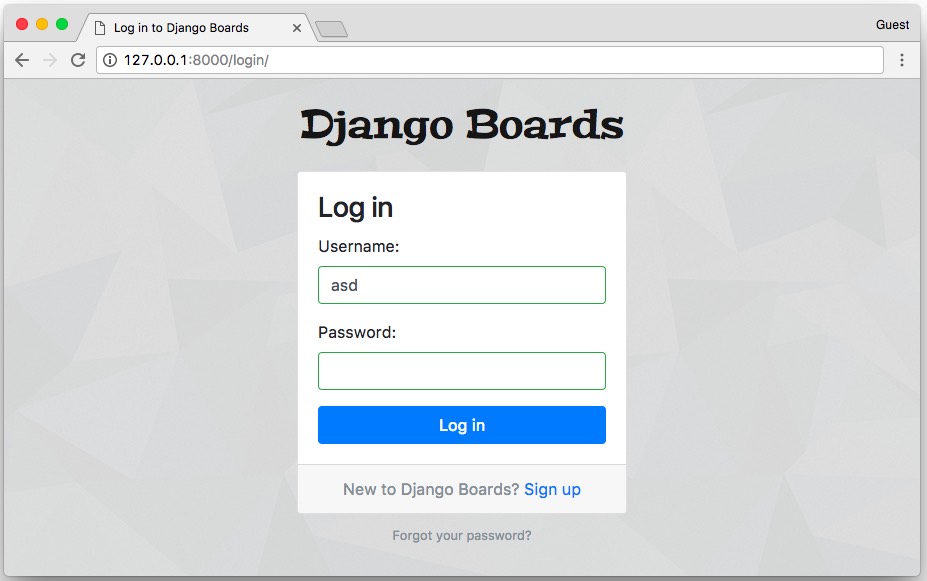
A little bit misleading. The fields are showing green, suggesting they are okay. Also, there’s no message saying anything.
That’s because forms have a special type of error, which is called non-field errors. It’s a collection of errors that are not related to a specific field. Let’s refactor the form.html partial template to display those errors as well:
templates/includes/form.html
{% load widget_tweaks %}

{% if form.non_field_errors %}
  <div class="alert alert-danger" role="alert">
    {% for error in form.non_field_errors %}
      <p{% if forloop.last %} class="mb-0"{% endif %}>{{ error }}</p>
    {% endfor %}
  </div>
{% endif %}

{% for field in form %}
  <!-- code suppressed -->
{% endfor %}
The {% if forloop.last %} is just a minor thing. Because the p tag has a margin-bottom.
And a form may have several non-field errors. For each non-field error, we render a p tag with the error. Then
I’m checking if it’s the last error to render. If so, we add a Bootstrap 4 CSS class mb-0 which stands for
“margin bottom = 0”. Then the alert doesn’t look weird, with some extra space. Again, just a very minor detail. I did
that just to keep the consistency of the spacing.
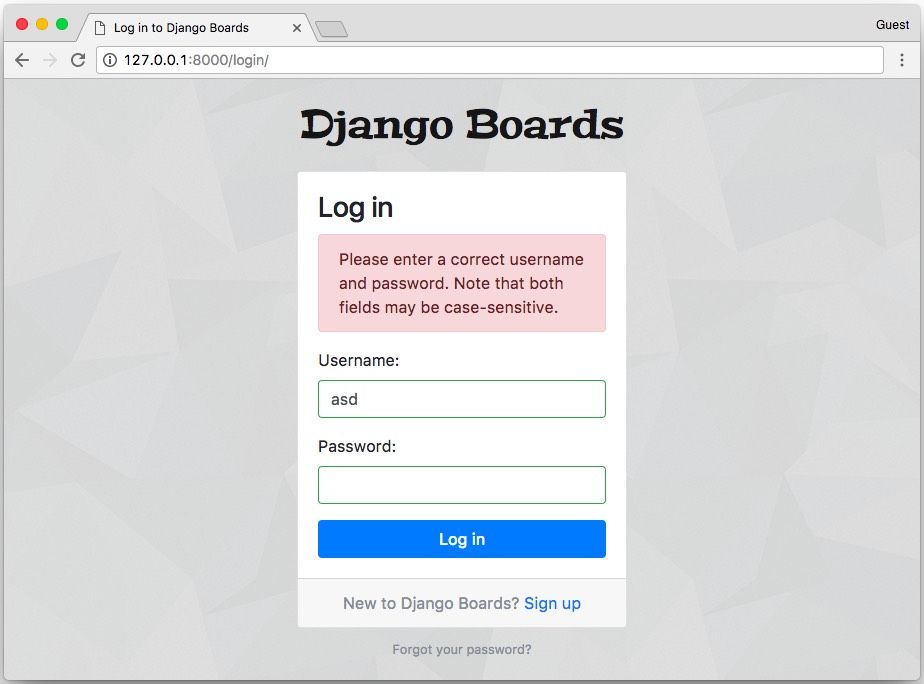
We still have to deal with the password field though. The thing is, Django never returned the data of password fields
to the client. So, instead of trying to do something smart, let’s just ignore the is-valid and is-invalid CSS
classes in some cases. But our form template already looks complicated. We can move some of the code to a
template tag.
Creating Custom Template Tags
Inside the boards app, create a new folder named templatetags. Then inside this folder, create two empty files named __init__.py and form_tags.py.
The structure should be the following:
myproject/
 |-- myproject/
 |    |-- accounts/
 |    |-- boards/
 |    |    |-- migrations/
 |    |    |-- templatetags/        <-- here
 |    |    |    |-- __init__.py
 |    |    |    +-- form_tags.py
 |    |    |-- __init__.py
 |    |    |-- admin.py
 |    |    |-- apps.py
 |    |    |-- models.py
 |    |    |-- tests.py
 |    |    +-- views.py
 |    |-- myproject/
 |    |-- static/
 |    |-- templates/
 |    |-- db.sqlite3
 |    +-- manage.py
 +-- venv/
In the form_tags.py file, let’s create two template tags:
boards/templatetags/form_tags.py
from django import template

register = template.Library()

@register.filter
def field_type(bound_field):
    return bound_field.field.widget.__class__.__name__

@register.filter
def input_class(bound_field):
    css_class = ''
    if bound_field.form.is_bound:
        if bound_field.errors:
            css_class = 'is-invalid'
        elif field_type(bound_field) != 'PasswordInput':
            css_class = 'is-valid'
    return 'form-control {}'.format(css_class)
Those are template filters. They work like this:
First, we load it in a template as we do with the widget_tweaks or static template tags. Note that after creating this file, you will have to manually stop the development server and start it again so Django can identify the new template tags.
{% load form_tags %}Then after that, we can use them in a template:
{{ form.username|field_type }}Will return:
'TextInput'Or in case of the input_class:
{{ form.username|input_class }}

<!-- if the form is not bound, it will simply return: -->
'form-control '

<!-- if the form is bound and valid: -->
'form-control is-valid'

<!-- if the form is bound and invalid: -->
'form-control is-invalid'
Now update the form.html to use the new template tags:
templates/includes/form.html
{% load form_tags widget_tweaks %}

{% if form.non_field_errors %}
  <div class="alert alert-danger" role="alert">
    {% for error in form.non_field_errors %}
      <p{% if forloop.last %} class="mb-0"{% endif %}>{{ error }}</p>
    {% endfor %}
  </div>
{% endif %}

{% for field in form %}
  <div class="form-group">
    {{ field.label_tag }}
    {% render_field field class=field|input_class %}
    {% for error in field.errors %}
      <div class="invalid-feedback">
        {{ error }}
      </div>
    {% endfor %}
    {% if field.help_text %}
      <small class="form-text text-muted">
        {{ field.help_text|safe }}
      </small>
    {% endif %}
  </div>
{% endfor %}
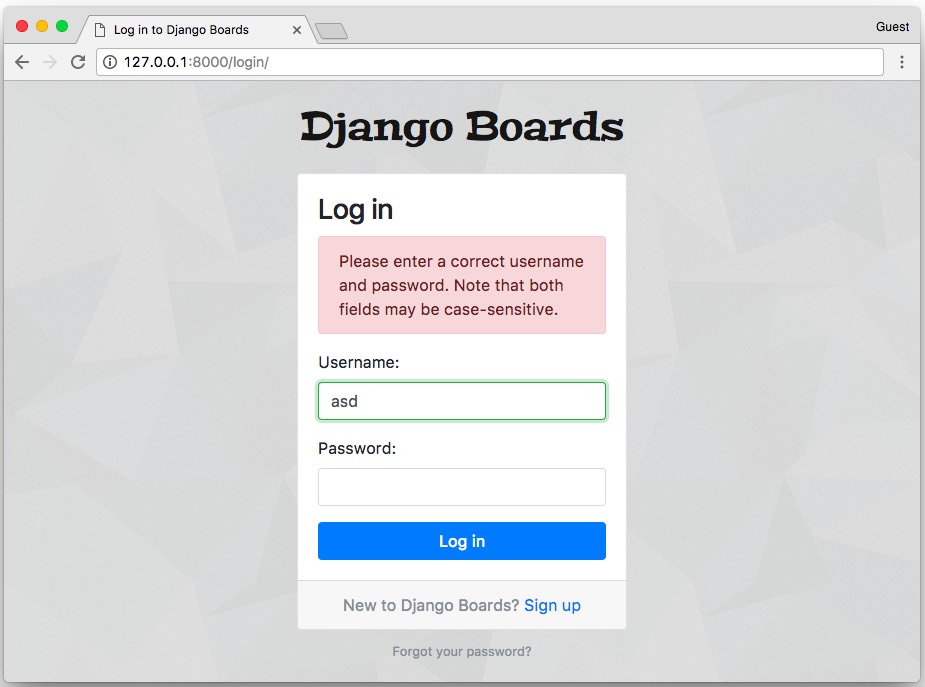
Much better, right? Reduced the complexity of the template. It looks cleaner now. And it also solved the problem with the password field displaying a green border:
Testing the Template Tags
First, let’s just organize the boards’ tests a little bit. Like we did with the accounts app, create a new folder named tests, add a __init__.py, copy the tests.py and rename it to just test_views.py for now.
Add a new empty file named test_templatetags.py.
myproject/
 |-- myproject/
 |    |-- accounts/
 |    |-- boards/
 |    |    |-- migrations/
 |    |    |-- templatetags/
 |    |    |-- tests/
 |    |    |    |-- __init__.py
 |    |    |    |-- test_templatetags.py  <-- new file, empty for now
 |    |    |    +-- test_views.py  <-- our old file with all the tests
 |    |    |-- __init__.py
 |    |    |-- admin.py
 |    |    |-- apps.py
 |    |    |-- models.py
 |    |    +-- views.py
 |    |-- myproject/
 |    |-- static/
 |    |-- templates/
 |    |-- db.sqlite3
 |    +-- manage.py
 +-- venv/
Fix the test_views.py imports:
boards/tests/test_views.py
from ..views import home, board_topics, new_topic
from ..models import Board, Topic, Post
from ..forms import NewTopicForm
Execute the tests just to make sure everything is working.
boards/tests/test_templatetags.py
from django import forms
from django.test import TestCase
from ..templatetags.form_tags import field_type, input_class

class ExampleForm(forms.Form):
    name = forms.CharField()
    password = forms.CharField(widget=forms.PasswordInput())
    class Meta:
        fields = ('name', 'password')

class FieldTypeTests(TestCase):
    def test_field_widget_type(self):
        form = ExampleForm()
        self.assertEquals('TextInput', field_type(form['name']))
        self.assertEquals('PasswordInput', field_type(form['password']))

class InputClassTests(TestCase):
    def test_unbound_field_initial_state(self):
        form = ExampleForm()  # unbound form
        self.assertEquals('form-control ', input_class(form['name']))

    def test_valid_bound_field(self):
        form = ExampleForm({'name': 'john', 'password': '123'})  # bound form (field + data)
        self.assertEquals('form-control is-valid', input_class(form['name']))
        self.assertEquals('form-control ', input_class(form['password']))

    def test_invalid_bound_field(self):
        form = ExampleForm({'name': '', 'password': '123'})  # bound form (field + data)
        self.assertEquals('form-control is-invalid', input_class(form['name']))
We created a form class to be used in the tests then added test cases covering the possible scenarios in the two template tags.
python manage.py testCreating test database for alias 'default'...
System check identified no issues (0 silenced).
................................
----------------------------------------------------------------------
Ran 32 tests in 0.846s
OK
Destroying test database for alias 'default'...Password Reset
The password reset process involves some nasty URL patterns. But as we discussed in the previous tutorial, we don’t need to be an expert in regular expressions. It’s just a matter of knowing the common ones.
Another important thing before we start is that, for the password reset process, we need to send emails. It’s a little bit complicated in the beginning because we need an external service. For now, we won’t be configuring a production quality email service. In fact, during the development phase, we can use Django’s debug tools to check if the emails are being sent correctly.

Console Email Backend
The idea is during the development of the project, instead of sending real emails, we just log them. There are two options: writing all emails in a text file or simply displaying them in the console. I find the latter option more convenient because we are already using a console to run the development server and the setup is a bit easier.
Edit the settings.py module and add the EMAIL_BACKEND variable to the end of the file:
myproject/settings.py
EMAIL_BACKEND = 'django.core.mail.backends.console.EmailBackend'Configuring the Routes
The password reset process requires four views:
- A page with a form to start the reset process;
- A success page saying the process initiated, instructing the user to check their spam folders, etc.;
- A page to check the token sent via email;
- A page to tell the user if the reset was successful or not.
The views are built-in, we don’t need to implement anything. All we need to do is add the routes to the urls.py and create the templates.
myproject/urls.py (view complete file contents)
url(r'^reset/$',
    auth_views.PasswordResetView.as_view(
        template_name='password_reset.html',
        email_template_name='password_reset_email.html',
        subject_template_name='password_reset_subject.txt'
    ),
    name='password_reset'),
url(r'^reset/done/$',
    auth_views.PasswordResetDoneView.as_view(template_name='password_reset_done.html'),
    name='password_reset_done'),
url(r'^reset/(?P<uidb64>[0-9A-Za-z_\-]+)/(?P<token>[0-9A-Za-z]{1,13}-[0-9A-Za-z]{1,20})/$',
    auth_views.PasswordResetConfirmView.as_view(template_name='password_reset_confirm.html'),
    name='password_reset_confirm'),
url(r'^reset/complete/$',
    auth_views.PasswordResetCompleteView.as_view(template_name='password_reset_complete.html'),
    name='password_reset_complete'),
]
The template_name parameter in the password reset views are optional. But I thought it would be a good idea to
re-define it, so the link between the view and the template be more obvious than just using the defaults.
Inside the templates folder, the following template files:
- password_reset.html
- password_reset_email.html: this template is the body of the email message sent to the user
- password_reset_subject.txt: this template is the subject line of the email, it should be a single line file
- password_reset_done.html
- password_reset_confirm.html
- password_reset_complete.html
Before we start implementing the templates, let’s prepare a new test file.
We can add just some basic tests because those views and forms are already tested in the Django code. We are going to test just the specifics of our application.
Create a new test file named test_view_password_reset.py inside the accounts/tests folder.
Password Reset View
templates/password_reset.html
{% extends 'base_accounts.html' %}

{% block title %}Reset your password{% endblock %}

{% block content %}
  <div class="row justify-content-center">
    <div class="col-lg-4 col-md-6 col-sm-8">
      <div class="card">
        <div class="card-body">
          <h3 class="card-title">Reset your password</h3>
          <p>Enter your email address and we will send you a link to reset your password.</p>
          <form method="post" novalidate>
            {% csrf_token %}
            {% include 'includes/form.html' %}
            <button type="submit" class="btn btn-primary btn-block">Send password reset email</button>
          </form>
        </div>
      </div>
    </div>
  </div>
{% endblock %}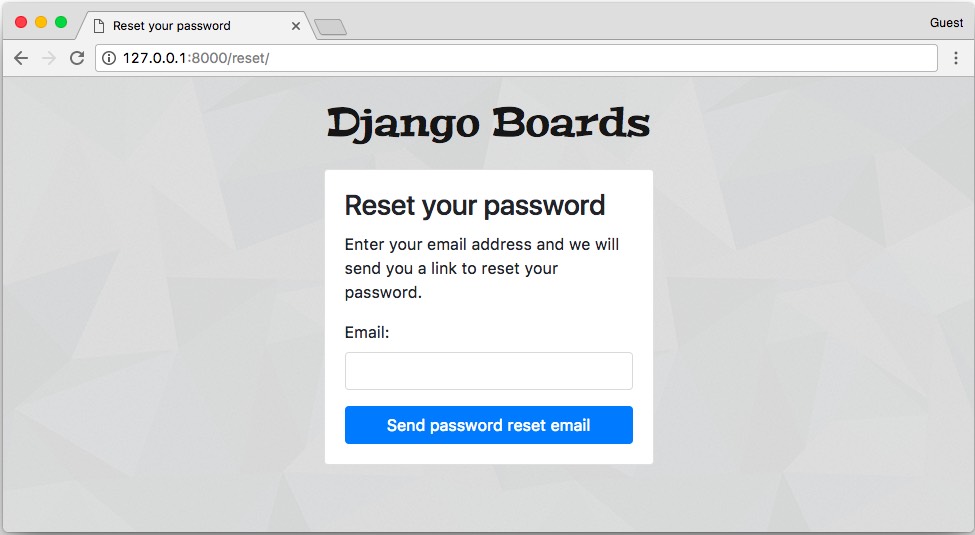
accounts/tests/test_view_password_reset.py
from django.contrib.auth import views as auth_views
from django.contrib.auth.forms import PasswordResetForm
from django.contrib.auth.models import User
from django.core import mail
from django.core.urlresolvers import reverse
from django.urls import resolve
from django.test import TestCase


class PasswordResetTests(TestCase):
    def setUp(self):
        url = reverse('password_reset')
        self.response = self.client.get(url)

    def test_status_code(self):
        self.assertEquals(self.response.status_code, 200)

    def test_view_function(self):
        view = resolve('/reset/')
        self.assertEquals(view.func.view_class, auth_views.PasswordResetView)

    def test_csrf(self):
        self.assertContains(self.response, 'csrfmiddlewaretoken')

    def test_contains_form(self):
        form = self.response.context.get('form')
        self.assertIsInstance(form, PasswordResetForm)

    def test_form_inputs(self):
        '''
        The view must contain two inputs: csrf and email
        '''
        self.assertContains(self.response, '<input', 2)
        self.assertContains(self.response, 'type="email"', 1)


class SuccessfulPasswordResetTests(TestCase):
    def setUp(self):
        email = 'john@doe.com'
        User.objects.create_user(username='john', email=email, password='123abcdef')
        url = reverse('password_reset')
        self.response = self.client.post(url, {'email': email})

    def test_redirection(self):
        '''
        A valid form submission should redirect the user to `password_reset_done` view
        '''
        url = reverse('password_reset_done')
        self.assertRedirects(self.response, url)

    def test_send_password_reset_email(self):
        self.assertEqual(1, len(mail.outbox))


class InvalidPasswordResetTests(TestCase):
    def setUp(self):
        url = reverse('password_reset')
        self.response = self.client.post(url, {'email': 'donotexist@email.com'})

    def test_redirection(self):
        '''
        Even invalid emails in the database should
        redirect the user to `password_reset_done` view
        '''
        url = reverse('password_reset_done')
        self.assertRedirects(self.response, url)

    def test_no_reset_email_sent(self):
        self.assertEqual(0, len(mail.outbox))
templates/password_reset_subject.txt
[Django Boards] Please reset your passwordtemplates/password_reset_email.html
Hi there,

Someone asked for a password reset for the email address {{ email }}.
Follow the link below:
{{ protocol }}://{{ domain }}{% url 'password_reset_confirm' uidb64=uid token=token %}

In case you forgot your Django Boards username: {{ user.username }}

If clicking the link above doesn't work, please copy and paste the URL
in a new browser window instead.

If you've received this mail in error, it's likely that another user entered
your email address by mistake while trying to reset a password. If you didn't
initiate the request, you don't need to take any further action and can safely
disregard this email.

Thanks,

The Django Boards Team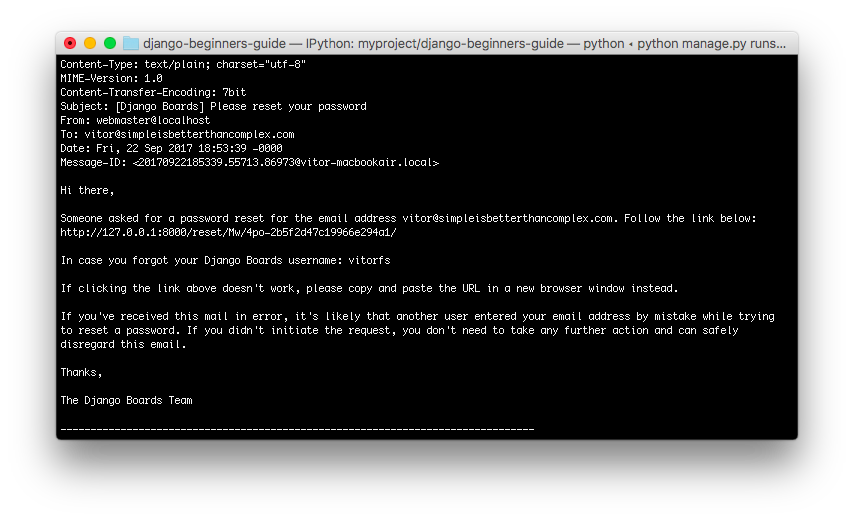
We can create a specific file to test the email message. Create a new file named test_mail_password_reset.py inside the accounts/tests folder:
accounts/tests/test_mail_password_reset.py
from django.core import mail
from django.contrib.auth.models import User
from django.urls import reverse
from django.test import TestCase

class PasswordResetMailTests(TestCase):
    def setUp(self):
        User.objects.create_user(username='john', email='john@doe.com', password='123')
        self.response = self.client.post(reverse('password_reset'), { 'email': 'john@doe.com' })
        self.email = mail.outbox[0]

    def test_email_subject(self):
        self.assertEqual('[Django Boards] Please reset your password', self.email.subject)

    def test_email_body(self):
        context = self.response.context
        token = context.get('token')
        uid = context.get('uid')
        password_reset_token_url = reverse('password_reset_confirm', kwargs={
            'uidb64': uid,
            'token': token
        })
        self.assertIn(password_reset_token_url, self.email.body)
        self.assertIn('john', self.email.body)
        self.assertIn('john@doe.com', self.email.body)

    def test_email_to(self):
        self.assertEqual(['john@doe.com',], self.email.to)
This test case grabs the email sent by the application, and examine the subject line, the body contents, and to who was the email sent to.
Password Reset Done View
templates/password_reset_done.html
{% extends 'base_accounts.html' %}

{% block title %}Reset your password{% endblock %}

{% block content %}
  <div class="row justify-content-center">
    <div class="col-lg-4 col-md-6 col-sm-8">
      <div class="card">
        <div class="card-body">
          <h3 class="card-title">Reset your password</h3>
          <p>Check your email for a link to reset your password. If it doesn't appear within a few minutes, check your spam folder.</p>
          <a href="{% url 'login' %}" class="btn btn-secondary btn-block">Return to log in</a>
        </div>
      </div>
    </div>
  </div>
{% endblock %}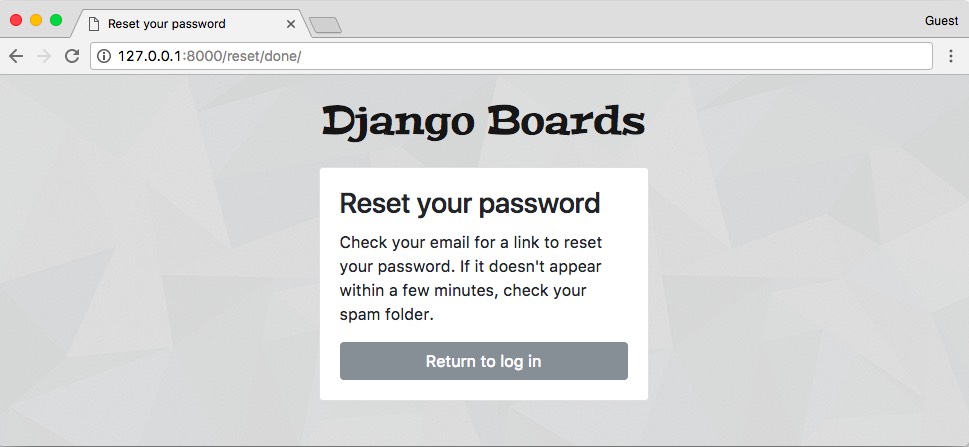
accounts/tests/test_view_password_reset.py
from django.contrib.auth import views as auth_views
from django.core.urlresolvers import reverse
from django.urls import resolve
from django.test import TestCase

class PasswordResetDoneTests(TestCase):
    def setUp(self):
        url = reverse('password_reset_done')
        self.response = self.client.get(url)

    def test_status_code(self):
        self.assertEquals(self.response.status_code, 200)

    def test_view_function(self):
        view = resolve('/reset/done/')
        self.assertEquals(view.func.view_class, auth_views.PasswordResetDoneView)
Password Reset Confirm View
templates/password_reset_confirm.html
{% extends 'base_accounts.html' %}

{% block title %}
  {% if validlink %}
    Change password for {{ form.user.username }}
  {% else %}
    Reset your password
  {% endif %}
{% endblock %}

{% block content %}
  <div class="row justify-content-center">
    <div class="col-lg-6 col-md-8 col-sm-10">
      <div class="card">
        <div class="card-body">
          {% if validlink %}
            <h3 class="card-title">Change password for @{{ form.user.username }}</h3>
            <form method="post" novalidate>
              {% csrf_token %}
              {% include 'includes/form.html' %}
              <button type="submit" class="btn btn-success btn-block">Change password</button>
            </form>
          {% else %}
            <h3 class="card-title">Reset your password</h3>
            <div class="alert alert-danger" role="alert">
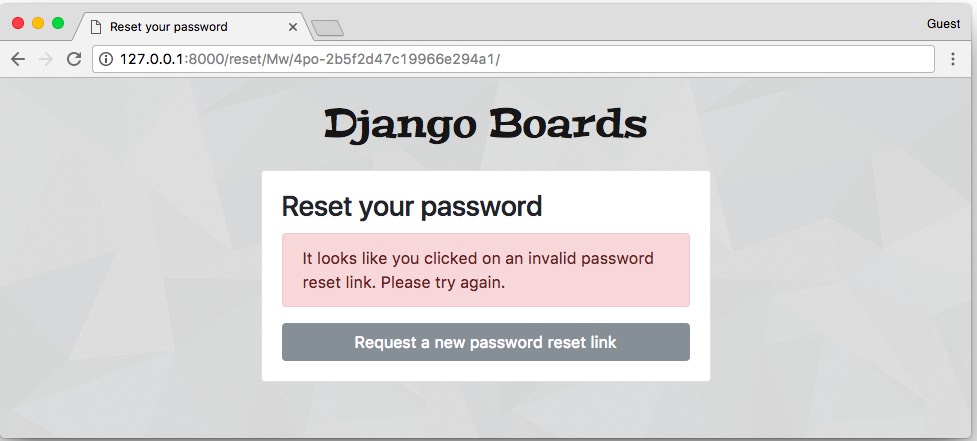
              It looks like you clicked on an invalid password reset link. Please try again.
            </div>
            <a href="{% url 'password_reset' %}" class="btn btn-secondary btn-block">Request a new password reset link</a>
          {% endif %}
        </div>
      </div>
    </div>
  </div>
{% endblock %}
This page can only be accessed with the link sent in the email. It looks like this: http://127.0.0.1:8000/reset/Mw/4po-2b5f2d47c19966e294a1/
During the development phase, grab this link from the email in the console.
If the link is valid:

Or if the link has already been used:
accounts/tests/test_view_password_reset.py
from django.contrib.auth.tokens import default_token_generator
from django.utils.encoding import force_bytes
from django.utils.http import urlsafe_base64_encode
from django.contrib.auth import views as auth_views
from django.contrib.auth.forms import SetPasswordForm
from django.contrib.auth.models import User
from django.core.urlresolvers import reverse
from django.urls import resolve
from django.test import TestCase


class PasswordResetConfirmTests(TestCase):
    def setUp(self):
        user = User.objects.create_user(username='john', email='john@doe.com', password='123abcdef')

        '''
        create a valid password reset token
        based on how django creates the token internally:
        https://github.com/django/django/blob/1.11.5/django/contrib/auth/forms.py#L280
        '''
        self.uid = urlsafe_base64_encode(force_bytes(user.pk)).decode()
        self.token = default_token_generator.make_token(user)

        url = reverse('password_reset_confirm', kwargs={'uidb64': self.uid, 'token': self.token})
        self.response = self.client.get(url, follow=True)

    def test_status_code(self):
        self.assertEquals(self.response.status_code, 200)

    def test_view_function(self):
        view = resolve('/reset/{uidb64}/{token}/'.format(uidb64=self.uid, token=self.token))
        self.assertEquals(view.func.view_class, auth_views.PasswordResetConfirmView)

    def test_csrf(self):
        self.assertContains(self.response, 'csrfmiddlewaretoken')

    def test_contains_form(self):
        form = self.response.context.get('form')
        self.assertIsInstance(form, SetPasswordForm)

    def test_form_inputs(self):
        '''
        The view must contain two inputs: csrf and two password fields
        '''
        self.assertContains(self.response, '<input', 3)
        self.assertContains(self.response, 'type="password"', 2)


class InvalidPasswordResetConfirmTests(TestCase):
    def setUp(self):
        user = User.objects.create_user(username='john', email='john@doe.com', password='123abcdef')
        uid = urlsafe_base64_encode(force_bytes(user.pk)).decode()
        token = default_token_generator.make_token(user)

        '''
        invalidate the token by changing the password
        '''
        user.set_password('abcdef123')
        user.save()

        url = reverse('password_reset_confirm', kwargs={'uidb64': uid, 'token': token})
        self.response = self.client.get(url)

    def test_status_code(self):
        self.assertEquals(self.response.status_code, 200)

    def test_html(self):
        password_reset_url = reverse('password_reset')
        self.assertContains(self.response, 'invalid password reset link')
        self.assertContains(self.response, 'href="{0}"'.format(password_reset_url))
Password Reset Complete View
templates/password_reset_complete.html
{% extends 'base_accounts.html' %}

{% block title %}Password changed!{% endblock %}

{% block content %}
  <div class="row justify-content-center">
    <div class="col-lg-6 col-md-8 col-sm-10">
      <div class="card">
        <div class="card-body">
          <h3 class="card-title">Password changed!</h3>
          <div class="alert alert-success" role="alert">
            You have successfully changed your password! You may now proceed to log in.
          </div>
          <a href="{% url 'login' %}" class="btn btn-secondary btn-block">Return to log in</a>
        </div>
      </div>
    </div>
  </div>
{% endblock %}
accounts/tests/test_view_password_reset.py (view complete file contents)
from django.contrib.auth import views as auth_views
from django.core.urlresolvers import reverse
from django.urls import resolve
from django.test import TestCase

class PasswordResetCompleteTests(TestCase):
    def setUp(self):
        url = reverse('password_reset_complete')
        self.response = self.client.get(url)

    def test_status_code(self):
        self.assertEquals(self.response.status_code, 200)

    def test_view_function(self):
        view = resolve('/reset/complete/')
        self.assertEquals(view.func.view_class, auth_views.PasswordResetCompleteView)
Password Change View
This view is meant to be used by logged in users that want to change their password. Usually, those forms are composed of three fields: old password, new password, and new password confirmation.
myproject/urls.py (view complete file contents)
url(r'^settings/password/$', auth_views.PasswordChangeView.as_view(template_name='password_change.html'),
    name='password_change'),
url(r'^settings/password/done/$', auth_views.PasswordChangeDoneView.as_view(template_name='password_change_done.html'),
    name='password_change_done'),
Those views only works for logged in users. They make use of a view decorator named @login_required. This decorator
prevents non-authorized users to access this page. If the user is not logged in, Django will redirect them to the login
page.
Now we have to define what is the login URL of our application in the settings.py:
myproject/settings.py (view complete file contents)
LOGIN_URL = 'login'templates/password_change.html
{% extends 'base.html' %}

{% block title %}Change password{% endblock %}

{% block breadcrumb %}
  <li class="breadcrumb-item active">Change password</li>
{% endblock %}

{% block content %}
  <div class="row">
    <div class="col-lg-6 col-md-8 col-sm-10">
      <form method="post" novalidate>
        {% csrf_token %}
        {% include 'includes/form.html' %}
        <button type="submit" class="btn btn-success">Change password</button>
      </form>
    </div>
  </div>
{% endblock %}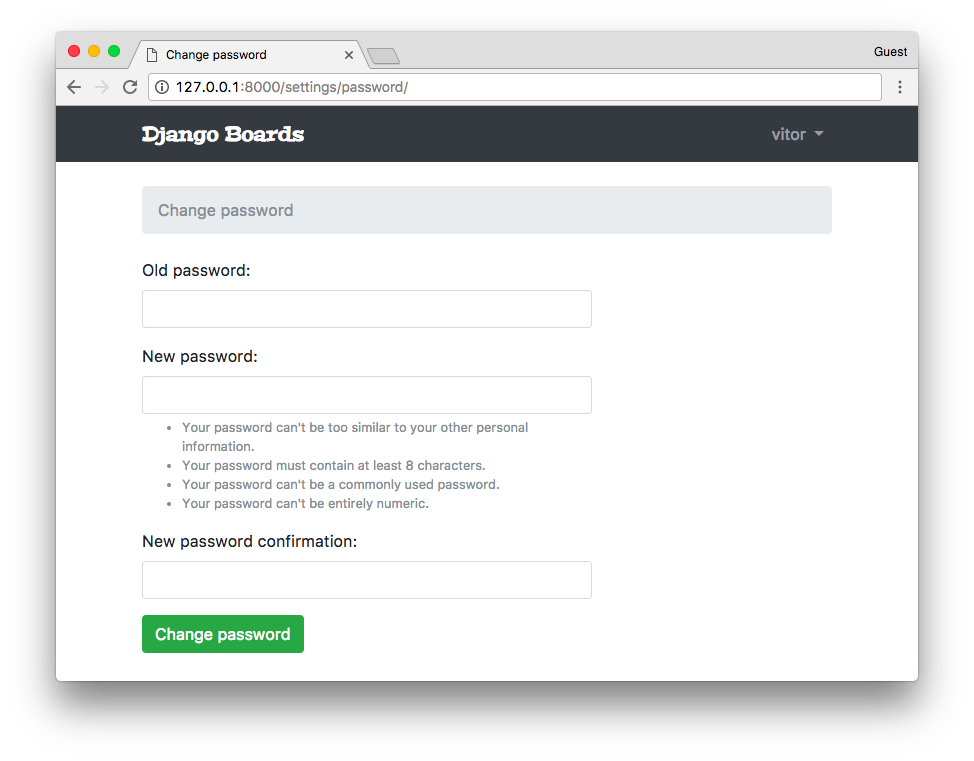
templates/password_change_done.html
{% extends 'base.html' %}

{% block title %}Change password successful{% endblock %}

{% block breadcrumb %}
  <li class="breadcrumb-item"><a href="{% url 'password_change' %}">Change password</a></li>
  <li class="breadcrumb-item active">Success</li>
{% endblock %}

{% block content %}
  <div class="alert alert-success" role="alert">
    <strong>Success!</strong> Your password has been changed!
  </div>
  <a href="{% url 'home' %}" class="btn btn-secondary">Return to home page</a>
{% endblock %}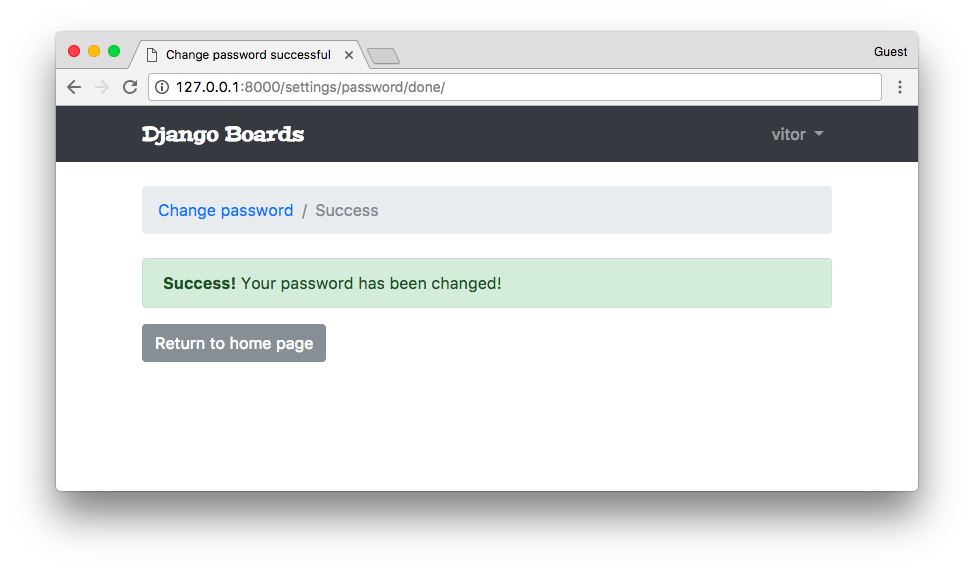
Regarding the password change view, we can implement similar test cases as we have already been doing so far. Create a new test file named test_view_password_change.py.
I will list below new types of tests. You can check all the tests I wrote for the password change view clicking in the view complete file contents link next to the code snippet. Most of the tests are similar to what we have been doing so far. I moved to an external file to avoid being too repetitive.
accounts/tests/test_view_password_change.py (view complete file contents)
class LoginRequiredPasswordChangeTests(TestCase):
    def test_redirection(self):
        url = reverse('password_change')
        login_url = reverse('login')
        response = self.client.get(url)
        self.assertRedirects(response, f'{login_url}?next={url}')
The test above tries to access the password_change view without being logged in. The expected behavior is to redirect the user to the login page.
accounts/tests/test_view_password_change.py (view complete file contents)
class PasswordChangeTestCase(TestCase):
    def setUp(self, data={}):
        self.user = User.objects.create_user(username='john', email='john@doe.com', password='old_password')
        self.url = reverse('password_change')
        self.client.login(username='john', password='old_password')
        self.response = self.client.post(self.url, data)
Here we defined a new class named PasswordChangeTestCase. It does a basic setup, creating a user and making a POST request to the password_change view. In the next set of test cases, we are going to use this class instead of the TestCase class and test a successful request and an invalid request:
accounts/tests/test_view_password_change.py (view complete file contents)
class SuccessfulPasswordChangeTests(PasswordChangeTestCase):
    def setUp(self):
        super().setUp({
            'old_password': 'old_password',
            'new_password1': 'new_password',
            'new_password2': 'new_password',
        })

    def test_redirection(self):
        '''
        A valid form submission should redirect the user
        '''
        self.assertRedirects(self.response, reverse('password_change_done'))

    def test_password_changed(self):
        '''
        refresh the user instance from database to get the new password
        hash updated by the change password view.
        '''
        self.user.refresh_from_db()
        self.assertTrue(self.user.check_password('new_password'))

    def test_user_authentication(self):
        '''
        Create a new request to an arbitrary page.
        The resulting response should now have an `user` to its context, after a successful sign up.
        '''
        response = self.client.get(reverse('home'))
        user = response.context.get('user')
        self.assertTrue(user.is_authenticated)


class InvalidPasswordChangeTests(PasswordChangeTestCase):
    def test_status_code(self):
        '''
        An invalid form submission should return to the same page
        '''
        self.assertEquals(self.response.status_code, 200)

    def test_form_errors(self):
        form = self.response.context.get('form')
        self.assertTrue(form.errors)

    def test_didnt_change_password(self):
        '''
        refresh the user instance from the database to make
        sure we have the latest data.
        '''
        self.user.refresh_from_db()
        self.assertTrue(self.user.check_password('old_password'))
The refresh_from_db() method make sure we have the latest state of the data. It forces Django to query the database
again to update the data. We have to do it because the change_password view update the password in the database.
So to test if the password really changed, we have to grab the latest data from the database.
Conclusions
Authentication is a very common use case for most Django applications. In this tutorial, we implemented all the important views: sign up, log in, log out, password reset, and change password. Now that we have a way to create users and authenticate them, we will be able to proceed with the development of the other views of our application.
We still have to improve lots of things regarding the code design: the templates folder is starting to get messy with too many files. The boards app tests are still disorganized. Also, we have to start refactoring the new topic view, because now we can retrieve the logged in user. We will get to that part soon.
I hope you enjoyed the forth part of this tutorial series! The fifth part is coming out next week, on Oct 2, 2017. If you would like to get notified when the fifth part is out, you can subscribe to our mailing list.
The source code of the project is available on GitHub. The current state of the project can be found under the release tag v0.4-lw. The link below will take you to the right place:
https://github.com/sibtc/django-beginners-guide/tree/v0.4-lw


 How to Extend Django User Model
 How to Setup a SSL Certificate on Nginx for a Django Application
 How to Deploy a Django Application to Digital Ocean