Introduction
Welcome to the 5th part of the tutorial series! In this tutorial, we are going to learn more about protecting views against unauthorized users and how to access the authenticated user in the views and forms. We are also going to implement the topic posts listing view and the reply view. Finally, we are going to explore some features of Django ORM and have a brief introduction to migrations.
Protecting Views
We have to start protecting our views against non-authorized users. So far we have the following view to start new posts:
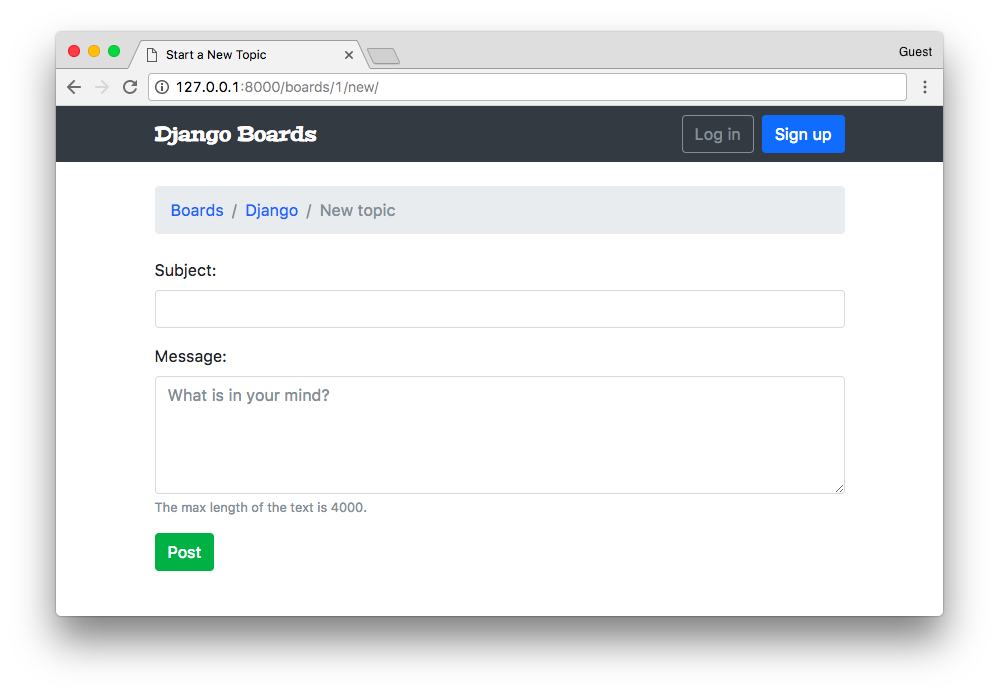
In the picture above the user is not logged in, and even though they can see the page and the form.
Django has a built-in view decorator to avoid that issue:
boards/views.py (view complete file contents)
from django.contrib.auth.decorators import login_required

@login_required
def new_topic(request, pk):
    # ...
From now on, if the user is not authenticated they will be redirected to the login page:
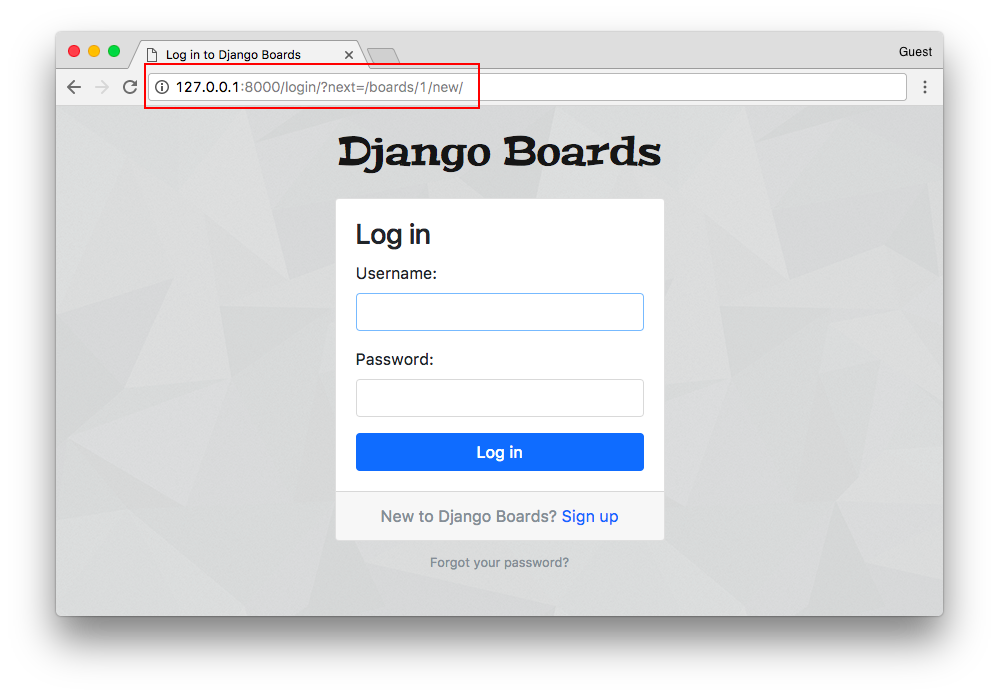
Notice the query string ?next=/boards/1/new/. We can improve the log in template to make use of the next variable and improve the user experience.
Configuring Login Next Redirect
templates/login.html (view complete file contents)
<form method="post" novalidate>
  {% csrf_token %}
  <input type="hidden" name="next" value="{{ next }}">
  {% include 'includes/form.html' %}
  <button type="submit" class="btn btn-primary btn-block">Log in</button>
</form>
Then if we try to log in now, the application will direct us back to where we were.

So the next parameter is part of a built-in functionality.
Login Required Tests
Let’s now add a test case to make sure this view is protected by the @login_required decorator. But first, let’s do
some refactoring in the boards/tests/test_views.py file.
Let’s split the test_views.py into three files:
- test_view_home.py will include the HomeTests class (view complete file contents)
- test_view_board_topics.py will include the BoardTopicsTests class (view complete file contents)
- test_view_new_topic.py will include the NewTopicTests class (view complete file contents)
myproject/
 |-- myproject/
 |    |-- accounts/
 |    |-- boards/
 |    |    |-- migrations/
 |    |    |-- templatetags/
 |    |    |-- tests/
 |    |    |    |-- __init__.py
 |    |    |    |-- test_templatetags.py
 |    |    |    |-- test_view_home.py          <-- here
 |    |    |    |-- test_view_board_topics.py  <-- here
 |    |    |    +-- test_view_new_topic.py     <-- and here
 |    |    |-- __init__.py
 |    |    |-- admin.py
 |    |    |-- apps.py
 |    |    |-- models.py
 |    |    +-- views.py
 |    |-- myproject/
 |    |-- static/
 |    |-- templates/
 |    |-- db.sqlite3
 |    +-- manage.py
 +-- venv/
Run the tests to make sure everything is working.
New let’s add a new test case in the test_view_new_topic.py to check if the view is decorated with
@login_required:
boards/tests/test_view_new_topic.py (view complete file contents)
from django.test import TestCase
from django.urls import reverse
from ..models import Board

class LoginRequiredNewTopicTests(TestCase):
    def setUp(self):
        Board.objects.create(name='Django', description='Django board.')
        self.url = reverse('new_topic', kwargs={'pk': 1})
        self.response = self.client.get(self.url)

    def test_redirection(self):
        login_url = reverse('login')
        self.assertRedirects(self.response, '{login_url}?next={url}'.format(login_url=login_url, url=self.url))
In the test case above we are trying to make a request to the new topic view without being authenticated. The expected result is for the request be redirected to the login view.
Accessing the Authenticated User
Now we can improve the new_topic view and this time set the proper user, instead of just querying the database and picking the first user. That code was temporary because we had no way to authenticate the user. But now we can do better:
boards/views.py (view complete file contents)
from django.contrib.auth.decorators import login_required
from django.shortcuts import get_object_or_404, redirect, render

from .forms import NewTopicForm
from .models import Board, Post

@login_required
def new_topic(request, pk):
    board = get_object_or_404(Board, pk=pk)
    if request.method == 'POST':
        form = NewTopicForm(request.POST)
        if form.is_valid():
            topic = form.save(commit=False)
            topic.board = board
            topic.starter = request.user  # <- here
            topic.save()
            Post.objects.create(
                message=form.cleaned_data.get('message'),
                topic=topic,
                created_by=request.user  # <- and here
            )
            return redirect('board_topics', pk=board.pk)  # TODO: redirect to the created topic page
    else:
        form = NewTopicForm()
    return render(request, 'new_topic.html', {'board': board, 'form': form})
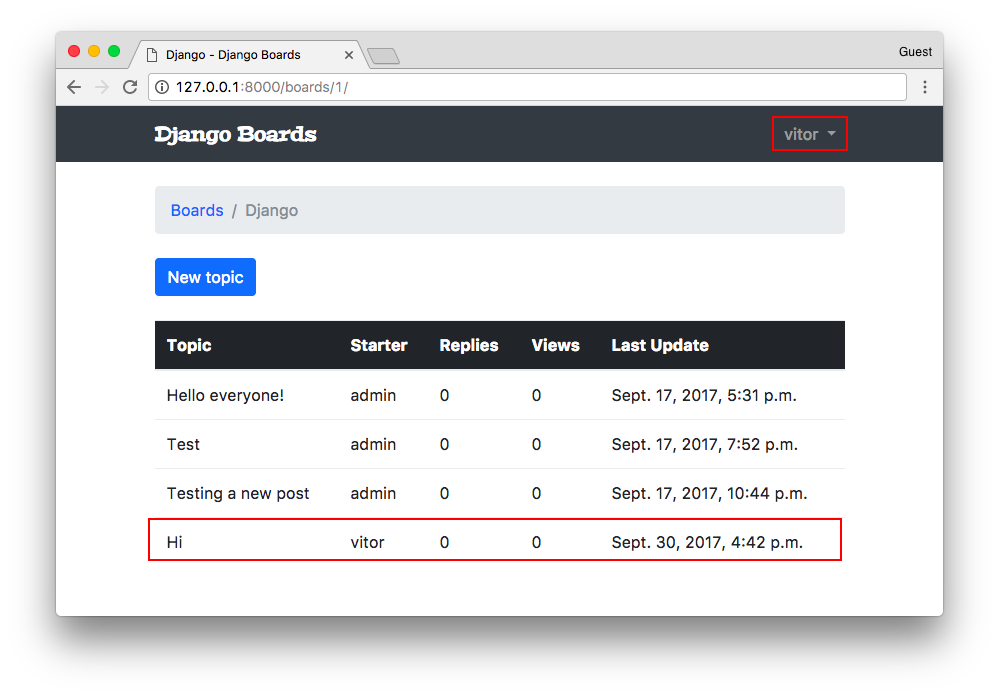
We can do a quick test here by adding a new topic:
Topic Posts View
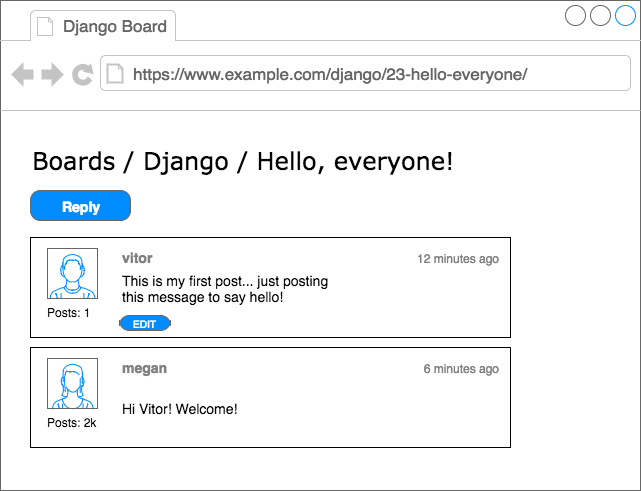
Let’s take the time now to implement the posts listing page, accordingly to the wireframe below:
First, we need a route:
myproject/urls.py (view complete file contents)
url(r'^boards/(?P<pk>\d+)/topics/(?P<topic_pk>\d+)/$', views.topic_posts, name='topic_posts'),Observe that now we are dealing with two keyword arguments: pk which is used to identify the Board, and now we have
the topic_pk which is used to identify which topic to retrieve from the database.
The matching view would be like this:
boards/views.py (view complete file contents)
from django.shortcuts import get_object_or_404, render
from .models import Topic

def topic_posts(request, pk, topic_pk):
    topic = get_object_or_404(Topic, board__pk=pk, pk=topic_pk)
    return render(request, 'topic_posts.html', {'topic': topic})
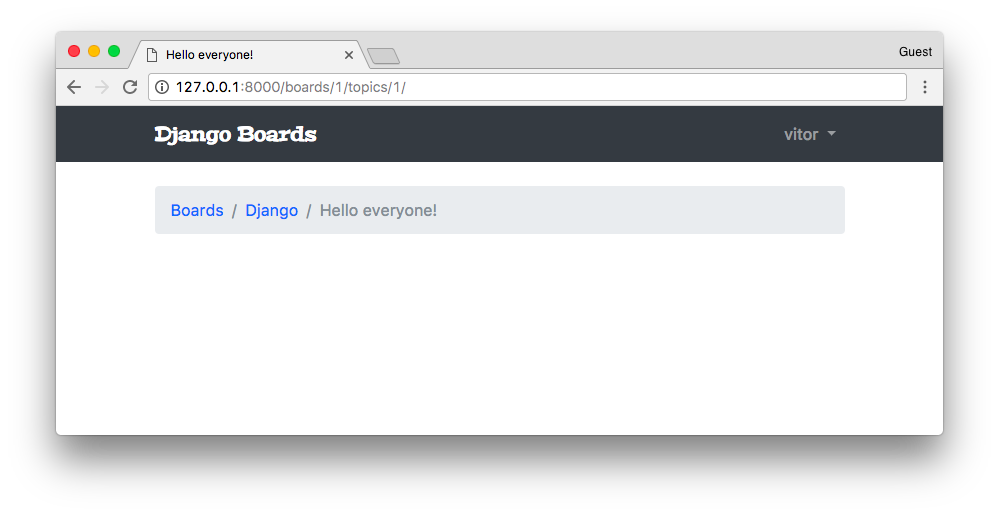
Note that we are indirectly retrieving the current board. Remember that the topic model is related to the board model, so we can access the current board. You will see in the next snippet:
templates/topic_posts.html (view complete file contents)
{% extends 'base.html' %}

{% block title %}{{ topic.subject }}{% endblock %}

{% block breadcrumb %}
  <li class="breadcrumb-item"><a href="{% url 'home' %}">Boards</a></li>
  <li class="breadcrumb-item"><a href="{% url 'board_topics' topic.board.pk %}">{{ topic.board.name }}</a></li>
  <li class="breadcrumb-item active">{{ topic.subject }}</li>
{% endblock %}

{% block content %}

{% endblock %}
Observe that now instead of using board.name in the template, we are navigating through the topic properties, using
topic.board.name.
Now let’s create a new test file for the topic_posts view:
boards/tests/test_view_topic_posts.py
from django.contrib.auth.models import User
from django.test import TestCase
from django.urls import resolve, reverse

from ..models import Board, Post, Topic
from ..views import topic_posts


class TopicPostsTests(TestCase):
    def setUp(self):
        board = Board.objects.create(name='Django', description='Django board.')
        user = User.objects.create_user(username='john', email='john@doe.com', password='123')
        topic = Topic.objects.create(subject='Hello, world', board=board, starter=user)
        Post.objects.create(message='Lorem ipsum dolor sit amet', topic=topic, created_by=user)
        url = reverse('topic_posts', kwargs={'pk': board.pk, 'topic_pk': topic.pk})
        self.response = self.client.get(url)

    def test_status_code(self):
        self.assertEquals(self.response.status_code, 200)

    def test_view_function(self):
        view = resolve('/boards/1/topics/1/')
        self.assertEquals(view.func, topic_posts)
Note that the test setup is starting to get more complex. We can create mixins or an abstract class to reuse the code as needed. We can also use a third party library to setup some test data, to reduce the boilerplate code.
Also, by now we already have a significant amount of tests, and it’s gradually starting to run slower. We can instruct the test suite just to run tests from a given app:
python manage.py test boardsCreating test database for alias 'default'...
System check identified no issues (0 silenced).
.......................
----------------------------------------------------------------------
Ran 23 tests in 1.246s
OK
Destroying test database for alias 'default'...We could also run only a specific test file:
python manage.py test boards.tests.test_view_topic_postsCreating test database for alias 'default'...
System check identified no issues (0 silenced).
..
----------------------------------------------------------------------
Ran 2 tests in 0.129s
OK
Destroying test database for alias 'default'...Or just a specific test case:
python manage.py test boards.tests.test_view_topic_posts.TopicPostsTests.test_status_codeCreating test database for alias 'default'...
System check identified no issues (0 silenced).
.
----------------------------------------------------------------------
Ran 1 test in 0.100s
OK
Destroying test database for alias 'default'...Cool, right?
Let’s keep moving forward.
Inside the topic_posts.html, we can create a for loop iterating over the topic posts:
templates/topic_posts.html
{% extends 'base.html' %}

{% load static %}

{% block title %}{{ topic.subject }}{% endblock %}

{% block breadcrumb %}
  <li class="breadcrumb-item"><a href="{% url 'home' %}">Boards</a></li>
  <li class="breadcrumb-item"><a href="{% url 'board_topics' topic.board.pk %}">{{ topic.board.name }}</a></li>
  <li class="breadcrumb-item active">{{ topic.subject }}</li>
{% endblock %}

{% block content %}

  <div class="mb-4">
    <a href="#" class="btn btn-primary" role="button">Reply</a>
  </div>

  {% for post in topic.posts.all %}
    <div class="card mb-2">
      <div class="card-body p-3">
        <div class="row">
          <div class="col-2">
            <img src="{% static 'img/avatar.svg' %}" alt="{{ post.created_by.username }}" class="w-100">
            <small>Posts: {{ post.created_by.posts.count }}</small>
          </div>
          <div class="col-10">
            <div class="row mb-3">
              <div class="col-6">
                <strong class="text-muted">{{ post.created_by.username }}</strong>
              </div>
              <div class="col-6 text-right">
                <small class="text-muted">{{ post.created_at }}</small>
              </div>
            </div>
            {{ post.message }}
            {% if post.created_by == user %}
              <div class="mt-3">
                <a href="#" class="btn btn-primary btn-sm" role="button">Edit</a>
              </div>
            {% endif %}
          </div>
        </div>
      </div>
    </div>
  {% endfor %}

{% endblock %}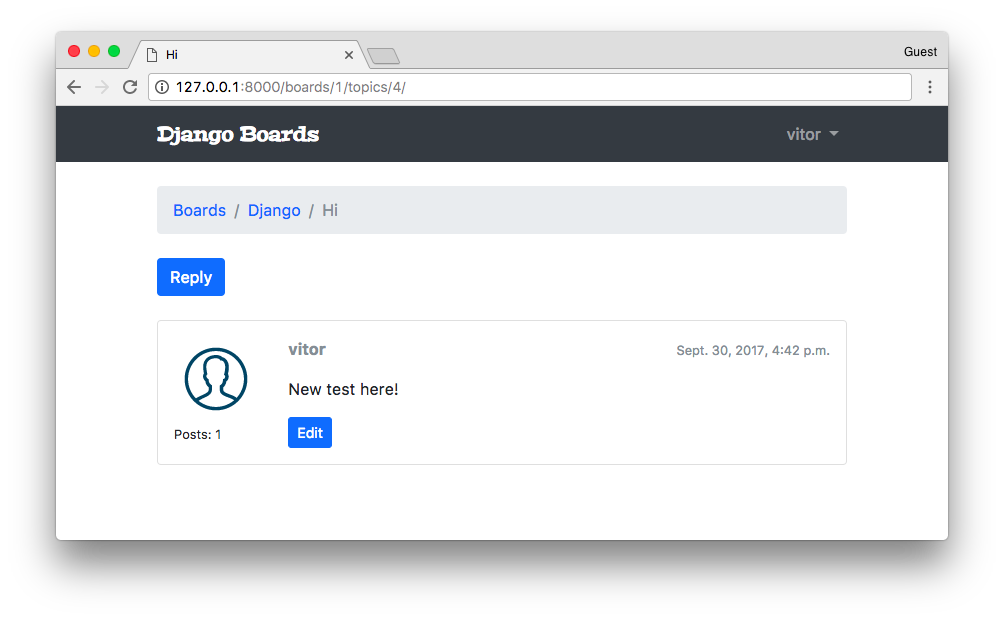
Since right now we don’t have a way to upload a user picture, let’s just have an empty image.
I downloaded a free image from IconFinder and saved in the static/img folder of the project.
We still haven’t really explored Django’s ORM, but the code {{ post.created_by.posts.count }}
is executing a select count in the database. Even though the result is correct, it is a bad approach. Right now it’s
causing several unnecessary queries in the database. But hey, don’t worry about that right now. Let’s focus on how
we interact with the application. Later on, we are going to improve this code, and how to diagnose heavy queries.
Another interesting point here is that we are testing if the current post belongs to the authenticated user:
{% if post.created_by == user %}. And we are only showing the edit button for the owner of the
post.
Since we now have the URL route to the topic posts listing, update the topics.html template with the link:
templates/topics.html (view complete file contents)
{% for topic in board.topics.all %}
  <tr>
    <td><a href="{% url 'topic_posts' board.pk topic.pk %}">{{ topic.subject }}</a></td>
    <td>{{ topic.starter.username }}</td>
    <td>0</td>
    <td>0</td>
    <td>{{ topic.last_updated }}</td>
  </tr>
{% endfor %}
Reply Post View
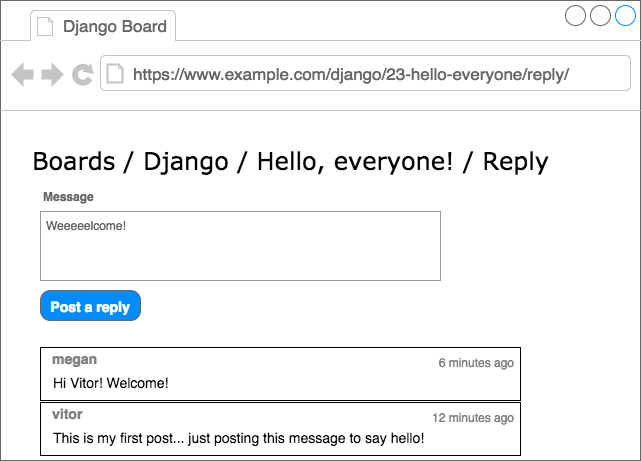
Let’s implement now the reply post view so that we can add more data and progress with the implementation and tests.
New URL route:
myproject/urls.py (view complete file contents)
url(r'^boards/(?P<pk>\d+)/topics/(?P<topic_pk>\d+)/reply/$', views.reply_topic, name='reply_topic'),Create a new form for the post reply:
boards/forms.py (view complete file contents)
from django import forms
from .models import Post

class PostForm(forms.ModelForm):
    class Meta:
        model = Post
        fields = ['message', ]
A new view protected by @login_required and with a simple form processing logic:
boards/views.py (view complete file contents)
from django.contrib.auth.decorators import login_required
from django.shortcuts import get_object_or_404, redirect, render
from .forms import PostForm
from .models import Topic

@login_required
def reply_topic(request, pk, topic_pk):
    topic = get_object_or_404(Topic, board__pk=pk, pk=topic_pk)
    if request.method == 'POST':
        form = PostForm(request.POST)
        if form.is_valid():
            post = form.save(commit=False)
            post.topic = topic
            post.created_by = request.user
            post.save()
            return redirect('topic_posts', pk=pk, topic_pk=topic_pk)
    else:
        form = PostForm()
    return render(request, 'reply_topic.html', {'topic': topic, 'form': form})
Also take the time to update the return redirect of the new_topic view function (marked with the comment # TODO).
@login_required
def new_topic(request, pk):
    board = get_object_or_404(Board, pk=pk)
    if request.method == 'POST':
        form = NewTopicForm(request.POST)
        if form.is_valid():
            topic = form.save(commit=False)
            # code suppressed ...
            return redirect('topic_posts', pk=pk, topic_pk=topic.pk)  # <- here
    # code suppressed ...
Very important: in the view reply_topic we are using topic_pk because we are referring to the keyword argument
of the function, in the view new_topic we are using topic.pk because a topic is an object (Topic model
instance) and .pk we are accessing the pk property of the Topic model instance. Small detail, big difference.
The first version of our template:
templates/reply_topic.html
{% extends 'base.html' %}

{% load static %}

{% block title %}Post a reply{% endblock %}

{% block breadcrumb %}
  <li class="breadcrumb-item"><a href="{% url 'home' %}">Boards</a></li>
  <li class="breadcrumb-item"><a href="{% url 'board_topics' topic.board.pk %}">{{ topic.board.name }}</a></li>
  <li class="breadcrumb-item"><a href="{% url 'topic_posts' topic.board.pk topic.pk %}">{{ topic.subject }}</a></li>
  <li class="breadcrumb-item active">Post a reply</li>
{% endblock %}

{% block content %}

  <form method="post" class="mb-4">
    {% csrf_token %}
    {% include 'includes/form.html' %}
    <button type="submit" class="btn btn-success">Post a reply</button>
  </form>

  {% for post in topic.posts.all %}
    <div class="card mb-2">
      <div class="card-body p-3">
        <div class="row mb-3">
          <div class="col-6">
            <strong class="text-muted">{{ post.created_by.username }}</strong>
          </div>
          <div class="col-6 text-right">
            <small class="text-muted">{{ post.created_at }}</small>
          </div>
        </div>
        {{ post.message }}
      </div>
    </div>
  {% endfor %}

{% endblock %}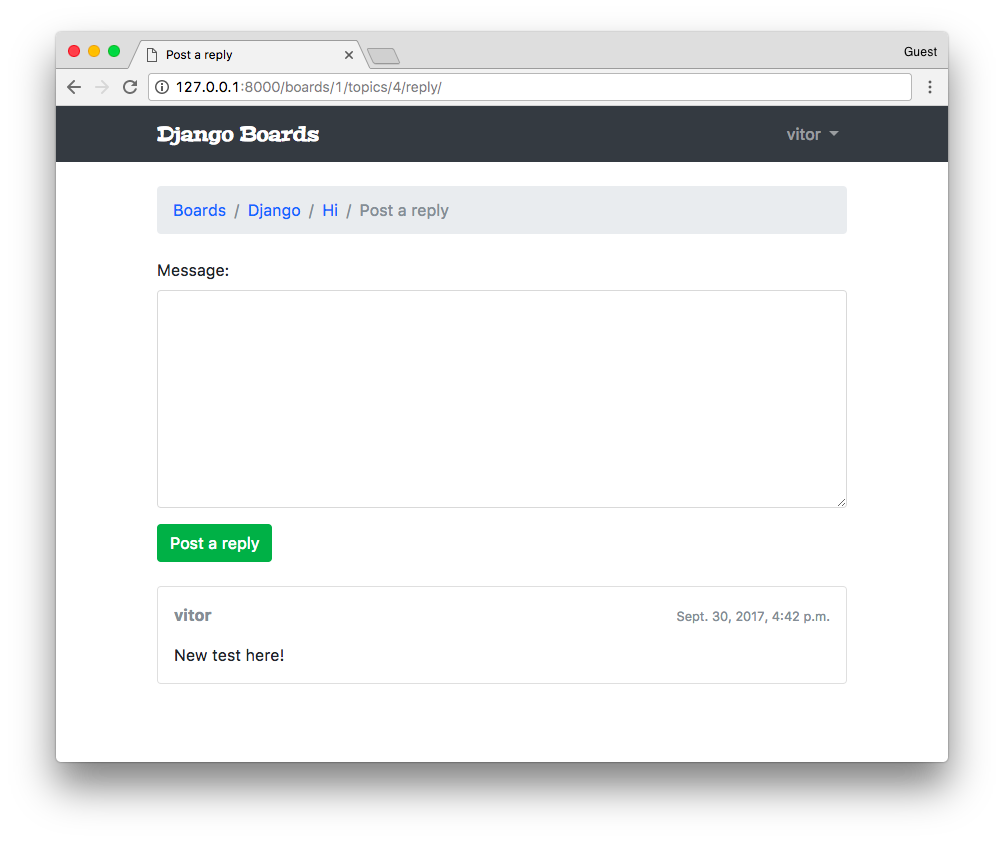
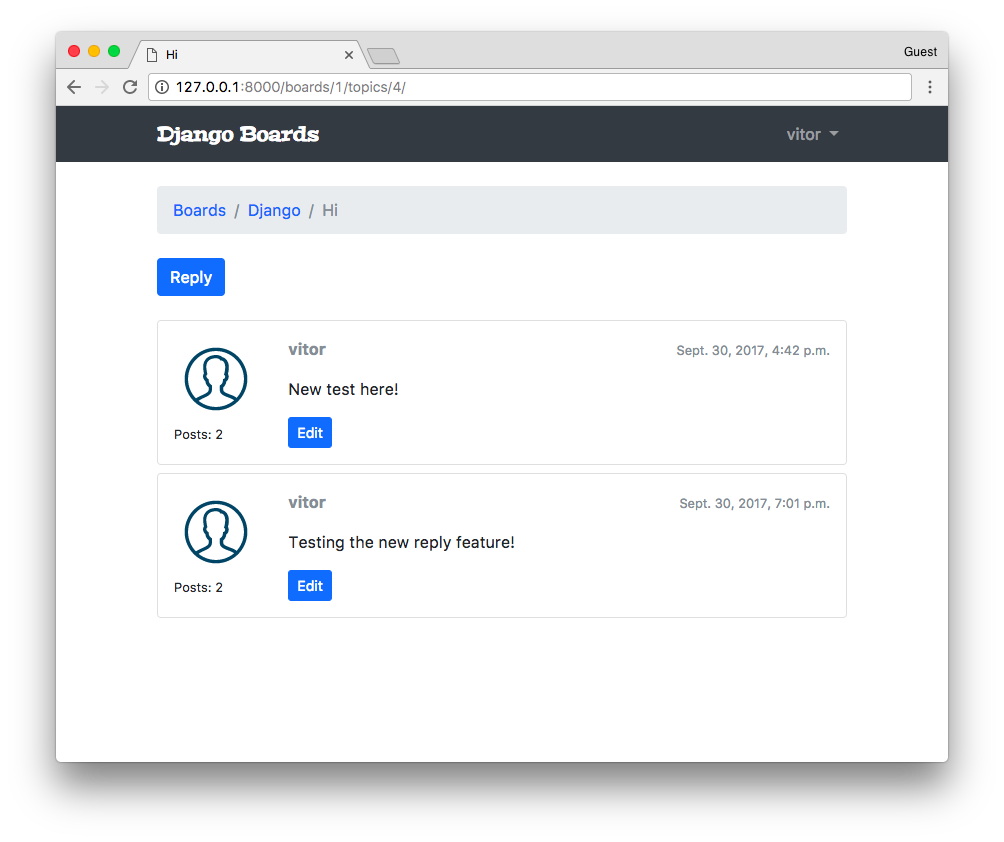
Then after posting a reply, the user is redirected back to the topic posts:
We could now change the starter post, so to give it more emphasis in the page:
templates/topic_posts.html (view complete file contents)
{% for post in topic.posts.all %}
  <div class="card mb-2 {% if forloop.first %}border-dark{% endif %}">
    {% if forloop.first %}
      <div class="card-header text-white bg-dark py-2 px-3">{{ topic.subject }}</div>
    {% endif %}
    <div class="card-body p-3">
      <!-- code suppressed -->
    </div>
  </div>
{% endfor %}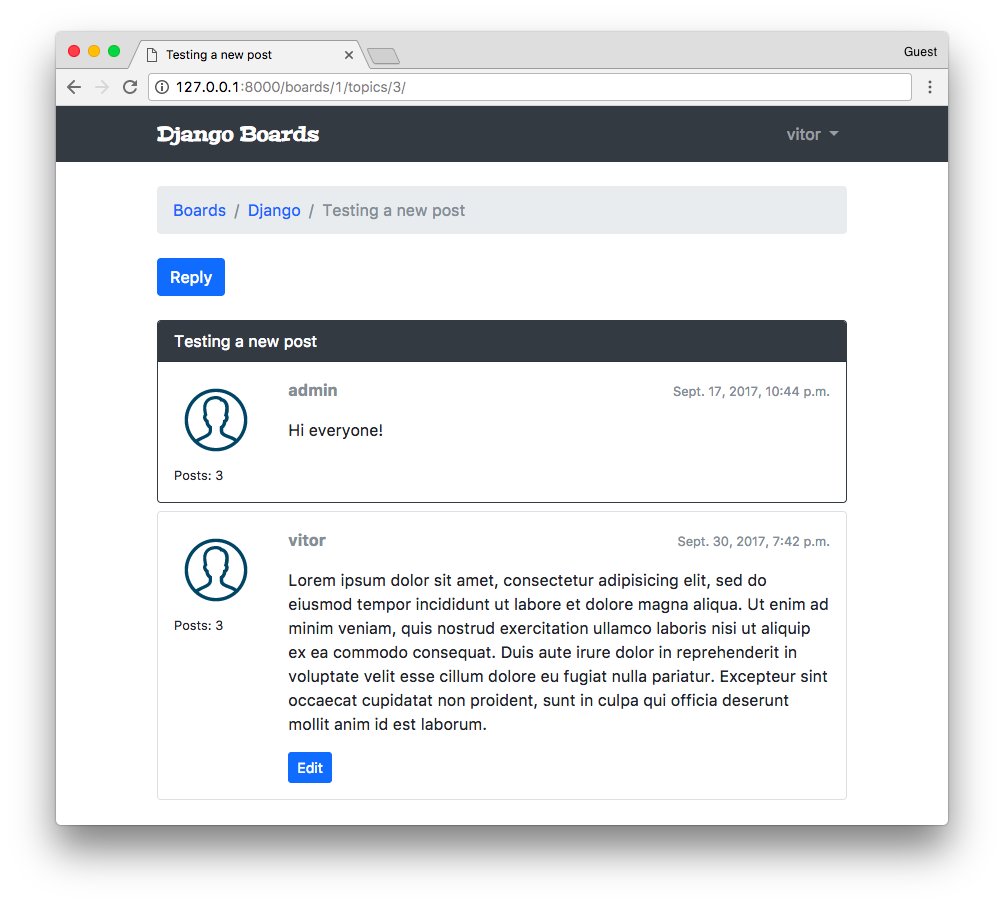
Now for the tests, pretty standard, just like we have been doing so far. Create a new file test_view_reply_topic.py inside the boards/tests folder:
boards/tests/test_view_reply_topic.py (view complete file contents)
from django.contrib.auth.models import User
from django.test import TestCase
from django.urls import reverse
from ..models import Board, Post, Topic
from ..views import reply_topic

class ReplyTopicTestCase(TestCase):
    '''
    Base test case to be used in all `reply_topic` view tests
    '''
    def setUp(self):
        self.board = Board.objects.create(name='Django', description='Django board.')
        self.username = 'john'
        self.password = '123'
        user = User.objects.create_user(username=self.username, email='john@doe.com', password=self.password)
        self.topic = Topic.objects.create(subject='Hello, world', board=self.board, starter=user)
        Post.objects.create(message='Lorem ipsum dolor sit amet', topic=self.topic, created_by=user)
        self.url = reverse('reply_topic', kwargs={'pk': self.board.pk, 'topic_pk': self.topic.pk})

class LoginRequiredReplyTopicTests(ReplyTopicTestCase):
    # ...

class ReplyTopicTests(ReplyTopicTestCase):
    # ...

class SuccessfulReplyTopicTests(ReplyTopicTestCase):
    # ...

class InvalidReplyTopicTests(ReplyTopicTestCase):
    # ...
The essence here is the custom test case class ReplyTopicTestCase. Then all the four classes will extend this test case.
First, we test if the view is protected with the @login_required decorator, then check the HTML inputs, status code.
Finally, we test a valid and an invalid form submission.
QuerySets
Let’s take the time now to explore some of the models’ API functionalities a little bit. First, let’s improve the home view:
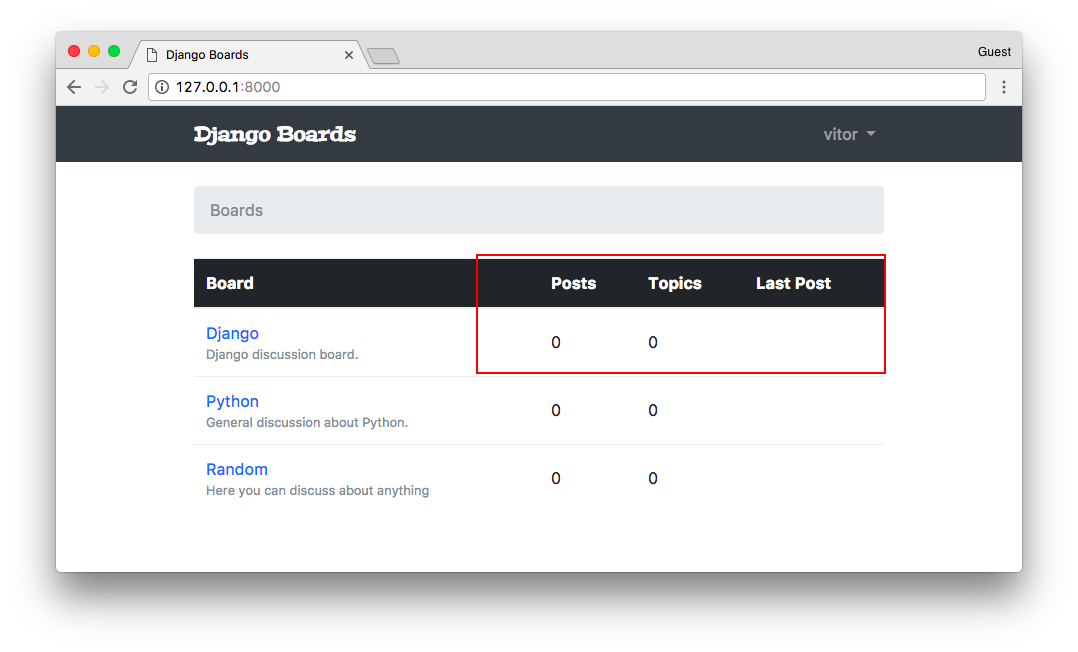
We have three tasks here:
- Display the posts count of the board;
- Display the topics count of the board;
- Display the last user who posted something and the date and time.
Let’s play with the Python terminal first, before we jump into the implementation.
Since we are going to try things out in the Python terminal, it’s a good idea to define a __str__ method for all
our models.
boards/models.py (view complete file contents)
from django.db import models
from django.utils.text import Truncator

class Board(models.Model):
    # ...
    def __str__(self):
        return self.name

class Topic(models.Model):
    # ...
    def __str__(self):
        return self.subject

class Post(models.Model):
    # ...
    def __str__(self):
        truncated_message = Truncator(self.message)
        return truncated_message.chars(30)
In the Post model we are using the Truncator utility class. It’s a convenient way to truncate long strings into an arbitrary string size (here we are using 30).
Now let’s open the Python shell terminal:
python manage.py shell

# First get a board instance from the database
board = Board.objects.get(name='Django')
The easiest of the three tasks is to get the current topics count, because the Topic and Board are directly related:
board.topics.all()
<QuerySet [<Topic: Hello everyone!>, <Topic: Test>, <Topic: Testing a new post>, <Topic: Hi>]>

board.topics.count()
4
That’s about it.
Now the number of posts within a board is a little bit trickier because Post is not directly related to Board.
from boards.models import Post

Post.objects.all()
<QuerySet [<Post: This is my first topic.. :-)>, <Post: test.>, <Post: Hi everyone!>,
  <Post: New test here!>, <Post: Testing the new reply feature!>, <Post: Lorem ipsum dolor sit amet,...>,
  <Post: hi there>, <Post: test>, <Post: Testing..>, <Post: some reply>, <Post: Random random.>
]>

Post.objects.count()
11
Here we have 11 posts. But not all of them belongs to the “Django” board.
Here is how we can filter it:
from boards.models import Board, Post

board = Board.objects.get(name='Django')

Post.objects.filter(topic__board=board)
<QuerySet [<Post: This is my first topic.. :-)>, <Post: test.>, <Post: hi there>,
  <Post: Hi everyone!>, <Post: Lorem ipsum dolor sit amet,...>, <Post: New test here!>,
  <Post: Testing the new reply feature!>
]>

Post.objects.filter(topic__board=board).count()
7
The double underscores topic__board is used to navigate through the models’ relationships. Under the hoods, Django
builds the bridge between the Board - Topic - Post, and build a SQL query to retrieve just the posts that belong to
a specific board.
Now our last mission is to identify the last post.
# order by the `created_at` field, getting the most recent first
Post.objects.filter(topic__board=board).order_by('-created_at')
<QuerySet [<Post: testing>, <Post: new post>, <Post: hi there>, <Post: Lorem ipsum dolor sit amet,...>,
  <Post: Testing the new reply feature!>, <Post: New test here!>, <Post: Hi everyone!>,
  <Post: test.>, <Post: This is my first topic.. :-)>
]>

# we can use the `first()` method to just grab the result that interest us
Post.objects.filter(topic__board=board).order_by('-created_at').first()
<Post: testing>
Sweet. Now we can implement it.
boards/models.py (view complete file contents)
from django.db import models

class Board(models.Model):
    name = models.CharField(max_length=30, unique=True)
    description = models.CharField(max_length=100)

    def __str__(self):
        return self.name

    def get_posts_count(self):
        return Post.objects.filter(topic__board=self).count()

    def get_last_post(self):
        return Post.objects.filter(topic__board=self).order_by('-created_at').first()
Observe that we are using self, because this method will be used by a Board instance. So that means we are using
this instance to filter the QuerySet.
Now we can improve the home HTML template to display this brand new information:
templates/home.html
{% extends 'base.html' %}

{% block breadcrumb %}
  <li class="breadcrumb-item active">Boards</li>
{% endblock %}

{% block content %}
  <table class="table">
    <thead class="thead-inverse">
      <tr>
        <th>Board</th>
        <th>Posts</th>
        <th>Topics</th>
        <th>Last Post</th>
      </tr>
    </thead>
    <tbody>
      {% for board in boards %}
        <tr>
          <td>
            <a href="{% url 'board_topics' board.pk %}">{{ board.name }}</a>
            <small class="text-muted d-block">{{ board.description }}</small>
          </td>
          <td class="align-middle">
            {{ board.get_posts_count }}
          </td>
          <td class="align-middle">
            {{ board.topics.count }}
          </td>
          <td class="align-middle">
            {% with post=board.get_last_post %}
              <small>
                <a href="{% url 'topic_posts' board.pk post.topic.pk %}">
                  By {{ post.created_by.username }} at {{ post.created_at }}
                </a>
              </small>
            {% endwith %}
          </td>
        </tr>
      {% endfor %}
    </tbody>
  </table>
{% endblock %}
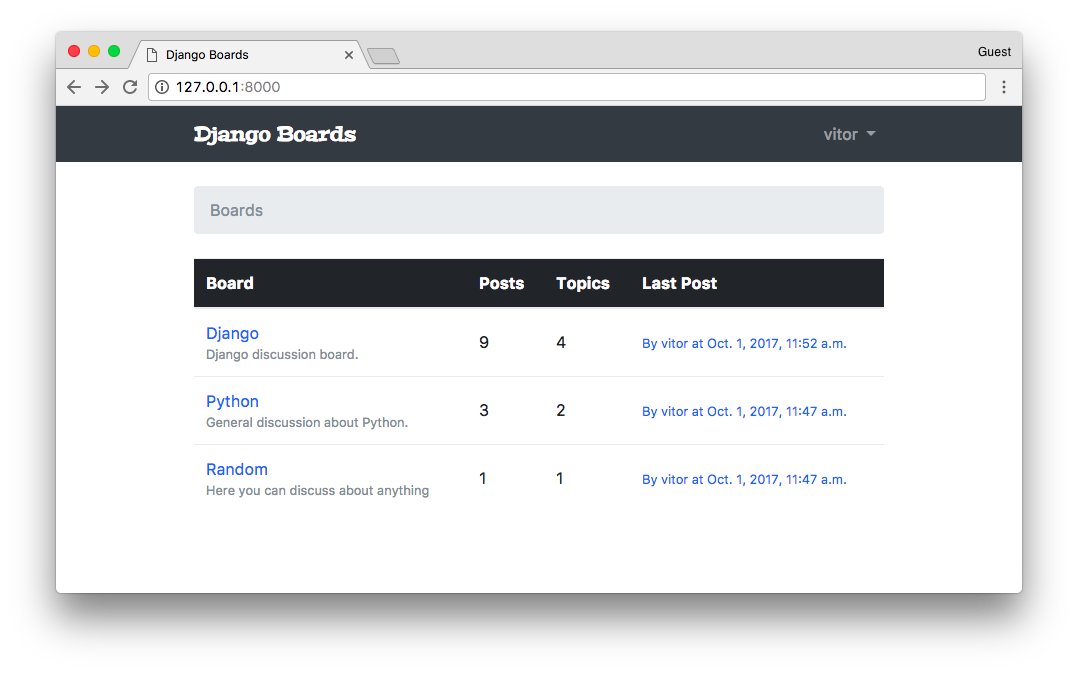
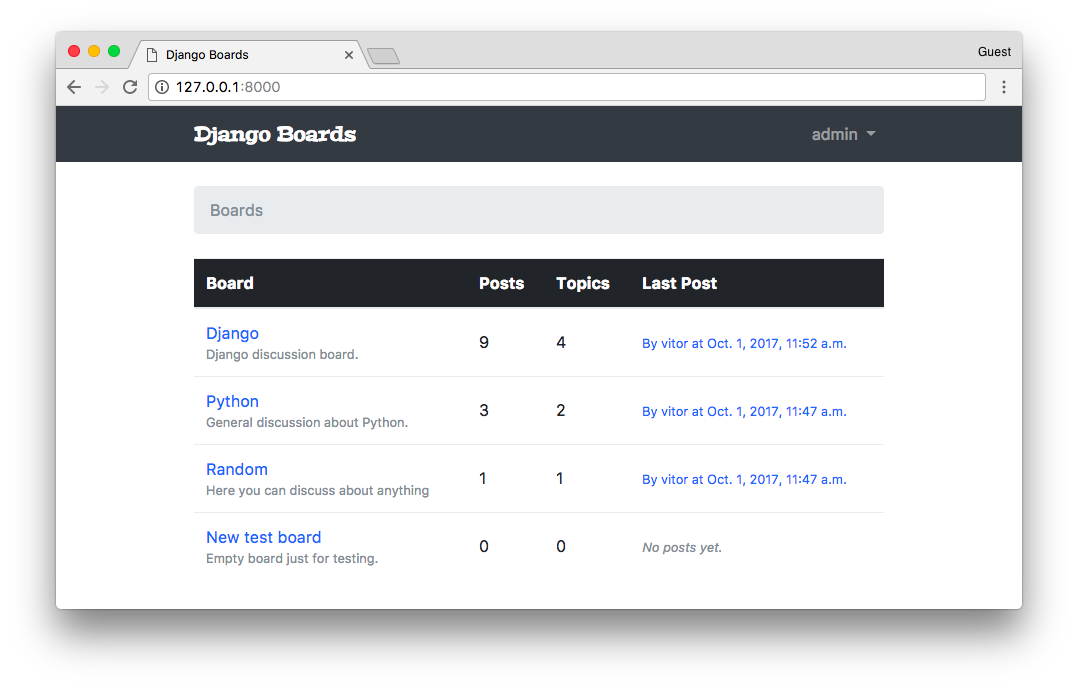
And that’s the result for now:
Run the tests:
python manage.py testCreating test database for alias 'default'...
System check identified no issues (0 silenced).
.......................................................EEE......................
======================================================================
ERROR: test_home_url_resolves_home_view (boards.tests.test_view_home.HomeTests)
----------------------------------------------------------------------
django.urls.exceptions.NoReverseMatch: Reverse for 'topic_posts' with arguments '(1, '')' not found. 1 pattern(s) tried: ['boards/(?P<pk>\\d+)/topics/(?P<topic_pk>\\d+)/$']
======================================================================
ERROR: test_home_view_contains_link_to_topics_page (boards.tests.test_view_home.HomeTests)
----------------------------------------------------------------------
django.urls.exceptions.NoReverseMatch: Reverse for 'topic_posts' with arguments '(1, '')' not found. 1 pattern(s) tried: ['boards/(?P<pk>\\d+)/topics/(?P<topic_pk>\\d+)/$']
======================================================================
ERROR: test_home_view_status_code (boards.tests.test_view_home.HomeTests)
----------------------------------------------------------------------
django.urls.exceptions.NoReverseMatch: Reverse for 'topic_posts' with arguments '(1, '')' not found. 1 pattern(s) tried: ['boards/(?P<pk>\\d+)/topics/(?P<topic_pk>\\d+)/$']
----------------------------------------------------------------------
Ran 80 tests in 5.663s
FAILED (errors=3)
Destroying test database for alias 'default'...It seems like we have a problem with our implementation here. The application is crashing if there are no posts.
templates/home.html
{% with post=board.get_last_post %}
  {% if post %}
    <small>
      <a href="{% url 'topic_posts' board.pk post.topic.pk %}">
        By {{ post.created_by.username }} at {{ post.created_at }}
      </a>
    </small>
  {% else %}
    <small class="text-muted">
      <em>No posts yet.</em>
    </small>
  {% endif %}
{% endwith %}
Run the tests again:
python manage.py testCreating test database for alias 'default'...
System check identified no issues (0 silenced).
................................................................................
----------------------------------------------------------------------
Ran 80 tests in 5.630s
OK
Destroying test database for alias 'default'...I added a new board with no messages just to check the “empty message”:
Now it’s time to improve the topics listing view.
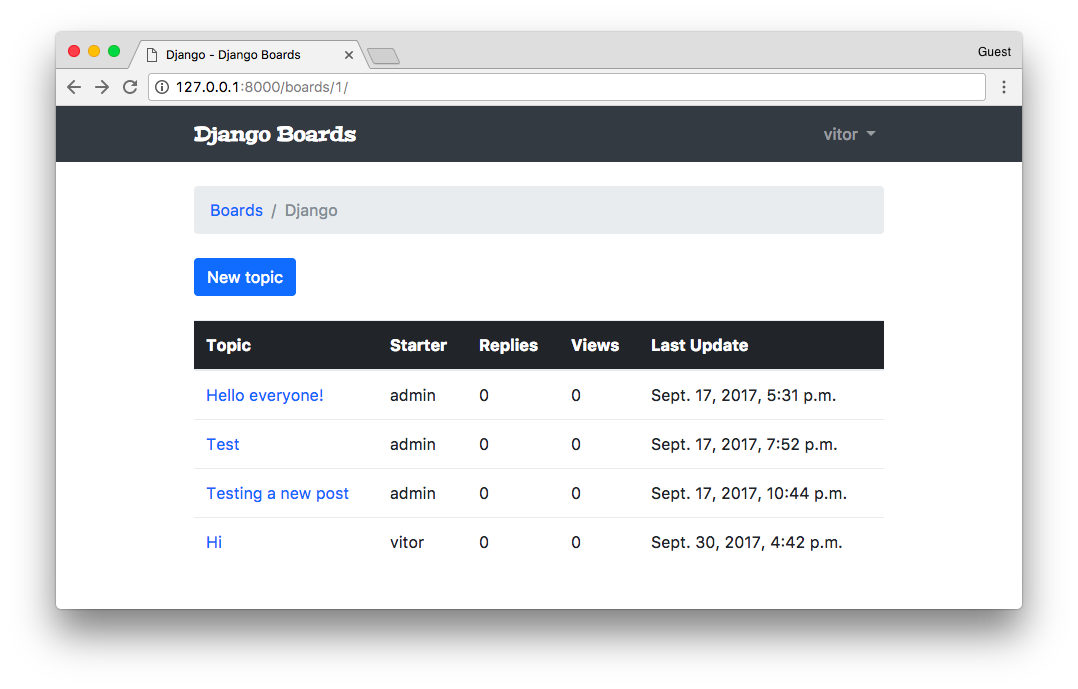
I will show you another way to include the count, this time to the number of replies, in a more effective way.
As usual, let’s try first with the Python shell:
python manage.py shellfrom django.db.models import Count
from boards.models import Board
board = Board.objects.get(name='Django')
topics = board.topics.order_by('-last_updated').annotate(replies=Count('posts'))
for topic in topics:
print(topic.replies)
2
4
2
1Here we are using the annotate QuerySet method to generate a new “column” on the fly. This new column, which will
be translated into a property, accessible via topic.replies contain the count of posts a given topic has.
We can do just a minor fix because the replies should not consider the starter topic (which is also a Post instance).
So here is how we do it:
topics = board.topics.order_by('-last_updated').annotate(replies=Count('posts') - 1)

for topic in topics:
    print(topic.replies)

1
3
1
0
Cool, right?
boards/views.py (view complete file contents)
from django.db.models import Count
from django.shortcuts import get_object_or_404, render
from .models import Board

def board_topics(request, pk):
    board = get_object_or_404(Board, pk=pk)
    topics = board.topics.order_by('-last_updated').annotate(replies=Count('posts') - 1)
    return render(request, 'topics.html', {'board': board, 'topics': topics})
templates/topics.html (view complete file contents)
{% for topic in topics %}
  <tr>
    <td><a href="{% url 'topic_posts' board.pk topic.pk %}">{{ topic.subject }}</a></td>
    <td>{{ topic.starter.username }}</td>
    <td>{{ topic.replies }}</td>
    <td>0</td>
    <td>{{ topic.last_updated }}</td>
  </tr>
{% endfor %}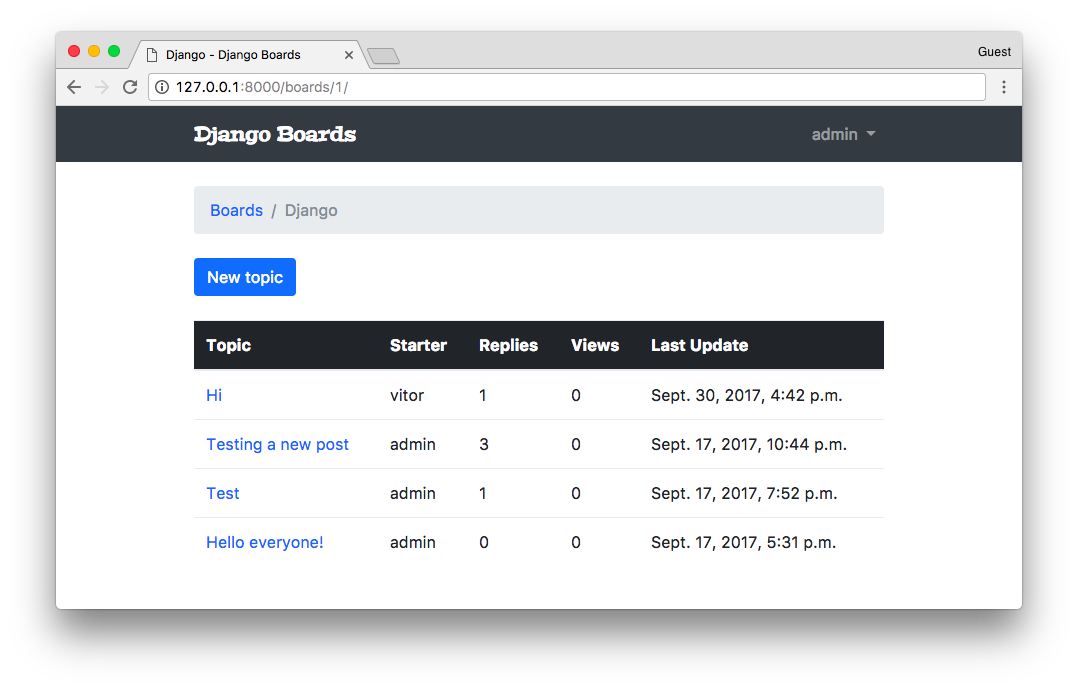
Next step now is to fix the views count. But for that, we will need to create a new field.
Migrations
Migration is a fundamental part of Web development with Django. It’s how we evolve our application’s models keeping the models’ files synchronized with the database.
When we first run the command python manage.py migrate Django grab all migration files and generate the database
schema.
When Django applies a migration, it has a special table called django_migrations. In this table, Django registers all the applied migrations.
So if we try to run the command again:
python manage.py migrateOperations to perform:
Apply all migrations: admin, auth, boards, contenttypes, sessions
Running migrations:
No migrations to apply.Django will know there’s nothing to do.
Let’s create a migration by adding a new field to the Topic model:
boards/models.py (view complete file contents)
class Topic(models.Model):
    subject = models.CharField(max_length=255)
    last_updated = models.DateTimeField(auto_now_add=True)
    board = models.ForeignKey(Board, related_name='topics')
    starter = models.ForeignKey(User, related_name='topics')
    views = models.PositiveIntegerField(default=0)  # <- here

    def __str__(self):
        return self.subject
Here we added a PositiveIntegerField. Since this field is going to store the number of page views, a negative page
view wouldn’t make sense.
Before we can use our new field, we have to update the database schema. Execute the makemigrations command:
python manage.py makemigrations

Migrations for 'boards':
  boards/migrations/0003_topic_views.py
    - Add field views to topic
The makemigrations command automatically generated the 0003_topic_views.py file, which will be used to modify the
database, adding the views field.
Now apply the migration by running the command migrate:
python manage.py migrate

Operations to perform:
  Apply all migrations: admin, auth, boards, contenttypes, sessions
Running migrations:
  Applying boards.0003_topic_views... OK
Now we can use it to keep track of the number of views a given topic is receiving:
boards/views.py (view complete file contents)
from django.shortcuts import get_object_or_404, render
from .models import Topic

def topic_posts(request, pk, topic_pk):
    topic = get_object_or_404(Topic, board__pk=pk, pk=topic_pk)
    topic.views += 1
    topic.save()
    return render(request, 'topic_posts.html', {'topic': topic})
templates/topics.html (view complete file contents)
{% for topic in topics %}
  <tr>
    <td><a href="{% url 'topic_posts' board.pk topic.pk %}">{{ topic.subject }}</a></td>
    <td>{{ topic.starter.username }}</td>
    <td>{{ topic.replies }}</td>
    <td>{{ topic.views }}</td>  <!-- here -->
    <td>{{ topic.last_updated }}</td>
  </tr>
{% endfor %}
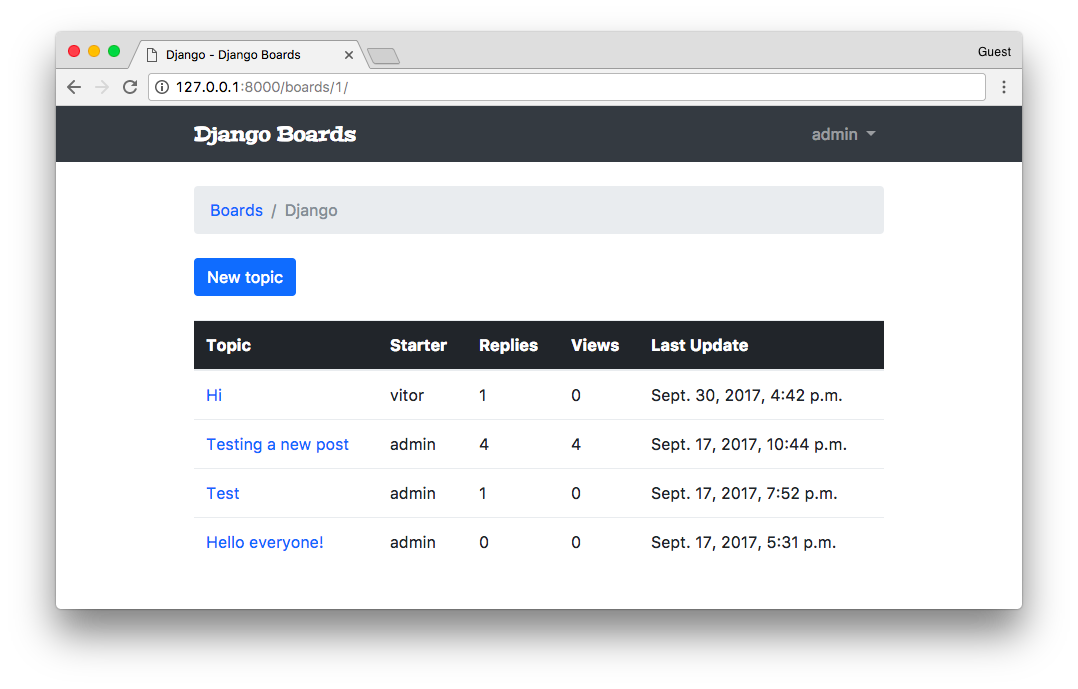
Now open a topic and refresh the page a few times, and see if it’s counting the page views:
Conclusions
In this tutorial, we made some progress in the development of the Web boards functionalities. There are a few things left to implement: the edit post view, the “my account” view for the user to update their names, etc. After those two views, we are going to enable markdown in the posts and implement pagination in both topic listing and topic replies listing.
The next tutorial will be focused on using class-based views to solve those problems. And after that, we are going to learn how to deploy our application to a Web server.
I hope you enjoyed the fifth part of this tutorial series! The sixth part is coming out next week, on Oct 9, 2017. If you would like to get notified when the fifth part is out, you can subscribe to our mailing list.
The source code of the project is available on GitHub. The current state of the project can be found under the release tag v0.5-lw. The link below will take you to the right place:
https://github.com/sibtc/django-beginners-guide/tree/v0.5-lw


 How to Extend Django User Model
 How to Setup a SSL Certificate on Nginx for a Django Application
 How to Deploy a Django Application to Digital Ocean