

Introduction
Welcome to the sixth part of the tutorial series! In this tutorial, we are going to explore in great detail the Class-Based Views. We are also going to refactor some of the existing views so to take advantage of the built-in Generic Class-Based Views.
There are many other topics that we are going to touch with this tutorial, such as how to work with pagination, how to work with Markdown and how to add a simple editor. We are also going to explore a built-in package called Humanize, which is used to give a “human touch” to the data.
Alright, folks! Let’s implement some code. We have plenty of work to do today!
Views Strategies
At the end of the day, all Django views are functions. Even class-based views (CBV). Behind the scenes, it does all the magic and ends up returning a view function.
Class-based views were introduced to make it easier for developers to reuse and extend views. There are many benefits of using them, such as the extendability, the ability to use O.O. techniques such as multiple inheritances, the handling of HTTP methods are done in separate methods, rather than using conditional branching, and there are also the Generic Class-Based Views (GCBV).
Before we move forward, let’s clarify what those three terms mean:
- Function-Based Views (FBV)
- Class-Based Views (CBV)
- Generic Class-Based Views (GCBV)
A FBV is the simplest representation of a Django view: it’s just a function that receives an HttpRequest object and returns an HttpResponse.
A CBV is every Django view defined as a Python class that extends the django.views.generic.View abstract class. A
CBV essentially is a class that wraps a FBV. CBVs are great to extend and reuse code.
GCBVs are built-in CBVs that solve specific problems such as listing views, create, update, and delete views.
Below we are going to explore some examples of the different implementation strategies.
Function-Based View
views.py
def new_post(request):
    if request.method == 'POST':
        form = PostForm(request.POST)
        if form.is_valid():
            form.save()
            return redirect('post_list')
    else:
        form = PostForm()
    return render(request, 'new_post.html', {'form': form})
urls.py
urlpatterns = [
    url(r'^new_post/$', views.new_post, name='new_post'),
]
Class-Based View
A CBV is a view that extends the View class. The main difference here is that the requests are handled inside class methods named after the HTTP methods, such as get, post, put, head, etc.
So, here we don’t need to do a conditional to check if the request is a POST or if it’s a GET. The code goes straight to the right method. This logic is handled internally in the View class.
views.py
from django.views.generic import View

class NewPostView(View):
    def post(self, request):
        form = PostForm(request.POST)
        if form.is_valid():
            form.save()
            return redirect('post_list')
        return render(request, 'new_post.html', {'form': form})

    def get(self, request):
        form = PostForm()
        return render(request, 'new_post.html', {'form': form})
The way we refer to the CBVs in the urls.py module is a little bit different:
urls.py
urlpatterns = [
    url(r'^new_post/$', views.NewPostView.as_view(), name='new_post'),
]
Here we need to use the as_view() class method, which returns a view function to the url patterns. In some cases, we
can also feed the as_view() with some keyword arguments, so to customize the behavior of the CBV, just like we did
with some of the authentication views to customize the templates.
Anyway, the good thing about CBV is that we can add more methods, and perhaps do something like this:
from django.views.generic import View

class NewPostView(View):
    def render(self, request):
        return render(request, 'new_post.html', {'form': self.form})

    def post(self, request):
        self.form = PostForm(request.POST)
        if self.form.is_valid():
            self.form.save()
            return redirect('post_list')
        return self.render(request)

    def get(self, request):
        self.form = PostForm()
        return self.render(request)
It’s also possible to create some generic views that accomplish some tasks so that we can reuse it across the project.
But that’s pretty much all you need to know about CBVs. Simple as that.
Generic Class-Based View
Now about the GCBV. That’s a different story. As I mentioned earlier, those views are built-in CBVs for common use cases. Their implementation makes heavy usage of multiple inheritances (mixins) and other O.O. strategies.
They are very flexible and can save many hours of work. But in the beginning, it can be difficult to work with them.
When I first started working with Django, I found GCBV hard to work with. At first, it’s hard to tell what is going on, because the code flow is not obvious, as there is good chunk of code hidden in the parent classes. The documentation is a little bit challenging to follow too, mostly because the attributes and methods are sometimes spread across eight parent classes. When working with GCBV, it’s always good to have the ccbv.co.uk opened for quick reference. No worries, we are going to explore it together.
Now let’s see a GCBV example.
views.py
from django.views.generic import CreateView

class NewPostView(CreateView):
    model = Post
    form_class = PostForm
    success_url = reverse_lazy('post_list')
    template_name = 'new_post.html'
Here we are using a generic view used to create model objects. It does all the form processing and save the object if the form is valid.
Since it’s a CBV, we refer to it in the urls.py the same way as any other CBV:
urls.py
urlpatterns = [
    url(r'^new_post/$', views.NewPostView.as_view(), name='new_post'),
]
Other examples of GCBVs are DetailView, DeleteView, FormView, UpdateView, ListView.
Update View
Let’s get back to the implementation of our project. This time we are going to use a GCBV to implement the edit post view:
boards/views.py (view complete file contents)
from django.shortcuts import redirect
from django.views.generic import UpdateView
from django.utils import timezone

class PostUpdateView(UpdateView):
    model = Post
    fields = ('message', )
    template_name = 'edit_post.html'
    pk_url_kwarg = 'post_pk'
    context_object_name = 'post'

    def form_valid(self, form):
        post = form.save(commit=False)
        post.updated_by = self.request.user
        post.updated_at = timezone.now()
        post.save()
        return redirect('topic_posts', pk=post.topic.board.pk, topic_pk=post.topic.pk)
With the UpdateView and the CreateView, we have the option to either define form_class or the fields attribute. In the example above we are using the fields attribute to create a model form on-the-fly. Internally, Django will use a model form factory to compose a form of the Post model. Since it’s a very simple form with just the message field, we can afford to work like this. But for complex form definitions, it’s better to define a model form externally and refer to it here.
The pk_url_kwarg will be used to identify the name of the keyword argument used to retrieve the Post object. It’s the same as we define in the urls.py.
If we don’t set the context_object_name attribute, the Post object will be available in the template as “object.” So, here we are using the context_object_name to rename it to post instead. You will see how we are using it in the template below.
In this particular example, we had to override the form_valid() method so as to set some extra fields such as the updated_by and updated_at. You can see what the base form_valid() method looks like here: UpdateView#form_valid.
myproject/urls.py (view complete file contents)
from django.conf.urls import url
from boards import views
urlpatterns = [
# ...
url(r'^boards/(?P<pk>\d+)/topics/(?P<topic_pk>\d+)/posts/(?P<post_pk>\d+)/edit/$',
views.PostUpdateView.as_view(), name='edit_post'),
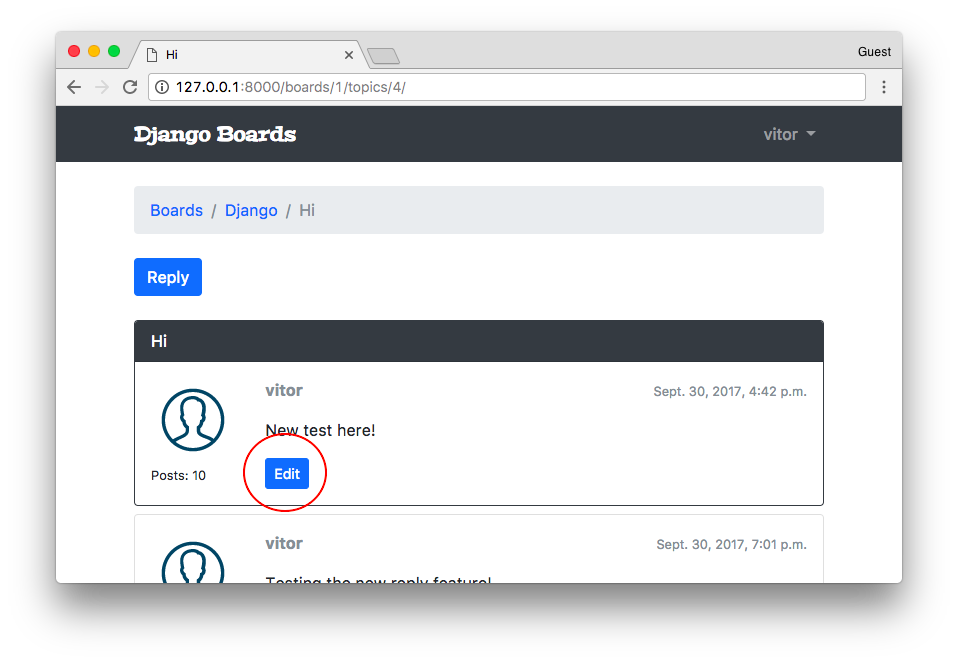
]Now we can add the link to the edit page:
templates/topic_posts.html (view complete file contents)
{% if post.created_by == user %}
<div class="mt-3">
<a href="{% url 'edit_post' post.topic.board.pk post.topic.pk post.pk %}"
class="btn btn-primary btn-sm"
role="button">Edit</a>
</div>
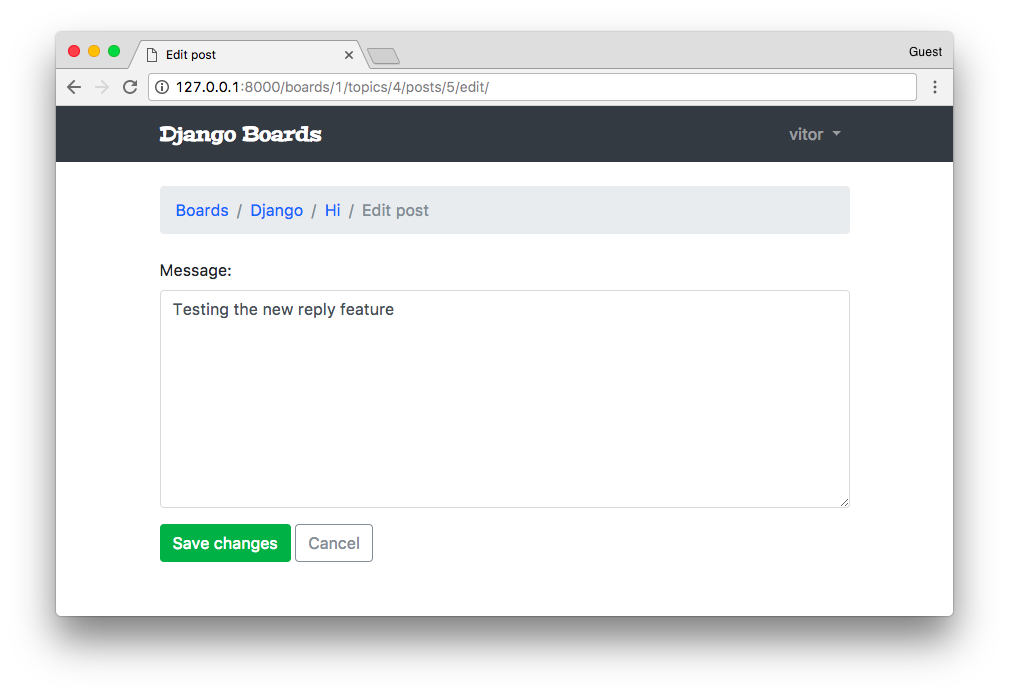
{% endif %}templates/edit_post.html (view complete file contents)
{% extends 'base.html' %}

{% block title %}Edit post{% endblock %}

{% block breadcrumb %}
  <li class="breadcrumb-item"><a href="{% url 'home' %}">Boards</a></li>
  <li class="breadcrumb-item"><a href="{% url 'board_topics' post.topic.board.pk %}">{{ post.topic.board.name }}</a></li>
  <li class="breadcrumb-item"><a href="{% url 'topic_posts' post.topic.board.pk post.topic.pk %}">{{ post.topic.subject }}</a></li>
  <li class="breadcrumb-item active">Edit post</li>
{% endblock %}

{% block content %}
  <form method="post" class="mb-4" novalidate>
    {% csrf_token %}
    {% include 'includes/form.html' %}
    <button type="submit" class="btn btn-success">Save changes</button>
    <a href="{% url 'topic_posts' post.topic.board.pk post.topic.pk %}" class="btn btn-outline-secondary" role="button">Cancel</a>
  </form>
{% endblock %}
Observe now how we are navigating through the post object: post.topic.board.pk. If we didn’t set the context_object_name to post, it would be available as: object.topic.board.pk. Got it?
Testing The Update View
Create a new test file named test_view_edit_post.py inside the boards/tests folder. Clicking on the link below you will see many routine tests, just like we have been doing in this tutorial. So I will just highlight the new parts here:
boards/tests/test_view_edit_post.py (view complete file contents)
from django.contrib.auth.models import User
from django.test import TestCase
from django.urls import reverse
from ..models import Board, Post, Topic
from ..views import PostUpdateView

class PostUpdateViewTestCase(TestCase):
    '''
    Base test case to be used in all `PostUpdateView` view tests
    '''
    def setUp(self):
        self.board = Board.objects.create(name='Django', description='Django board.')
        self.username = 'john'
        self.password = '123'
        user = User.objects.create_user(username=self.username, email='john@doe.com', password=self.password)
        self.topic = Topic.objects.create(subject='Hello, world', board=self.board, starter=user)
        self.post = Post.objects.create(message='Lorem ipsum dolor sit amet', topic=self.topic, created_by=user)
        self.url = reverse('edit_post', kwargs={
            'pk': self.board.pk,
            'topic_pk': self.topic.pk,
            'post_pk': self.post.pk
        })

class LoginRequiredPostUpdateViewTests(PostUpdateViewTestCase):
    def test_redirection(self):
        '''
        Test if only logged in users can edit the posts
        '''
        login_url = reverse('login')
        response = self.client.get(self.url)
        self.assertRedirects(response, '{login_url}?next={url}'.format(login_url=login_url, url=self.url))

class UnauthorizedPostUpdateViewTests(PostUpdateViewTestCase):
    def setUp(self):
        '''
        Create a new user different from the one who posted
        '''
        super().setUp()
        username = 'jane'
        password = '321'
        user = User.objects.create_user(username=username, email='jane@doe.com', password=password)
        self.client.login(username=username, password=password)
        self.response = self.client.get(self.url)

    def test_status_code(self):
        '''
        A topic should be edited only by the owner.
        Unauthorized users should get a 404 response (Page Not Found)
        '''
        self.assertEquals(self.response.status_code, 404)


class PostUpdateViewTests(PostUpdateViewTestCase):
    # ...

class SuccessfulPostUpdateViewTests(PostUpdateViewTestCase):
    # ...

class InvalidPostUpdateViewTests(PostUpdateViewTestCase):
    # ...
For now, the important parts are: PostUpdateViewTestCase is a class we defined to be reused across the other test cases. It’s just the basic setup, creating users, topic, boards, and so on.
The class LoginRequiredPostUpdateViewTests will test if the view is protected with the @login_required
decorator. That is if only authenticated users can access the edit page.
The class UnauthorizedPostUpdateViewTests creates a new user, different from the one who posted and tries to access the edit page. The application should only authorize the owner of the post to edit it.
Let’s run the tests:
python manage.py test boards.tests.test_view_edit_postCreating test database for alias 'default'...
System check identified no issues (0 silenced).
..F.......F
======================================================================
FAIL: test_redirection (boards.tests.test_view_edit_post.LoginRequiredPostUpdateViewTests)
----------------------------------------------------------------------
...
AssertionError: 200 != 302 : Response didn't redirect as expected: Response code was 200 (expected 302)
======================================================================
FAIL: test_status_code (boards.tests.test_view_edit_post.UnauthorizedPostUpdateViewTests)
----------------------------------------------------------------------
...
AssertionError: 200 != 404
----------------------------------------------------------------------
Ran 11 tests in 1.360s
FAILED (failures=2)
Destroying test database for alias 'default'...First, let’s fix the problem with the @login_required decorator. The way we use view decorators on class-based views
is a little bit different. We need an extra import:
boards/views.py (view complete file contents)
from django.contrib.auth.decorators import login_required
from django.shortcuts import redirect
from django.views.generic import UpdateView
from django.utils import timezone
from django.utils.decorators import method_decorator
from .models import Post

@method_decorator(login_required, name='dispatch')
class PostUpdateView(UpdateView):
    model = Post
    fields = ('message', )
    template_name = 'edit_post.html'
    pk_url_kwarg = 'post_pk'
    context_object_name = 'post'

    def form_valid(self, form):
        post = form.save(commit=False)
        post.updated_by = self.request.user
        post.updated_at = timezone.now()
        post.save()
        return redirect('topic_posts', pk=post.topic.board.pk, topic_pk=post.topic.pk)
We can’t decorate the class directly with the @login_required decorator. We have to use the utility
@method_decorator, and pass a decorator (or a list of decorators) and tell which method should be decorated. In
class-based views it’s common to decorate the dispatch method. It’s an internal method Django use (defined inside
the View class). All requests pass through this method, so it’s safe to decorate it.
Run the tests:
python manage.py test boards.tests.test_view_edit_postCreating test database for alias 'default'...
System check identified no issues (0 silenced).
..........F
======================================================================
FAIL: test_status_code (boards.tests.test_view_edit_post.UnauthorizedPostUpdateViewTests)
----------------------------------------------------------------------
...
AssertionError: 200 != 404
----------------------------------------------------------------------
Ran 11 tests in 1.353s
FAILED (failures=1)
Destroying test database for alias 'default'...Okay! We fixed the @login_required problem. Now we have to deal with the other users editing any posts problem.
The easiest way to solve this problem is by overriding the get_queryset method of the UpdateView. You can see
what the original method looks like here UpdateView#get_queryset.
boards/views.py (view complete file contents)
@method_decorator(login_required, name='dispatch')
class PostUpdateView(UpdateView):
    model = Post
    fields = ('message', )
    template_name = 'edit_post.html'
    pk_url_kwarg = 'post_pk'
    context_object_name = 'post'

    def get_queryset(self):
        queryset = super().get_queryset()
        return queryset.filter(created_by=self.request.user)

    def form_valid(self, form):
        post = form.save(commit=False)
        post.updated_by = self.request.user
        post.updated_at = timezone.now()
        post.save()
        return redirect('topic_posts', pk=post.topic.board.pk, topic_pk=post.topic.pk)
With the line queryset = super().get_queryset() we are reusing the get_queryset method from the parent class, that
is, the UpateView class. Then, we are adding an extra filter to the queryset, which is filtering the post using
the logged in user, available inside the request object.
Test it again:
python manage.py test boards.tests.test_view_edit_postCreating test database for alias 'default'...
System check identified no issues (0 silenced).
...........
----------------------------------------------------------------------
Ran 11 tests in 1.321s
OK
Destroying test database for alias 'default'...All good!
List View
We could refactor some of our existing views to take advantage of the CBV capabilities. Take the home page for example. We are just grabbing all the boards from the database and listing it in the HTML:
boards/views.py
from django.shortcuts import render
from .models import Board

def home(request):
    boards = Board.objects.all()
    return render(request, 'home.html', {'boards': boards})
Here is how we could rewrite it using a GCBV for models listing:
boards/views.py (view complete file contents)
from django.views.generic import ListView
from .models import Board

class BoardListView(ListView):
    model = Board
    context_object_name = 'boards'
    template_name = 'home.html'
Then we have to change the reference in the urls.py module:
myproject/urls.py (view complete file contents)
from django.conf.urls import url
from boards import views

urlpatterns = [
    url(r'^$', views.BoardListView.as_view(), name='home'),
    # ...
]
If we check the homepage we will see that nothing really changed, everything is working as expected. But we have to tweak our tests a little bit because now we are dealing with a class-based view:
boards/tests/test_view_home.py (view complete file contents)
from django.test import TestCase
from django.urls import resolve
from ..views import BoardListView

class HomeTests(TestCase):
    # ...
    def test_home_url_resolves_home_view(self):
        view = resolve('/')
        self.assertEquals(view.func.view_class, BoardListView)
Pagination
We can very easily implement pagination with class-based views. But first I wanted to do a pagination by hand, so that we can explore better the mechanics behind it, so it doesn’t look like magic.
It wouldn’t really make sense to paginate the boards listing view because we do not expect to have many boards. But definitely the topics listing and the posts listing need some pagination.
From now on, we will be working on the board_topics view.
First, let’s add some volume of posts. We could just use the application’s user interface and add several posts, or open the Python shell and write a small script to do it for us:
python manage.py shellfrom django.contrib.auth.models import User
from boards.models import Board, Topic, Post
user = User.objects.first()
board = Board.objects.get(name='Django')
for i in range(100):
subject = 'Topic test #{}'.format(i)
topic = Topic.objects.create(subject=subject, board=board, starter=user)
Post.objects.create(message='Lorem ipsum...', topic=topic, created_by=user)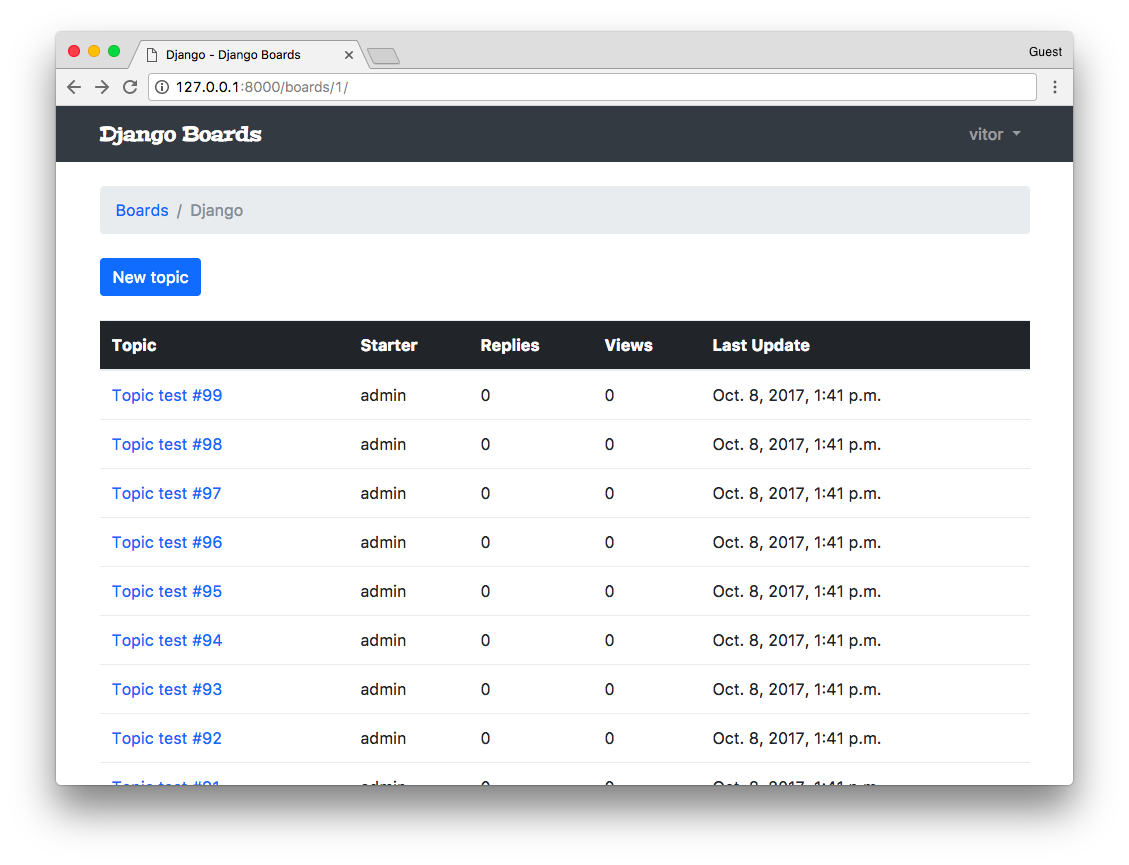
Good, now we have some data to play with.
Before we jump into the code, let’s experiment a little bit more with the Python shell:
python manage.py shellfrom boards.models import Topic
# All the topics in the app
Topic.objects.count()
107
# Just the topics in the Django board
Topic.objects.filter(board__name='Django').count()
104
# Let's save this queryset into a variable to paginate it
queryset = Topic.objects.filter(board__name='Django').order_by('-last_updated')It’s very important always define an ordering to a QuerySet you are going to paginate! Otherwise, it can give you inconsistent results.
Now let’s import the Paginator utility:
from django.core.paginator import Paginator

paginator = Paginator(queryset, 20)
Here we are telling Django to paginate our QuerySet in pages of 20 each. Now let’s explore some of the paginator properties:
# count the number of elements in the paginator
paginator.count
104

# total number of pages
# 104 elements, paginating 20 per page gives you 6 pages
# where the last page will have only 4 elements
paginator.num_pages
6

# range of pages that can be used to iterate and create the
# links to the pages in the template
paginator.page_range
range(1, 7)

# returns a Page instance
paginator.page(2)
<Page 2 of 6>

page = paginator.page(2)

type(page)
django.core.paginator.Page

type(paginator)
django.core.paginator.Paginator
Here we have to pay attention because if we try to get a page that doesn’t exist, the Paginator will throw an exception:
paginator.page(7)
EmptyPage: That page contains no results
Or if we try to pass an arbitrary parameter, which is not a page number:
paginator.page('abc')
PageNotAnInteger: That page number is not an integer
We have to keep those details in mind when designing the user interface.
Now let’s explore the attributes and methods offered by the Page class a little bit:
page = paginator.page(1)

# Check if there is another page after this one
page.has_next()
True

# If there is no previous page, that means this one is the first page
page.has_previous()
False

page.has_other_pages()
True

page.next_page_number()
2

# Take care here, since there is no previous page,
# if we call the method `previous_page_number() we will get an exception:
page.previous_page_number()
EmptyPage: That page number is less than 1
FBV Pagination
Here is how we do it using regular function-based views:
boards/views.py (view complete file contents)
from django.db.models import Count
from django.core.paginator import Paginator, EmptyPage, PageNotAnInteger
from django.shortcuts import get_object_or_404, render
from django.views.generic import ListView
from .models import Board

def board_topics(request, pk):
    board = get_object_or_404(Board, pk=pk)
    queryset = board.topics.order_by('-last_updated').annotate(replies=Count('posts') - 1)
    page = request.GET.get('page', 1)

    paginator = Paginator(queryset, 20)

    try:
        topics = paginator.page(page)
    except PageNotAnInteger:
        # fallback to the first page
        topics = paginator.page(1)
    except EmptyPage:
        # probably the user tried to add a page number
        # in the url, so we fallback to the last page
        topics = paginator.page(paginator.num_pages)

    return render(request, 'topics.html', {'board': board, 'topics': topics})
Now the trick part is to render the pages correctly using the Bootstrap 4 pagination component. But take the time
to read the code and see if it makes sense for you. We are using here all the methods we played with before. And here
in that context, topics is no longer a QuerySet but a paginator.Page instance.
Right after the topics HTML table, we can render the pagination component:
templates/topics.html (view complete file contents)
{% if topics.has_other_pages %}
  <nav aria-label="Topics pagination" class="mb-4">
    <ul class="pagination">
      {% if topics.has_previous %}
        <li class="page-item">
          <a class="page-link" href="?page={{ topics.previous_page_number }}">Previous</a>
        </li>
      {% else %}
        <li class="page-item disabled">
          <span class="page-link">Previous</span>
        </li>
      {% endif %}

      {% for page_num in topics.paginator.page_range %}
        {% if topics.number == page_num %}
          <li class="page-item active">
            <span class="page-link">
              {{ page_num }}
              <span class="sr-only">(current)</span>
            </span>
          </li>
        {% else %}
          <li class="page-item">
            <a class="page-link" href="?page={{ page_num }}">{{ page_num }}</a>
          </li>
        {% endif %}
      {% endfor %}

      {% if topics.has_next %}
        <li class="page-item">
          <a class="page-link" href="?page={{ topics.next_page_number }}">Next</a>
        </li>
      {% else %}
        <li class="page-item disabled">
          <span class="page-link">Next</span>
        </li>
      {% endif %}
    </ul>
  </nav>
{% endif %}
GCBV Pagination
Below, the same implementation but this time using the ListView.
boards/views.py (view complete file contents)
class TopicListView(ListView):
    model = Topic
    context_object_name = 'topics'
    template_name = 'topics.html'
    paginate_by = 20

    def get_context_data(self, **kwargs):
        kwargs['board'] = self.board
        return super().get_context_data(**kwargs)

    def get_queryset(self):
        self.board = get_object_or_404(Board, pk=self.kwargs.get('pk'))
        queryset = self.board.topics.order_by('-last_updated').annotate(replies=Count('posts') - 1)
        return queryset
While using pagination with class-based views, the way we interact with the paginator in the template is a little bit different. It will make available the following variables in the template: paginator, page_obj, is_paginated, object_list, and also a variable with the name we defined in the context_object_name. In our case this extra variable will be named topics, and it will be equivalent to object_list.
Now about the whole get_context_data thing, well, that’s how we add stuff to the request context when extending a GCBV.
But the main point here is the paginate_by attribute. In some cases, just by adding it will be enough.
Remember to update the urls.py:
myproject/urls.py (view complete file contents)
from django.conf.urls import url
from boards import views

urlpatterns = [
    # ...
    url(r'^boards/(?P<pk>\d+)/$', views.TopicListView.as_view(), name='board_topics'),
]
Now let’s fix the template:
templates/topics.html (view complete file contents)
{% block content %}
  <div class="mb-4">
    <a href="{% url 'new_topic' board.pk %}" class="btn btn-primary">New topic</a>
  </div>

  <table class="table mb-4">
    <!-- table content suppressed -->
  </table>

  {% if is_paginated %}
    <nav aria-label="Topics pagination" class="mb-4">
      <ul class="pagination">
        {% if page_obj.has_previous %}
          <li class="page-item">
            <a class="page-link" href="?page={{ page_obj.previous_page_number }}">Previous</a>
          </li>
        {% else %}
          <li class="page-item disabled">
            <span class="page-link">Previous</span>
          </li>
        {% endif %}

        {% for page_num in paginator.page_range %}
          {% if page_obj.number == page_num %}
            <li class="page-item active">
              <span class="page-link">
                {{ page_num }}
                <span class="sr-only">(current)</span>
              </span>
            </li>
          {% else %}
            <li class="page-item">
              <a class="page-link" href="?page={{ page_num }}">{{ page_num }}</a>
            </li>
          {% endif %}
        {% endfor %}

        {% if page_obj.has_next %}
          <li class="page-item">
            <a class="page-link" href="?page={{ page_obj.next_page_number }}">Next</a>
          </li>
        {% else %}
          <li class="page-item disabled">
            <span class="page-link">Next</span>
          </li>
        {% endif %}
      </ul>
    </nav>
  {% endif %}

{% endblock %}
Now take the time to run the tests and fix if needed.
boards/tests/test_view_board_topics.py
from django.test import TestCase
from django.urls import resolve
from ..views import TopicListView

class BoardTopicsTests(TestCase):
    # ...
    def test_board_topics_url_resolves_board_topics_view(self):
        view = resolve('/boards/1/')
        self.assertEquals(view.func.view_class, TopicListView)
Reusable Pagination Template
Just like we did with the form.html partial template, we can also create something similar for the pagination HTML snippet.
Let’s paginate the topic posts page, and then find a way to reuse the pagination component.
boards/views.py (view complete file contents)
class PostListView(ListView):
    model = Post
    context_object_name = 'posts'
    template_name = 'topic_posts.html'
    paginate_by = 2

    def get_context_data(self, **kwargs):
        self.topic.views += 1
        self.topic.save()
        kwargs['topic'] = self.topic
        return super().get_context_data(**kwargs)

    def get_queryset(self):
        self.topic = get_object_or_404(Topic, board__pk=self.kwargs.get('pk'), pk=self.kwargs.get('topic_pk'))
        queryset = self.topic.posts.order_by('created_at')
        return queryset
Now update the urls.py (view complete file contents)
from django.conf.urls import url
from boards import views

urlpatterns = [
    # ...
    url(r'^boards/(?P<pk>\d+)/topics/(?P<topic_pk>\d+)/$', views.PostListView.as_view(), name='topic_posts'),
]
Now we grab that pagination HTML snippet from the topics.html template, and create a new file named pagination.html inside the templates/includes folder, alongside with the forms.html file:
myproject/
 |-- myproject/
 |    |-- accounts/
 |    |-- boards/
 |    |-- myproject/
 |    |-- static/
 |    |-- templates/
 |    |    |-- includes/
 |    |    |    |-- form.html
 |    |    |    +-- pagination.html  <-- here!
 |    |    +-- ...
 |    |-- db.sqlite3
 |    +-- manage.py
 +-- venv/
templates/includes/pagination.html
{% if is_paginated %}
  <nav aria-label="Topics pagination" class="mb-4">
    <ul class="pagination">
      {% if page_obj.has_previous %}
        <li class="page-item">
          <a class="page-link" href="?page={{ page_obj.previous_page_number }}">Previous</a>
        </li>
      {% else %}
        <li class="page-item disabled">
          <span class="page-link">Previous</span>
        </li>
      {% endif %}

      {% for page_num in paginator.page_range %}
        {% if page_obj.number == page_num %}
          <li class="page-item active">
            <span class="page-link">
              {{ page_num }}
              <span class="sr-only">(current)</span>
            </span>
          </li>
        {% else %}
          <li class="page-item">
            <a class="page-link" href="?page={{ page_num }}">{{ page_num }}</a>
          </li>
        {% endif %}
      {% endfor %}

      {% if page_obj.has_next %}
        <li class="page-item">
          <a class="page-link" href="?page={{ page_obj.next_page_number }}">Next</a>
        </li>
      {% else %}
        <li class="page-item disabled">
          <span class="page-link">Next</span>
        </li>
      {% endif %}
    </ul>
  </nav>
{% endif %}
Now in the topic_posts.html template we use it:
templates/topic_posts.html (view complete file contents)
{% block content %}

  <div class="mb-4">
    <a href="{% url 'reply_topic' topic.board.pk topic.pk %}" class="btn btn-primary" role="button">Reply</a>
  </div>

  {% for post in posts %}
    <div class="card {% if forloop.last %}mb-4{% else %}mb-2{% endif %} {% if forloop.first %}border-dark{% endif %}">
      {% if forloop.first %}
        <div class="card-header text-white bg-dark py-2 px-3">{{ topic.subject }}</div>
      {% endif %}
      <div class="card-body p-3">
        <div class="row">
          <div class="col-2">
            <img src="{% static 'img/avatar.svg' %}" alt="{{ post.created_by.username }}" class="w-100">
            <small>Posts: {{ post.created_by.posts.count }}</small>
          </div>
          <div class="col-10">
            <div class="row mb-3">
              <div class="col-6">
                <strong class="text-muted">{{ post.created_by.username }}</strong>
              </div>
              <div class="col-6 text-right">
                <small class="text-muted">{{ post.created_at }}</small>
              </div>
            </div>
            {{ post.message }}
            {% if post.created_by == user %}
              <div class="mt-3">
                <a href="{% url 'edit_post' post.topic.board.pk post.topic.pk post.pk %}"
                   class="btn btn-primary btn-sm"
                   role="button">Edit</a>
              </div>
            {% endif %}
          </div>
        </div>
      </div>
    </div>
  {% endfor %}

  {% include 'includes/pagination.html' %}

{% endblock %}
Don’t forget to change the main forloop to {% for post in posts %}.
We can also update the previous template, the topics.html template to use the pagination partial template too:
templates/topics.html (view complete file contents)
{% block content %}
<div class="mb-4">
<a href="{% url 'new_topic' board.pk %}" class="btn btn-primary">New topic</a>
</div>
<table class="table mb-4">
<!-- table code suppressed -->
</table>
{% include 'includes/pagination.html' %}
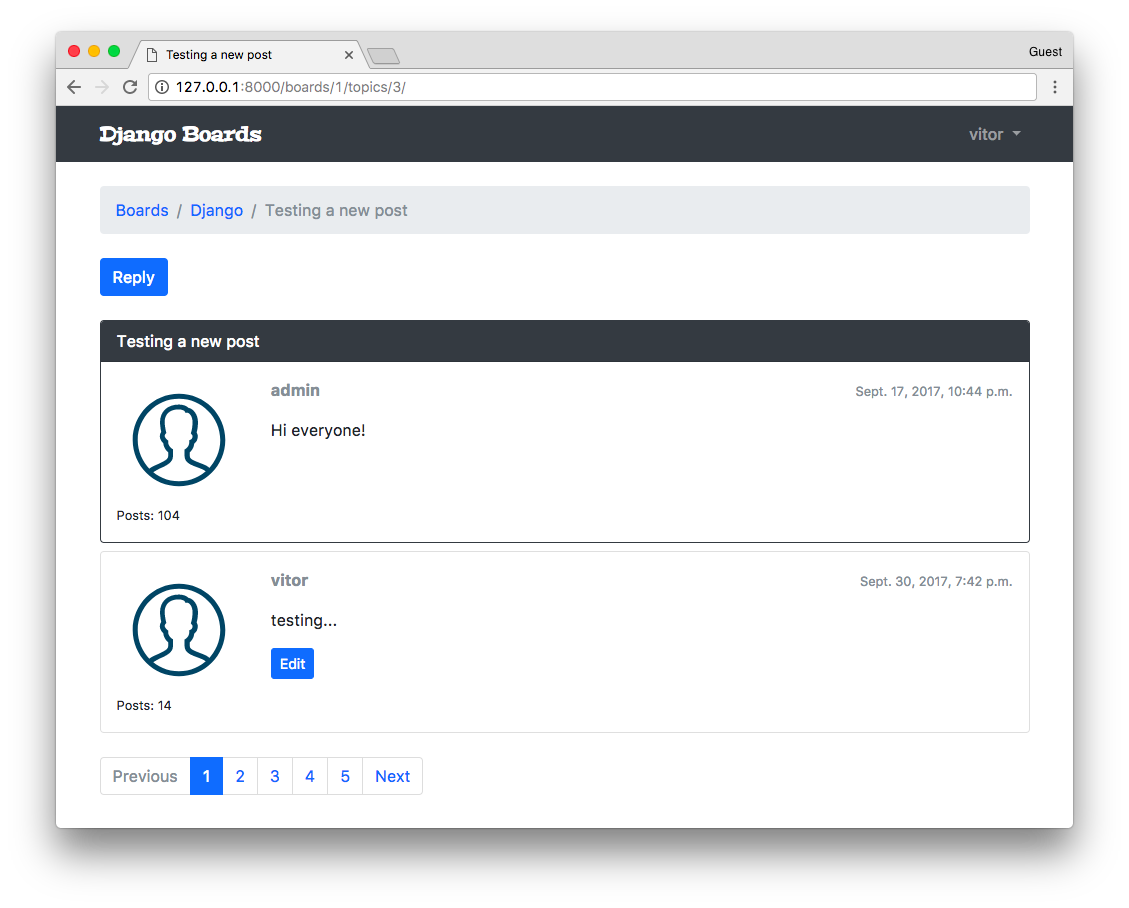
{% endblock %}Just for testing purpose, you could just add a few posts (or create some using the Python Shell) and change the paginate_by to a low number, say 2, and see how it’s looking like:
Update the test cases:
boards/tests/test_view_topic_posts.py
from django.test import TestCase
from django.urls import resolve
from ..views import PostListView

class TopicPostsTests(TestCase):
    # ...
    def test_view_function(self):
        view = resolve('/boards/1/topics/1/')
        self.assertEquals(view.func.view_class, PostListView)
My Account View
Okay, so, this is going to be our last view. After that, we will be working on improving the existing features.
accounts/views.py (view complete file contents)
from django.contrib.auth.decorators import login_required
from django.contrib.auth.models import User
from django.urls import reverse_lazy
from django.utils.decorators import method_decorator
from django.views.generic import UpdateView

@method_decorator(login_required, name='dispatch')
class UserUpdateView(UpdateView):
    model = User
    fields = ('first_name', 'last_name', 'email', )
    template_name = 'my_account.html'
    success_url = reverse_lazy('my_account')

    def get_object(self):
        return self.request.user
myproject/urls.py (view complete file contents)
from django.conf.urls import url
from accounts import views as accounts_views

urlpatterns = [
    # ...
    url(r'^settings/account/$', accounts_views.UserUpdateView.as_view(), name='my_account'),
]
templates/my_account.html
{% extends 'base.html' %}

{% block title %}My account{% endblock %}

{% block breadcrumb %}
  <li class="breadcrumb-item active">My account</li>
{% endblock %}

{% block content %}
  <div class="row">
    <div class="col-lg-6 col-md-8 col-sm-10">
      <form method="post" novalidate>
        {% csrf_token %}
        {% include 'includes/form.html' %}
        <button type="submit" class="btn btn-success">Save changes</button>
      </form>
    </div>
  </div>
{% endblock %}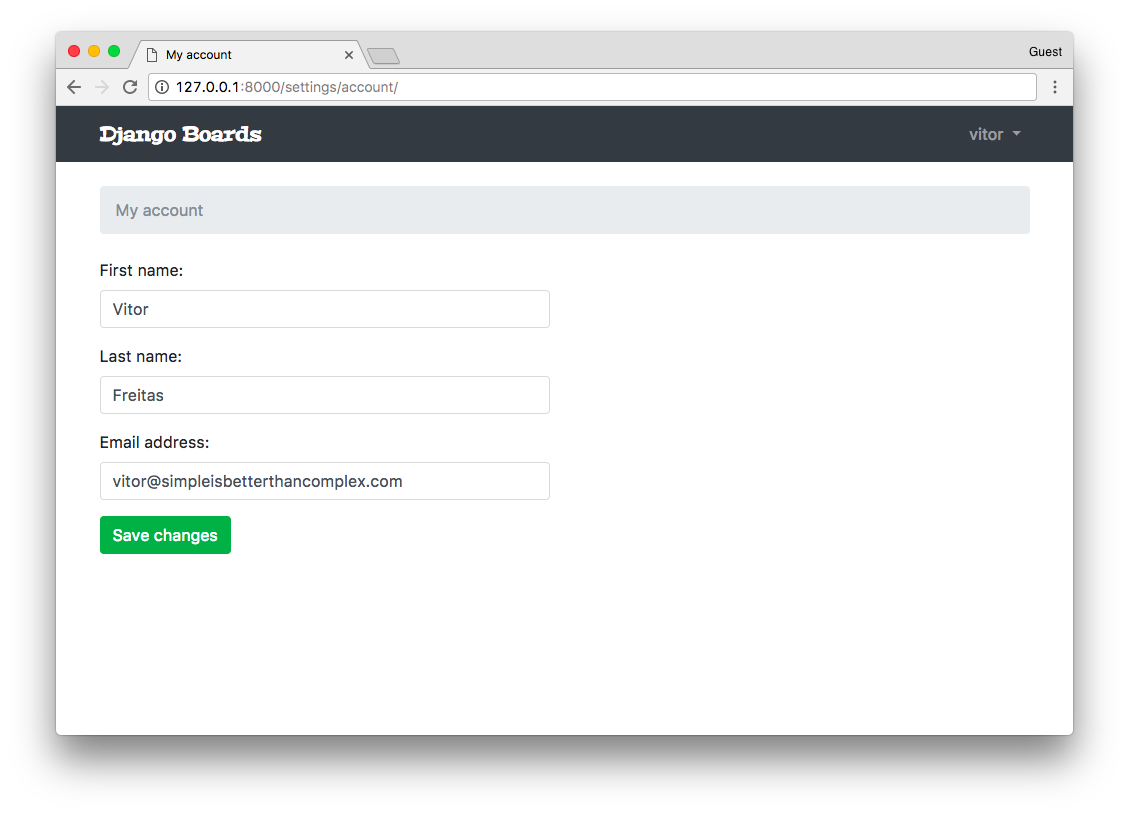
Adding Markdown
Let’s improve the user experience by adding Markdown to our text areas. You will see it’s very easy and simple.
First, let’s install a library called Python-Markdown:
pip install markdownWe can add a new method to the Post model:
boards/models.py (view complete file contents)
from django.db import models
from django.utils.html import mark_safe
from markdown import markdown

class Post(models.Model):
    # ...

    def get_message_as_markdown(self):
        return mark_safe(markdown(self.message, safe_mode='escape'))
Here we are dealing with user input, so we must take care. When using the markdown function, we are instructing it
to escape the special characters first and then parse the markdown tags. After that, we mark the output string as safe
to be used in the template.
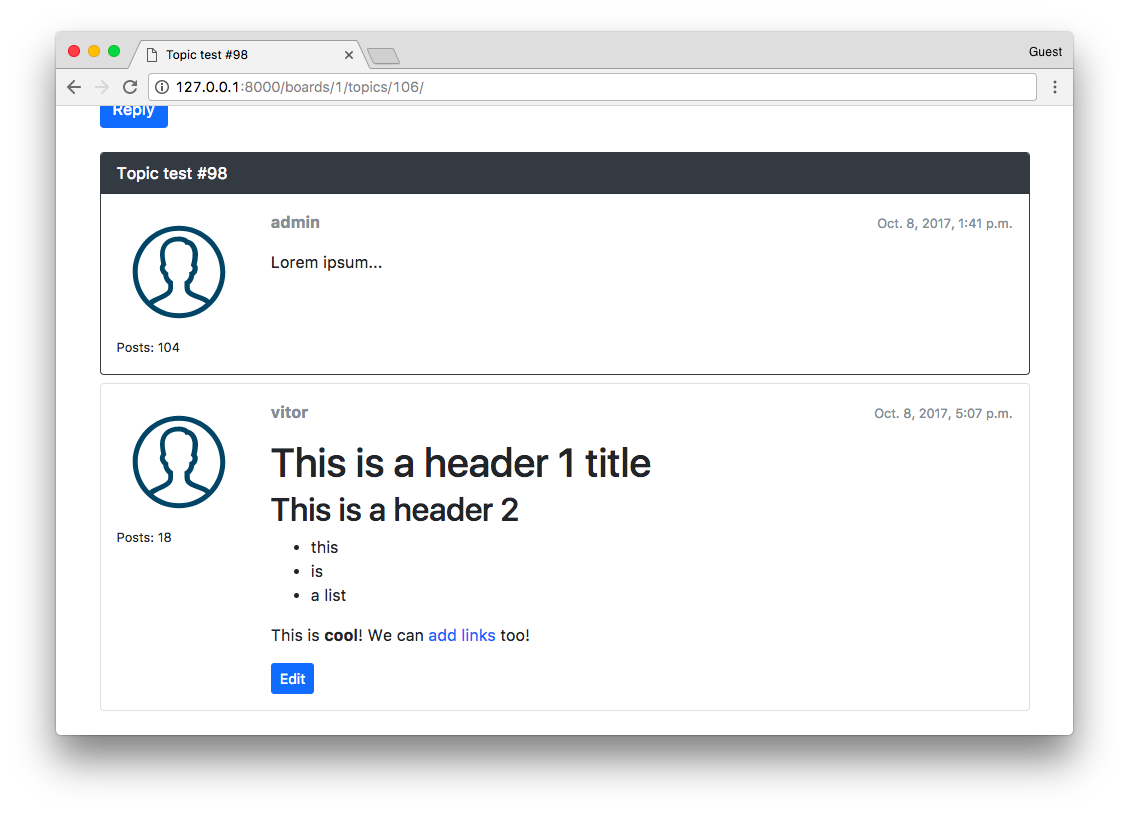
Now in the templates topic_posts.html and reply_topic.html just change from:
{{ post.message }}To:
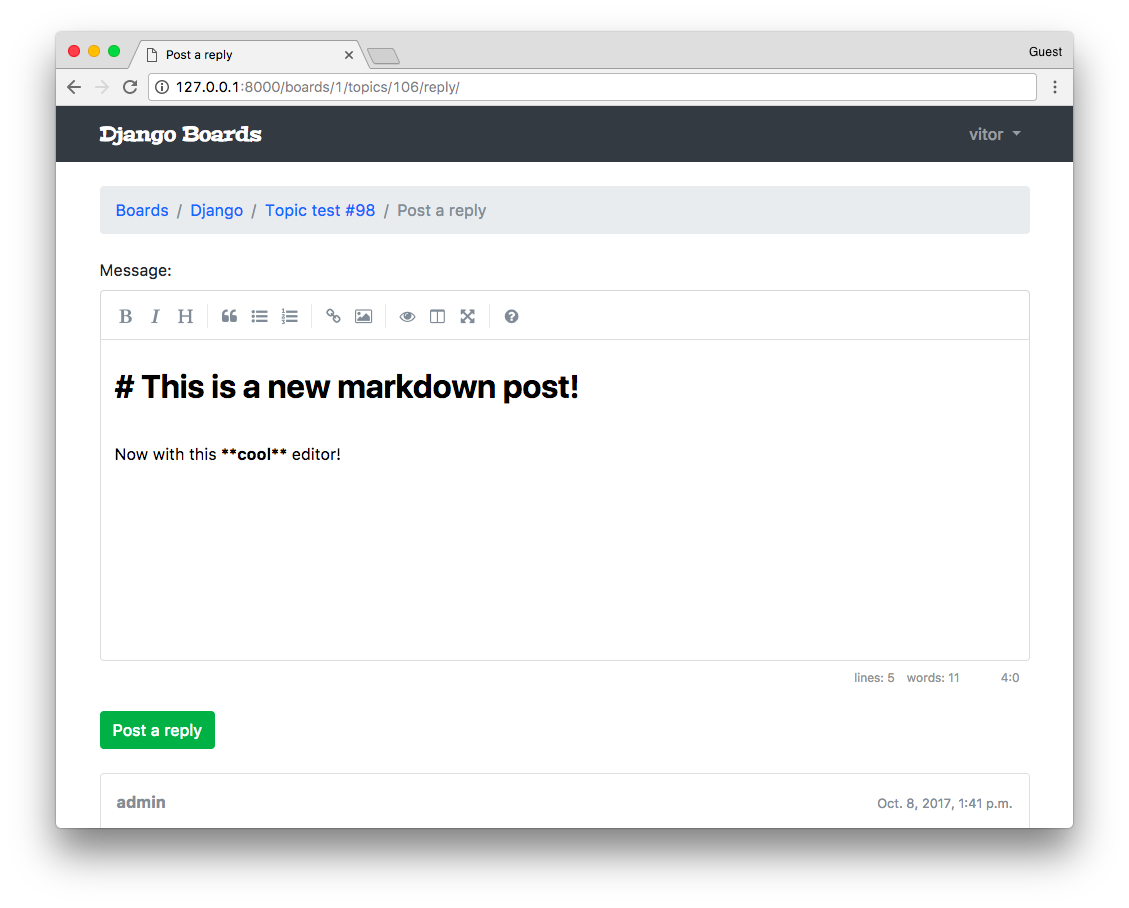
{{ post.get_message_as_markdown }}From now on the users can already use markdown in the posts:
Markdown Editor
We can also add a very cool Markdown editor called SimpleMD.
Either download the JavaScript library or use their CDN:
<link rel="stylesheet" href="https://cdn.jsdelivr.net/simplemde/latest/simplemde.min.css">
<script src="https://cdn.jsdelivr.net/simplemde/latest/simplemde.min.js"></script>
Now edit the base.html to make space for extra JavaScripts:
templates/base.html (view complete file contents)
    <script src="{% static 'js/jquery-3.2.1.min.js' %}"></script>
    <script src="{% static 'js/popper.min.js' %}"></script>
    <script src="{% static 'js/bootstrap.min.js' %}"></script>
    {% block javascript %}{% endblock %}  <!-- Add this empty block here! -->
First edit the reply_topic.html template:
templates/reply_topic.html (view complete file contents)
{% extends 'base.html' %}

{% load static %}

{% block title %}Post a reply{% endblock %}

{% block stylesheet %}
  <link rel="stylesheet" href="{% static 'css/simplemde.min.css' %}">
{% endblock %}

{% block javascript %}
  <script src="{% static 'js/simplemde.min.js' %}"></script>
  <script>
    var simplemde = new SimpleMDE();
  </script>
{% endblock %}
By default, this plugin will transform the first text area it finds into a markdown editor. So just that code should be enough:
Now do the same thing with the edit_post.html template:
templates/edit_post.html (view complete file contents)
{% extends 'base.html' %}

{% load static %}

{% block title %}Edit post{% endblock %}

{% block stylesheet %}
  <link rel="stylesheet" href="{% static 'css/simplemde.min.css' %}">
{% endblock %}

{% block javascript %}
  <script src="{% static 'js/simplemde.min.js' %}"></script>
  <script>
    var simplemde = new SimpleMDE();
  </script>
{% endblock %}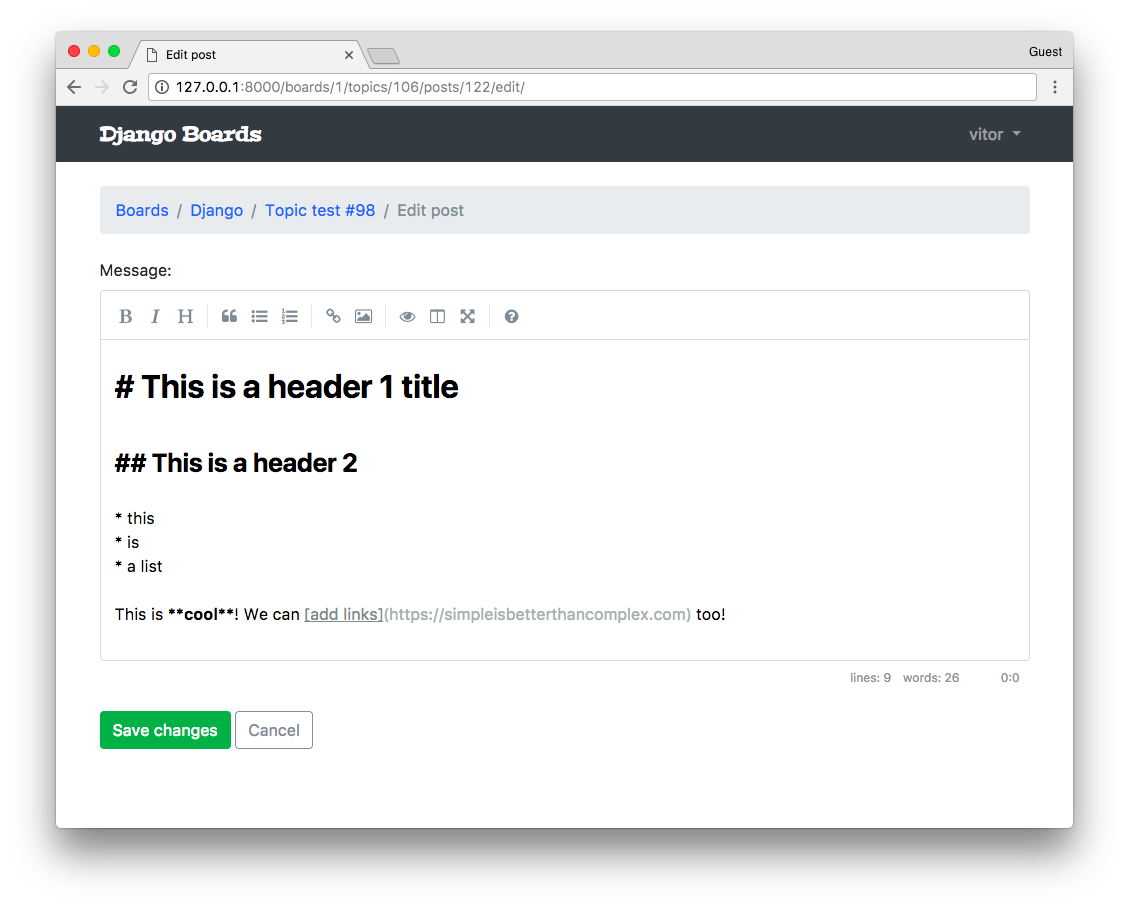
Humanize
I just thought it would be a nice touch to add the built-in humanize package. It’s a set of utility functions to add a “human touch” to data.
For example, we can use it to display date and time fields more naturally. Instead of showing the whole date, we can simply show: “2 minutes ago”.
Let’s do it. First, add the django.contrib.humanize to the INSTALLED_APPS.
myproject/settings.py
INSTALLED_APPS = [
    'django.contrib.admin',
    'django.contrib.auth',
    'django.contrib.contenttypes',
    'django.contrib.sessions',
    'django.contrib.messages',
    'django.contrib.staticfiles',
    'django.contrib.humanize',  # <- here

    'widget_tweaks',

    'accounts',
    'boards',
]
Now we can use it in the templates. First, let’s edit the topics.html template:
templates/topics.html (view complete file contents)
{% extends 'base.html' %}

{% load humanize %}

{% block content %}
  <!-- code suppressed -->

  <td>{{ topic.last_updated|naturaltime }}</td>

  <!-- code suppressed -->
{% endblock %}
All we have to do is to load the template tags using {% load humanize %} and then apply the
template filter: {{ topic.last_updated|naturaltime }}
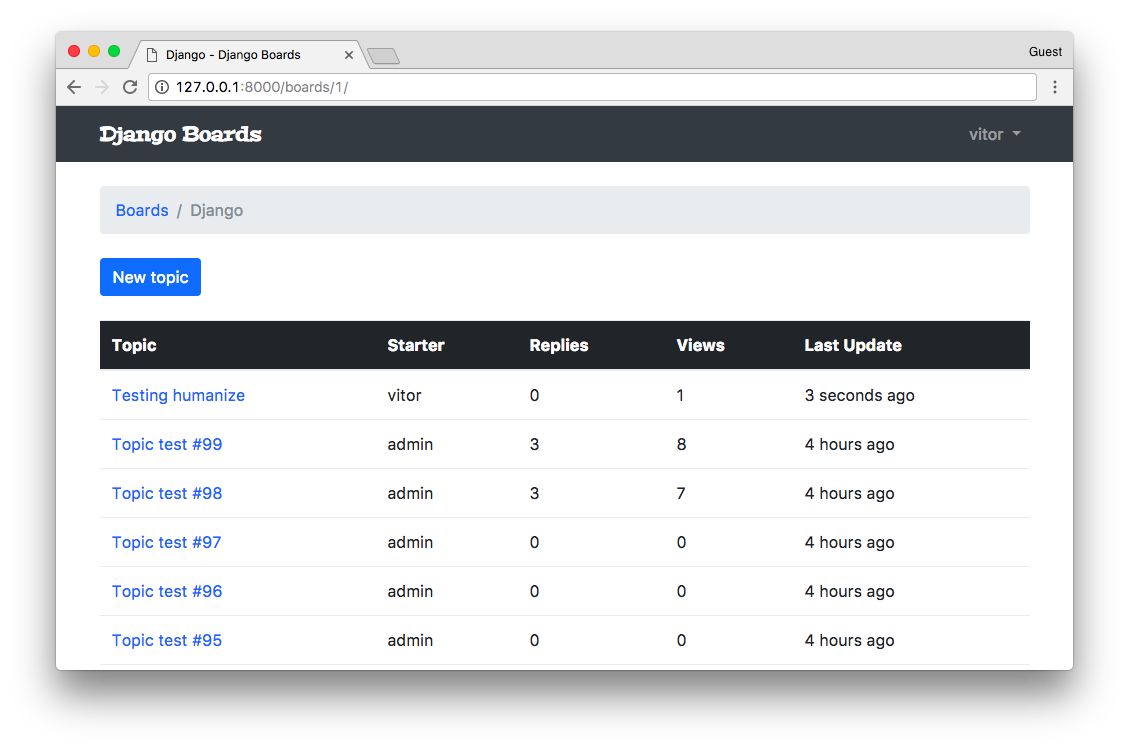
You may add it to other places you like.
Gravatar
A very easy way to add user profile pictures is by using Gravatar.
Inside the boards/templatetags folder, create a new file named gravatar.py:
boards/templatetags/gravatar.py
import hashlib
from urllib.parse import urlencode

from django import template
from django.conf import settings

register = template.Library()


@register.filter
def gravatar(user):
    email = user.email.lower().encode('utf-8')
    default = 'mm'
    size = 256
    url = 'https://www.gravatar.com/avatar/{md5}?{params}'.format(
        md5=hashlib.md5(email).hexdigest(),
        params=urlencode({'d': default, 's': str(size)})
    )
    return url
Basically I’m using the code snippet they provide. I just adapted it to work with Python 3.
Great, now we can load it in our template, just like we did with the Humanize template filter:
templates/topic_posts.html (view complete file contents)
{% extends 'base.html' %}

{% load gravatar %}

{% block content %}
  <!-- code suppressed -->

  <img src="{{ post.created_by|gravatar }}" alt="{{ post.created_by.username }}" class="w-100 rounded">

  <!-- code suppressed -->
{% endblock %}![]()
Final Adjustments
Maybe you have already noticed, but there’s a small issue when someone replies to a post. It’s not updating the
last_update field, so the ordering of the topics is broken right now.
Let’s fix it:
boards/views.py
@login_required
def reply_topic(request, pk, topic_pk):
    topic = get_object_or_404(Topic, board__pk=pk, pk=topic_pk)
    if request.method == 'POST':
        form = PostForm(request.POST)
        if form.is_valid():
            post = form.save(commit=False)
            post.topic = topic
            post.created_by = request.user
            post.save()

            topic.last_updated = timezone.now()  # <- here
            topic.save()                         # <- and here

            return redirect('topic_posts', pk=pk, topic_pk=topic_pk)
    else:
        form = PostForm()
    return render(request, 'reply_topic.html', {'topic': topic, 'form': form})
Next thing we want to do is try to control the view counting system a little bit more. We don’t want to the same user refreshing the page counting as multiple views. For this we can use sessions:
boards/views.py
class PostListView(ListView):
    model = Post
    context_object_name = 'posts'
    template_name = 'topic_posts.html'
    paginate_by = 20

    def get_context_data(self, **kwargs):

        session_key = 'viewed_topic_{}'.format(self.topic.pk)  # <-- here
        if not self.request.session.get(session_key, False):
            self.topic.views += 1
            self.topic.save()
            self.request.session[session_key] = True           # <-- until here

        kwargs['topic'] = self.topic
        return super().get_context_data(**kwargs)

    def get_queryset(self):
        self.topic = get_object_or_404(Topic, board__pk=self.kwargs.get('pk'), pk=self.kwargs.get('topic_pk'))
        queryset = self.topic.posts.order_by('created_at')
        return queryset
Now we could provide a better navigation in the topics listing. Currently the only option is for the user to click in the topic title and go to the first page. We could workout something like this:
boards/models.py
import math
from django.db import models

class Topic(models.Model):
    # ...

    def __str__(self):
        return self.subject

    def get_page_count(self):
        count = self.posts.count()
        pages = count / 20
        return math.ceil(pages)

    def has_many_pages(self, count=None):
        if count is None:
            count = self.get_page_count()
        return count > 6

    def get_page_range(self):
        count = self.get_page_count()
        if self.has_many_pages(count):
            return range(1, 5)
        return range(1, count + 1)
Then in the topics.html template we could implement something like this:
templates/topics.html
  <table class="table table-striped mb-4">
    <thead class="thead-inverse">
      <tr>
        <th>Topic</th>
        <th>Starter</th>
        <th>Replies</th>
        <th>Views</th>
        <th>Last Update</th>
      </tr>
    </thead>
    <tbody>
      {% for topic in topics %}
        {% url 'topic_posts' board.pk topic.pk as topic_url %}
        <tr>
          <td>
            <p class="mb-0">
              <a href="{{ topic_url }}">{{ topic.subject }}</a>
            </p>
            <small class="text-muted">
              Pages:
              {% for i in topic.get_page_range %}
                <a href="{{ topic_url }}?page={{ i }}">{{ i }}</a>
              {% endfor %}
              {% if topic.has_many_pages %}
              ... <a href="{{ topic_url }}?page={{ topic.get_page_count }}">Last Page</a>
              {% endif %}
            </small>
          </td>
          <td class="align-middle">{{ topic.starter.username }}</td>
          <td class="align-middle">{{ topic.replies }}</td>
          <td class="align-middle">{{ topic.views }}</td>
          <td class="align-middle">{{ topic.last_updated|naturaltime }}</td>
        </tr>
      {% endfor %}
    </tbody>
  </table>
Like a tiny pagination for each topic. Note that I also took the time to add the table-striped class for a better
styling of the table.

In the reply page, we are currently listing all topic replies. We could limit it to just the last ten posts.
boards/models.py
class Topic(models.Model):
    # ...

    def get_last_ten_posts(self):
        return self.posts.order_by('-created_at')[:10]
templates/reply_topic.html
{% block content %}

  <form method="post" class="mb-4" novalidate>
    {% csrf_token %}
    {% include 'includes/form.html' %}
    <button type="submit" class="btn btn-success">Post a reply</button>
  </form>

  {% for post in topic.get_last_ten_posts %}  <!-- here! -->
    <div class="card mb-2">
      <!-- code suppressed -->
    </div>
  {% endfor %}

{% endblock %}
Another thing is that when the user replies to a post, we are redirecting the user to the first page again. We could improve it by sending the user to the last page.
We can add an id to the post card:
templates/topic_posts.html
{% block content %}

  <div class="mb-4">
    <a href="{% url 'reply_topic' topic.board.pk topic.pk %}" class="btn btn-primary" role="button">Reply</a>
  </div>

  {% for post in posts %}
    <div id="{{ post.pk }}" class="card {% if forloop.last %}mb-4{% else %}mb-2{% endif %} {% if forloop.first %}border-dark{% endif %}">
      <!-- code suppressed -->
    </div>
  {% endfor %}

  {% include 'includes/pagination.html' %}

{% endblock %}
The important bit here is the <div id="{{ post.pk }}" ...>.
Then we can play with it like this in the views:
boards/views.py
@login_required
def reply_topic(request, pk, topic_pk):
    topic = get_object_or_404(Topic, board__pk=pk, pk=topic_pk)
    if request.method == 'POST':
        form = PostForm(request.POST)
        if form.is_valid():
            post = form.save(commit=False)
            post.topic = topic
            post.created_by = request.user
            post.save()

            topic.last_updated = timezone.now()
            topic.save()

            topic_url = reverse('topic_posts', kwargs={'pk': pk, 'topic_pk': topic_pk})
            topic_post_url = '{url}?page={page}#{id}'.format(
                url=topic_url,
                id=post.pk,
                page=topic.get_page_count()
            )

            return redirect(topic_post_url)
    else:
        form = PostForm()
    return render(request, 'reply_topic.html', {'topic': topic, 'form': form})
In the topic_post_url we are building a URL with the last page and adding an anchor to the element with id equals to the post ID.
With this, it will required us to update the following test case:
boards/tests/test_view_reply_topic.py
class SuccessfulReplyTopicTests(ReplyTopicTestCase):
    # ...

    def test_redirection(self):
        '''
        A valid form submission should redirect the user
        '''
        url = reverse('topic_posts', kwargs={'pk': self.board.pk, 'topic_pk': self.topic.pk})
        topic_posts_url = '{url}?page=1#2'.format(url=url)
        self.assertRedirects(self.response, topic_posts_url)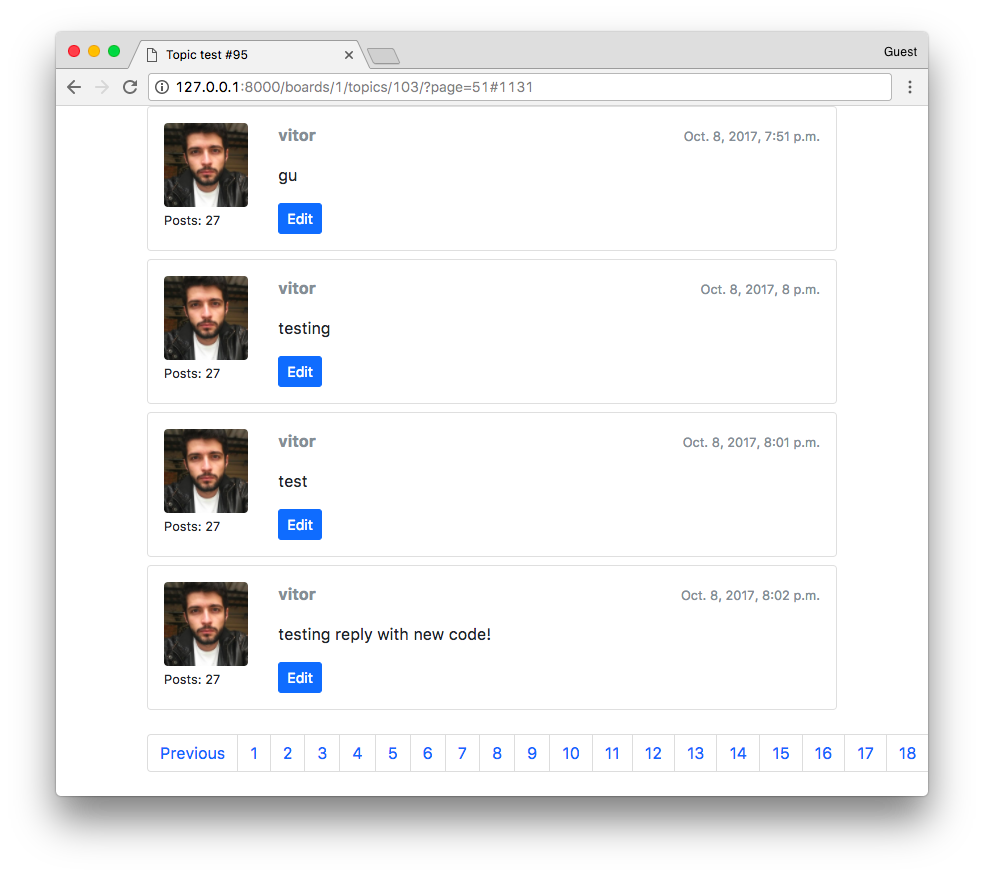
Next issue, as you can see in the previous screenshot, is to solve the problem with the pagination when the number of pages is too high.
The easiest way is to tweak the pagination.html template:
templates/includes/pagination.html
{% if is_paginated %}
  <nav aria-label="Topics pagination" class="mb-4">
    <ul class="pagination">
      {% if page_obj.number > 1 %}
        <li class="page-item">
          <a class="page-link" href="?page=1">First</a>
        </li>
      {% else %}
        <li class="page-item disabled">
          <span class="page-link">First</span>
        </li>
      {% endif %}

      {% if page_obj.has_previous %}
        <li class="page-item">
          <a class="page-link" href="?page={{ page_obj.previous_page_number }}">Previous</a>
        </li>
      {% else %}
        <li class="page-item disabled">
          <span class="page-link">Previous</span>
        </li>
      {% endif %}

      {% for page_num in paginator.page_range %}
        {% if page_obj.number == page_num %}
          <li class="page-item active">
            <span class="page-link">
              {{ page_num }}
              <span class="sr-only">(current)</span>
            </span>
          </li>
        {% elif page_num > page_obj.number|add:'-3' and page_num < page_obj.number|add:'3' %}
          <li class="page-item">
            <a class="page-link" href="?page={{ page_num }}">{{ page_num }}</a>
          </li>
        {% endif %}
      {% endfor %}

      {% if page_obj.has_next %}
        <li class="page-item">
          <a class="page-link" href="?page={{ page_obj.next_page_number }}">Next</a>
        </li>
      {% else %}
        <li class="page-item disabled">
          <span class="page-link">Next</span>
        </li>
      {% endif %}

      {% if page_obj.number != paginator.num_pages %}
        <li class="page-item">
          <a class="page-link" href="?page={{ paginator.num_pages }}">Last</a>
        </li>
      {% else %}
        <li class="page-item disabled">
          <span class="page-link">Last</span>
        </li>
      {% endif %}
    </ul>
  </nav>
{% endif %}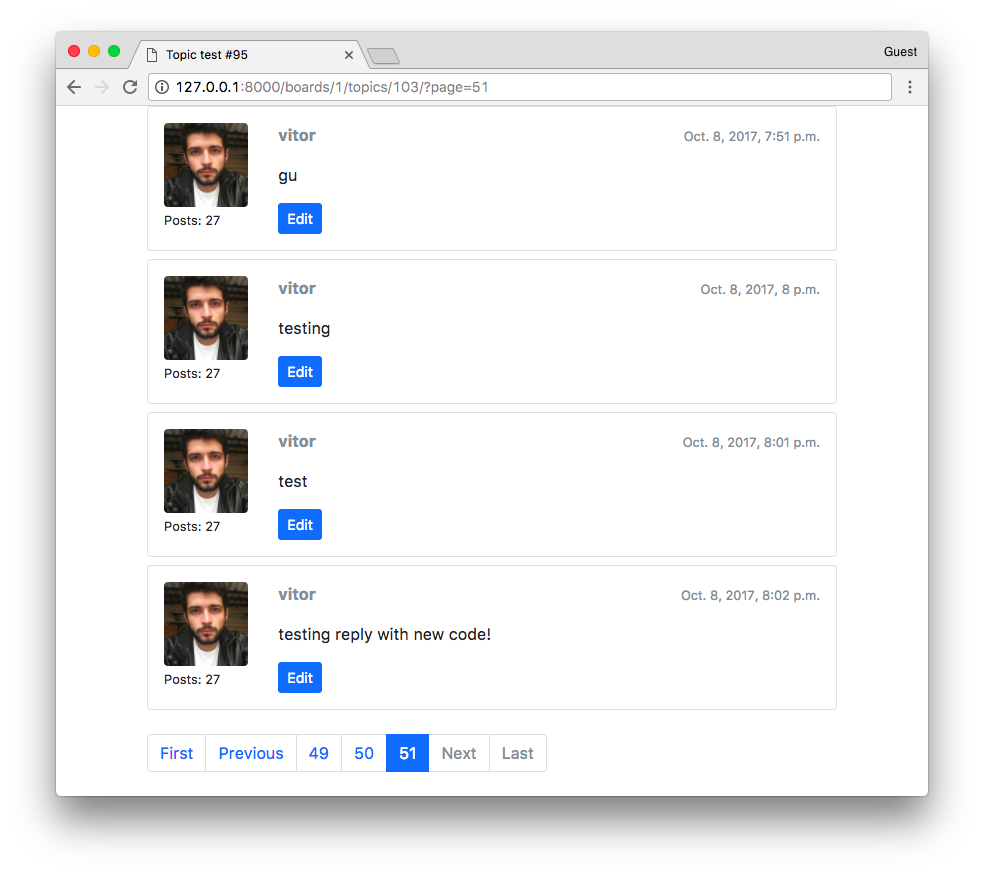
Conclusions
With this tutorial, we finalized the implementation of our Django board application. I will probably release a follow-up implementation tutorial to improve the code. There are many things we can explore together. For example, database optimizations, improve the user interface, play with file uploads, create a moderation system, and so on.
The next tutorial will be focused on deployment. It’s going to be a complete guide on how to put your code in production taking care of all the important details.
I hope you enjoyed the sixth part of this tutorial series! The last part is coming out next week, on Oct 16, 2017. If you would like to get notified when the last part is out, you can subscribe to our mailing list.
The source code of the project is available on GitHub. The current state of the project can be found under the release tag v0.6-lw. The link below will take you to the right place:
https://github.com/sibtc/django-beginners-guide/tree/v0.6-lw


 How to Extend Django User Model
 How to Setup a SSL Certificate on Nginx for a Django Application
 How to Deploy a Django Application to Digital Ocean