


Introduction
Welcome to the last part of our tutorial series! In this tutorial, we are going to deploy our Django application to a production server. We are also going to configure an Email service and HTTPS certificates for our servers.
At first, I thought about given an example using a Virtual Private Server (VPS), which is more generic and then using one Platform as a Service such as Heroku. But it was too much detail, so I ended up creating this tutorial focused on VPSs.
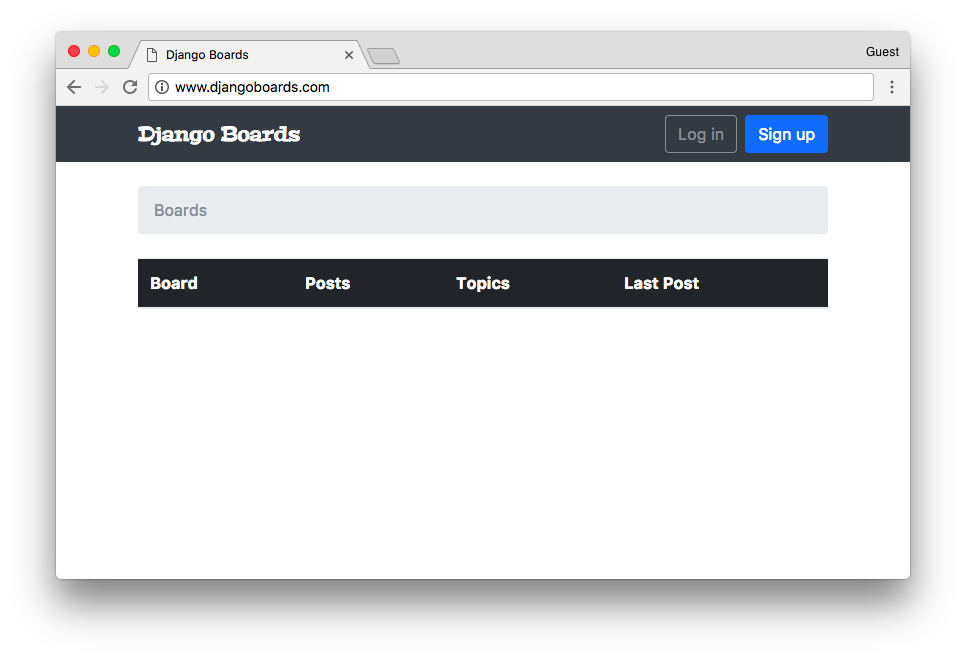
Our project is live! If you want to check online before you go through the text, this is the application we are going to deploy: www.djangoboards.com.
Version Control
Version control is an extremely important topic in software development. Especially when working with teams and maintaining production code at the same time, several features are being developed in parallel. No matter if it’s a one developer project or a multiple developers project, every project should use version control.
There are several options of version control systems out there. Perhaps because of the popularity of GitHub, Git become the de facto standard in version control. So if you are not familiar version control, Git is a good place to start. There are many tutorials, courses, and resources in general so that it’s easy to find help.
GitHub and Code School have a great interactive tutorial about Git, which I used years ago when I started moving from SVN to Git. It’s a very good introduction.
This is such an important topic that I probably should have brought it up since the first tutorial. But the truth is I wanted the focus of this tutorial series to be on Django. If all this is new for you, don’t worry. It’s important to take one step at a time. Your first project won’t be perfect. It’s important to keep learning and evolving your skills slowly but with constancy.
A very good thing about Git is that it’s much more than just a version control system. There’s a rich ecosystem of tools and services built around it. Some good examples are continuous integration, deployment, code review, code quality, and project management.
Using Git to support the deployment process of Django projects works very well. It’s a convenient way to pull the latest version from the source code repository or to rollback to a specific version in case of a problem. There are many services that integrate with Git so to automate test execution and deployment for example.
If you don’t have Git installed on your local machine, grab the installed from https://git-scm.com/downloads.
Basic Setup
First thing, set your identity:
git config --global user.name "Vitor Freitas"
git config --global user.email vitor@simpleisbetterthancomplex.com
In the project root (the same directory as manage.py is), initialize a git repository:
git initInitialized empty Git repository in /Users/vitorfs/Development/myproject/.git/Check the status of the repository:
git statusOn branch master
Initial commit
Untracked files:
(use "git add <file>..." to include in what will be committed)
accounts/
boards/
manage.py
myproject/
requirements.txt
static/
templates/
nothing added to commit but untracked files present (use "git add" to track)Before we proceed in adding the source files, create a new file named .gitignore in the project root. This special file will help us keep the repository clean, without unnecessary files like cache files or logs for example.
You can grab a generic .gitignore file for Python projects from GitHub.
Make sure to rename it from Python.gitignore to just .gitignore (the dot is important!).
You can complement the .gitignore file telling it to ignore SQLite database files for example:
.gitignore
__pycache__/
*.py[cod]
.env
venv/


# SQLite database files

*.sqlite3
Now add the files to the repository:
git add .Notice the dot here. The command above is telling Git to add all untracked files within the current directory.
Now make the first commit:
git commit -m "Initial commit"Always write a comment telling what this commit is about, briefly describing what have you changed.
Remote Repository
Now let’s setup GitHub as a remote repository. First, create a free account on GitHub, then confirm your email address. After that, you will be able to create public repositories.
For now, just pick a name for the repository, don’t initialize it with a README, or add a .gitignore or add a license so far. Make sure you start the repository empty:
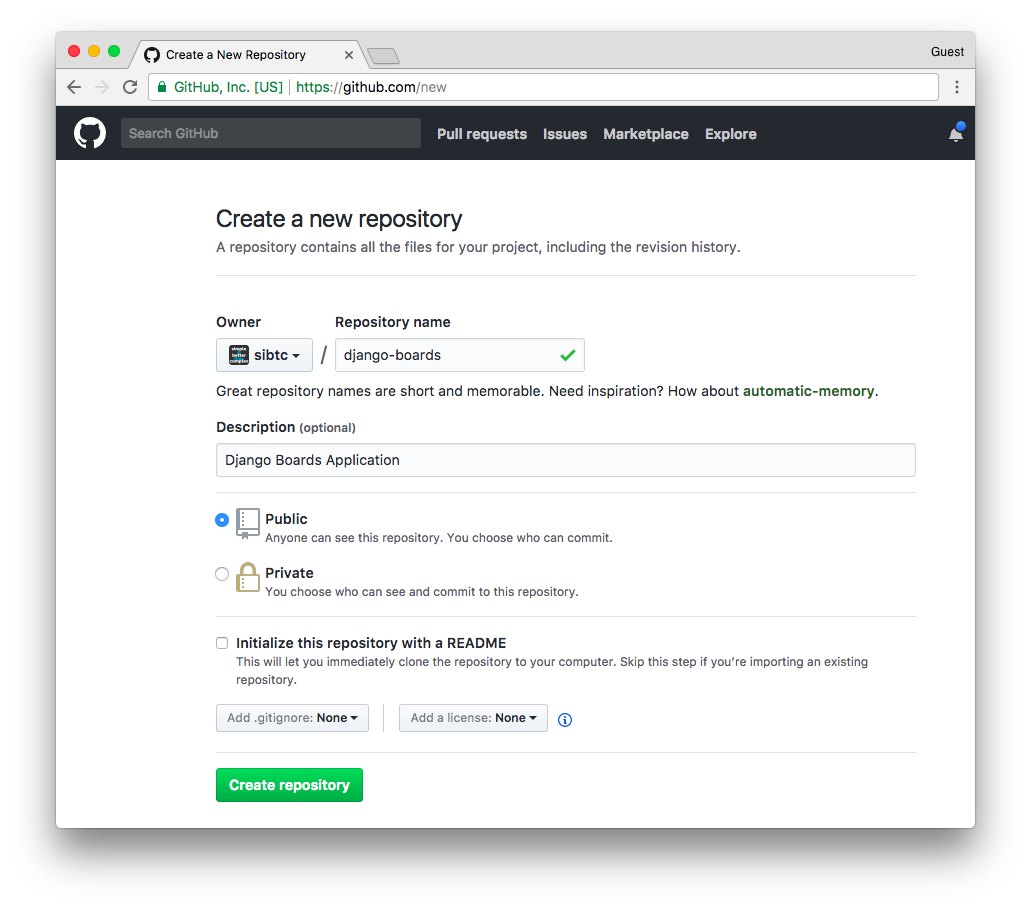
After you create the repository you should see something like this:
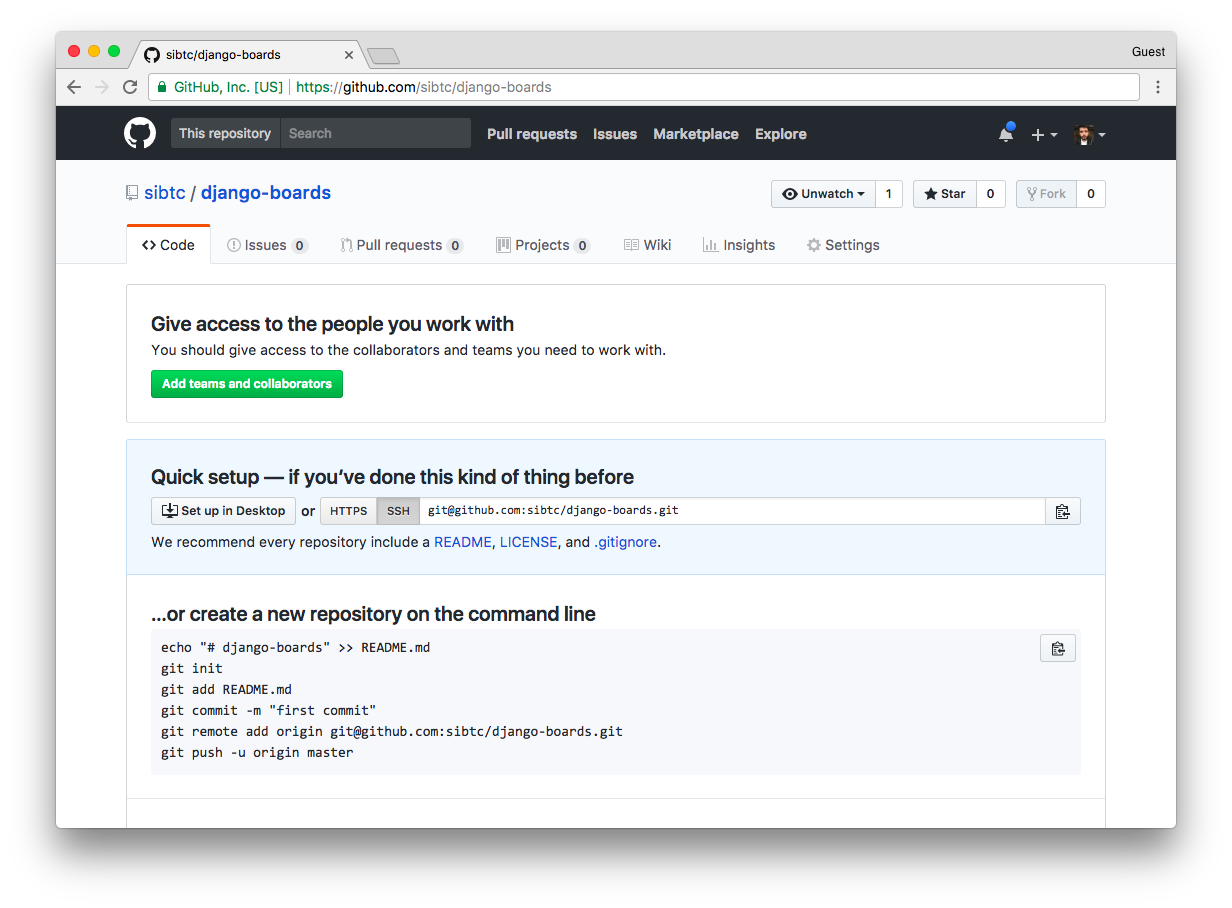
Now let’s configure it as our remote repository:
git remote add origin git@github.com:sibtc/django-boards.gitNow push the code to the remote server, that is, to the GitHub repository:
git push origin master

Counting objects: 84, done.
Delta compression using up to 4 threads.
Compressing objects: 100% (81/81), done.
Writing objects: 100% (84/84), 319.70 KiB | 0 bytes/s, done.
Total 84 (delta 10), reused 0 (delta 0)
remote: Resolving deltas: 100% (10/10), done.
To git@github.com:sibtc/django-boards.git
 * [new branch]      master -> master
I create this repository just to demonstrate the process to create a remote repository with an existing code base. The source code of the project is officially hosted in this repository: https://github.com/sibtc/django-beginners-guide.
Project Settings
No matter if the code is stored in a public or private remote repository, sensitive information should never be committed and pushed to the remote repository. That includes secret keys, passwords, API keys, etc.
At this point, we have to deal with two specific types of configuration in our settings.py module:
- Sensitive information such as keys and passwords;
- Configurations that are specific to a given environment.
Passwords and keys can be stored in environment variables or using local files (not committed to the remote repository):
# environment variables
import os
SECRET_KEY = os.environ['SECRET_KEY']

# or local files
with open('/etc/secret_key.txt') as f:
    SECRET_KEY = f.read().strip()
For that, there’s a great utility library called Python Decouple that I use in every single Django project I develop. It will search for a local file named .env to set the configuration variables and will fall back to the environment variables. It also provides an interface to define default values, transform the data into int, bool, and list when applicable.
It’s not mandatory, but I really find it a very useful tool. And it works like a charm with services like Heroku.
First, let’s install it:
pip install python-decouplemyproject/settings.py
from decouple import config

SECRET_KEY = config('SECRET_KEY')
Now we can place the sensitive information in a special file named .env (notice the dot in front) in the same directory where the manage.py file is:
myproject/
 |-- myproject/
 |    |-- accounts/
 |    |-- boards/
 |    |-- myproject/
 |    |-- static/
 |    |-- templates/
 |    |-- .env        <-- here!
 |    |-- .gitignore
 |    |-- db.sqlite3
 |    +-- manage.py
 +-- venv/
.env
SECRET_KEY=rqr_cjv4igscyu8&&(0ce(=sy=f2)p=f_wn&@0xsp7m$@!kp=dThe .env file is ignored in the .gitignore file, so every time we are going to deploy the application or run in a different machine, we will have to create a .env file and add the necessary configuration.
Now let’s install another library to help us write the database connection in a single line. This way it’s easier to write different database connection strings in different environments:
pip install dj-database-urlFor now, all the configurations we will need to decouple:
myproject/settings.py
from decouple import config, Csv
import dj_database_url

SECRET_KEY = config('SECRET_KEY')
DEBUG = config('DEBUG', default=False, cast=bool)
ALLOWED_HOSTS = config('ALLOWED_HOSTS', cast=Csv())
DATABASES = {
    'default': dj_database_url.config(
        default=config('DATABASE_URL')
    )
}
Example of a .env file for our local machine:
SECRET_KEY=rqr_cjv4igscyu8&&(0ce(=sy=f2)p=f_wn&@0xsp7m$@!kp=d
DEBUG=True
ALLOWED_HOSTS=.localhost,127.0.0.1
Notice that in the DEBUG configuration we have a default, so in production we can ignore this configuration because
it will be set to False automatically, as it is supposed to be.
Now the ALLOWED_HOSTS will be transformed into a list like ['.localhost', '127.0.0.1'. ]. Now, this is on our
local machine, for production we will set it to something like ['.djangoboards.com', ] or whatever domain you have.
This particular configuration makes sure your application is only served to this domain.
Tracking Requirements
It’s a good practice to keep track of the project’s dependencies, so to be easier to install it on another machine.
We can check the currently installed Python libraries by running the command:
pip freeze

dj-database-url==0.4.2
Django==1.11.6
django-widget-tweaks==1.4.1
Markdown==2.6.9
python-decouple==3.1
pytz==2017.2
Create a file named requirements.txt in the project root, and add the dependencies there:
requirements.txt
dj-database-url==0.4.2
Django==1.11.6
django-widget-tweaks==1.4.1
Markdown==2.6.9
python-decouple==3.1
I kept the pytz==2017.2 out, because it is automatically installed by Django.
You can update your source code repository:
git add .
git commit -m "Add requirements.txt file"
git push origin master
Domain Name
If we are going to deploy a Django application properly, we will need a domain name. It’s important to have a domain name to serve the application, configure an email service and configure an https certificate.
Lately, I’ve been using Namecheap a lot. You can get a .com domain for $8.88/year, or if you are just trying things out, you could register a .xyz domain for $0.99/year.
Anyway, you are free to use any registrar. To demonstrate the deployment process, I registered the www.DjangoBoards.com domain.
Deployment Strategy
Here is an overview of the deployment strategy we are going to use in this tutorial:
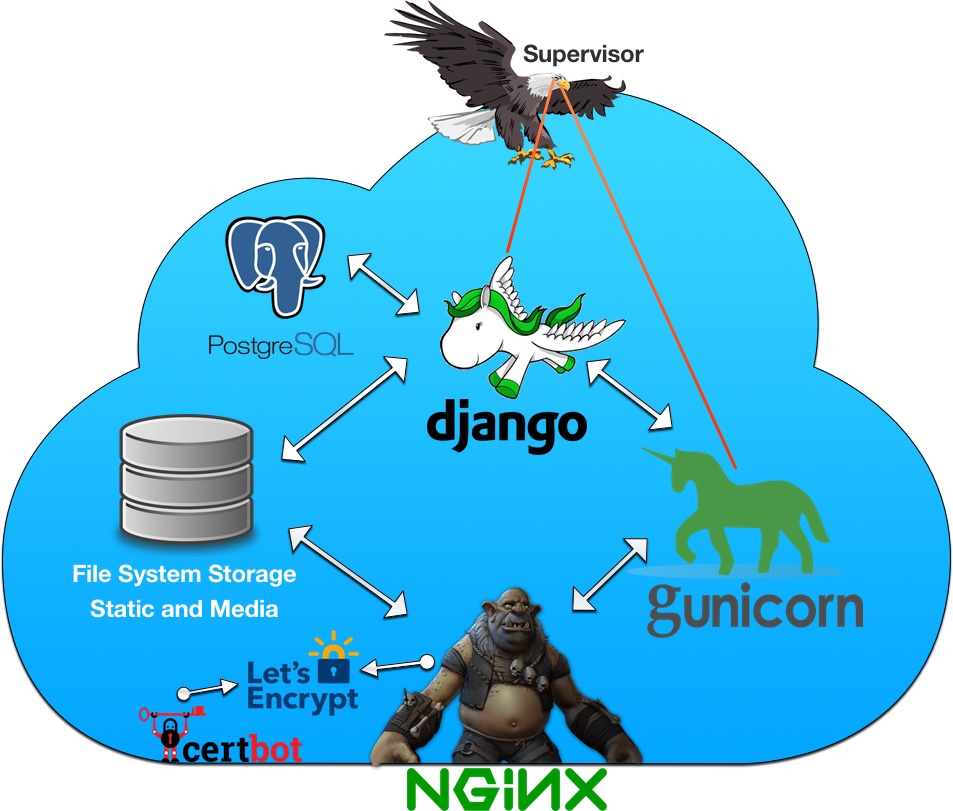
The cloud is our Virtual Private Server provided by Digital Ocean. You can sign up to Digital Ocean using my affiliate link to get a free $10 credit (only valid for new accounts).
Upfront we will have NGINX, illustrated by the ogre. NGINX will receive all requests to the server. But it won’t try to do anything smart if the request data. All it is going to do is decide if the requested information is a static asset that it can serve by itself, or if it’s something more complicated. If so, it will pass the request to Gunicorn.
The NGINX will also be configured with HTTPS certificates. Meaning it will only accept requests via HTTPS. If the client tries to request via HTTP, NGINX will first redirect the user to the HTTPS, and only then it will decide what to do with the request.
We are also going to install this certbot to automatically renew the Let’s Encrypt certificates.
Gunicorn is an application server. Depending on the number of processors the server has, it can spawn multiple workers to process multiple requests in parallel. It manages the workload and executes the Python and Django code.
Django is the one doing the hard work. It may access the database (PostgreSQL) or the file system. But for the most part, the work is done inside the views, rendering templates, all those things that we’ve been coding for the past weeks. After Django process the request, it returns a response to Gunicorn, who returns the result to NGINX that will finally deliver the response to the client.
We are also going to install PostgreSQL, a production quality database system. Because of Django’s ORM system, it’s easy to switch databases.
The last step is to install Supervisor. It’s a process control system and it will keep an eye on Gunicorn and Django to make sure everything runs smoothly. If the server restarts, or if Gunicorn crashes, it will automatically restart it.
Deploying to a VPS (Digital Ocean)
You may use any other VPS (Virtual Private Server) you like. The configuration should be very similar, after all, we are going to use Ubuntu 16.04 as our server.
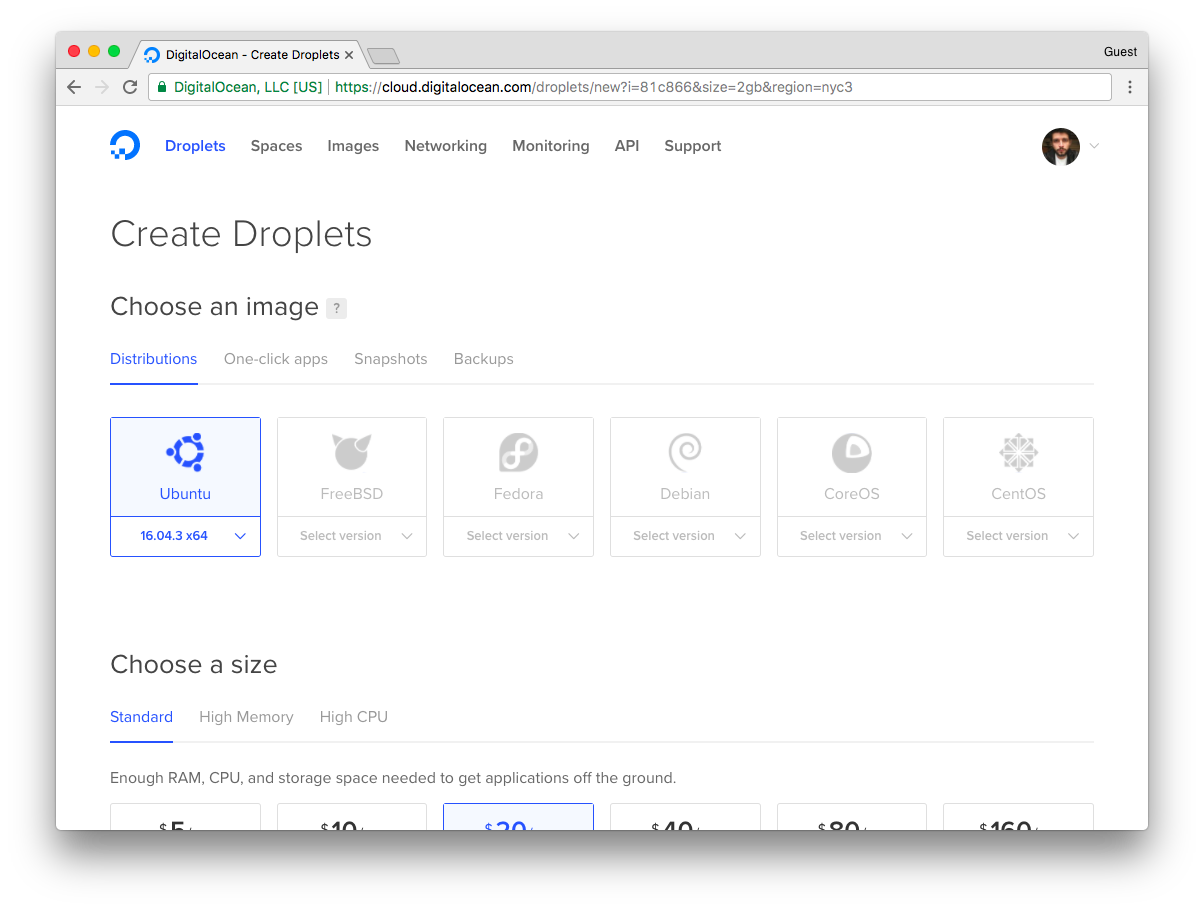
First, let’s create a new server (on Digital Ocean they call it “Droplet”). Select Ubuntu 16.04:
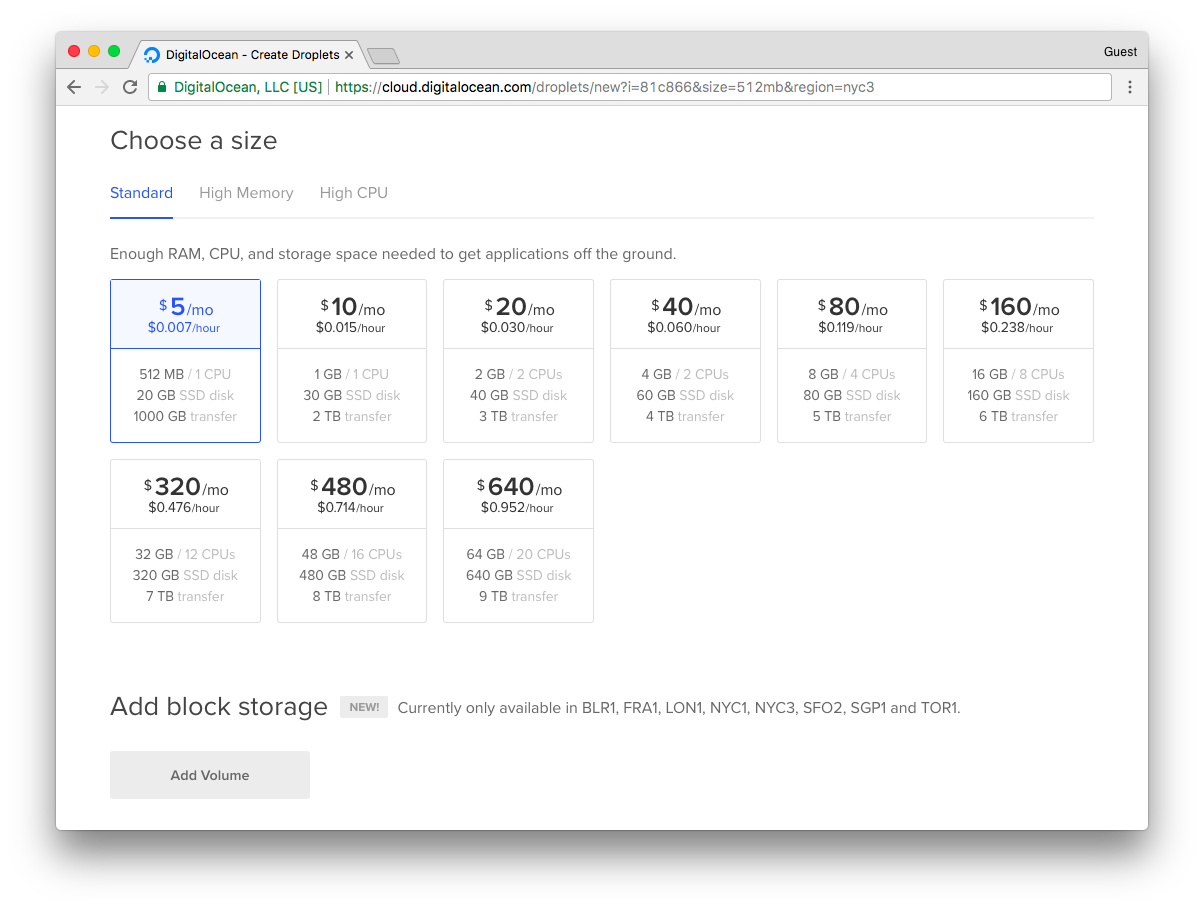
Pick the size. The smallest droplet is enough:
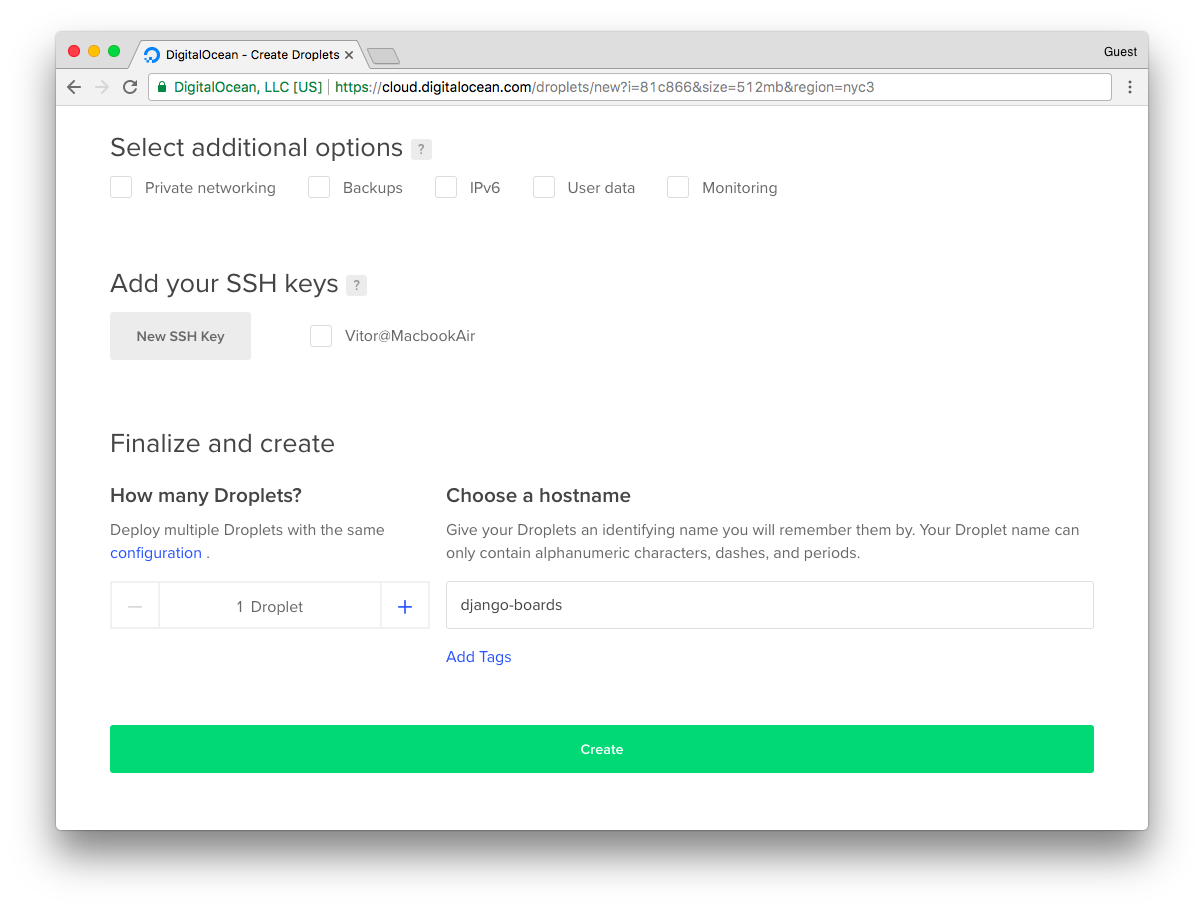
Then choose a hostname for your droplet (in my case “django-boards”):
If you have an SSH key, you can add it to your account. Then you will be able to log in the server using it. Otherwise, they will email you the root password.
Now pick the server’s IP address:
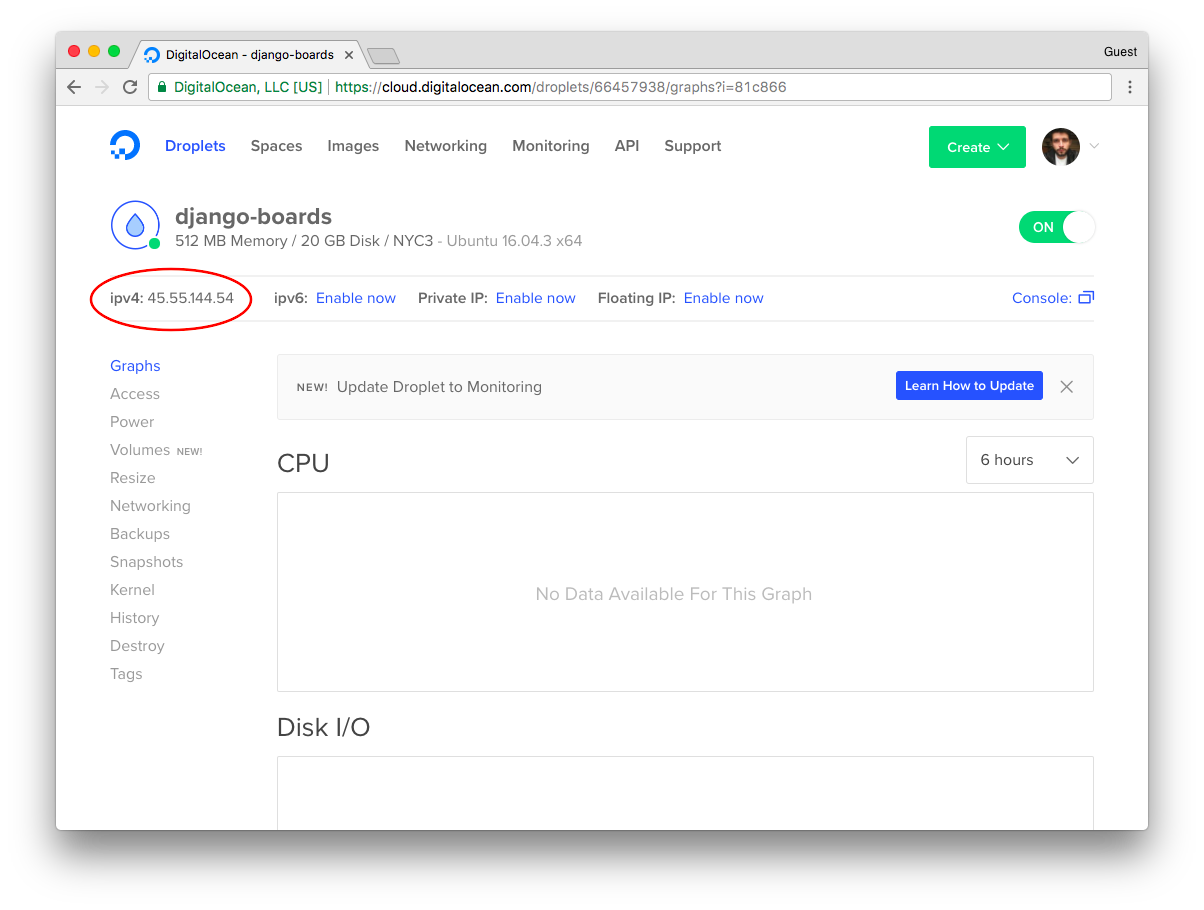
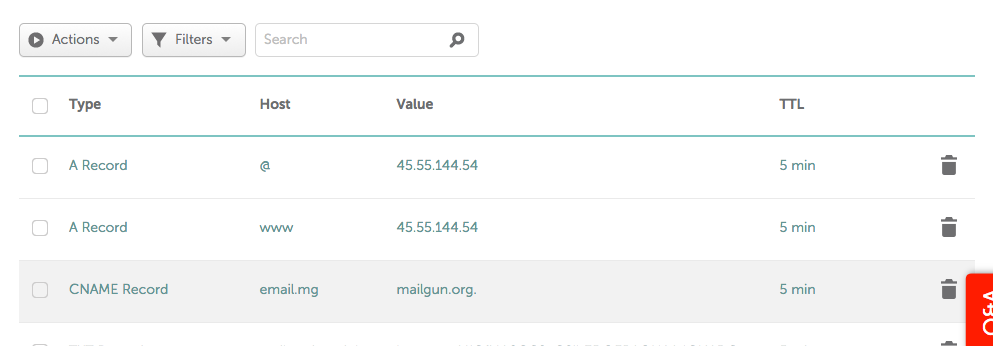
Before we log in to the server, let’s point our domain name to this IP address. This will save some time because DNS settings usually take a few minutes to propagate.
So here we added two A records, one pointing to the naked domain “djangoboards.com” and the other one for “www.djangoboards.com”. We will use NGINX to configure a canonical URL.
Now let’s log in to the server using your terminal:
ssh root@45.55.144.54
root@45.55.144.54's password:
Then you should see the following message:
You are required to change your password immediately (root enforced)
Welcome to Ubuntu 16.04.3 LTS (GNU/Linux 4.4.0-93-generic x86_64)

 * Documentation:  https://help.ubuntu.com
 * Management:     https://landscape.canonical.com
 * Support:        https://ubuntu.com/advantage

  Get cloud support with Ubuntu Advantage Cloud Guest:
    http://www.ubuntu.com/business/services/cloud

0 packages can be updated.
0 updates are security updates.


Last login: Sun Oct 15 18:39:21 2017 from 82.128.188.51
Changing password for root.
(current) UNIX password:
Set the new password, and let’s start to configure the server.
sudo apt-get update
sudo apt-get -y upgrade
If you get any prompt during the upgrade, select the option “keep the local version currently installed”.
Python 3.6
sudo add-apt-repository ppa:deadsnakes/ppa
sudo apt-get update
sudo apt-get install python3.6
PostgreSQL
sudo apt-get -y install postgresql postgresql-contribNGINX
sudo apt-get -y install nginxSupervisor
sudo apt-get -y install supervisor

sudo systemctl enable supervisor
sudo systemctl start supervisor
Virtualenv
wget https://bootstrap.pypa.io/get-pip.py
sudo python3.6 get-pip.py
sudo pip3.6 install virtualenv
Application User
Create a new user with the command below:
adduser boardsUsually, I just pick the name of the application. Enter a password and optionally add some extra info to the prompt.
Now add the user to the sudoers list:
gpasswd -a boards sudoPostgreSQL Database Setup
First switch to the postgres user:
sudo su - postgresCreate a database user:
createuser u_boardsCreate a new database and set the user as the owner:
createdb django_boards --owner u_boardsDefine a strong password for the user:
psql -c "ALTER USER u_boards WITH PASSWORD 'BcAZoYWsJbvE7RMgBPzxOCexPRVAq'"We can now exit the postgres user:
exitDjango Project Setup
Switch to the application user:
sudo su - boardsFirst, we can check where we are:
pwd
/home/boards
First, let’s clone the repository with our code:
git clone https://github.com/sibtc/django-beginners-guide.gitStart a virtual environment:
virtualenv venv -p python3.6Initialize the virtualenv:
source venv/bin/activateInstall the requirements:
pip install -r django-beginners-guide/requirements.txtWe will have to add two extra libraries here, the Gunicorn and the PostgreSQL driver:
pip install gunicorn
pip install psycopg2
Now inside the /home/boards/django-beginners-guide folder, let’s create a .env file to store the database credentials, the secret key and everything else:
/home/boards/django-beginners-guide/.env
SECRET_KEY=rqr_cjv4igscyu8&&(0ce(=sy=f2)p=f_wn&@0xsp7m$@!kp=d
ALLOWED_HOSTS=.djangoboards.com
DATABASE_URL=postgres://u_boards:BcAZoYWsJbvE7RMgBPzxOCexPRVAq@localhost:5432/django_boards
Here is the syntax of the database URL: postgres://db_user:db_password@db_host:db_port/db_name.
Now let’s migrate the database, collect the static files and create a super user:
cd django-beginners-guidepython manage.py migrate
Operations to perform:
Apply all migrations: admin, auth, boards, contenttypes, sessions
Running migrations:
Applying contenttypes.0001_initial... OK
Applying auth.0001_initial... OK
Applying admin.0001_initial... OK
Applying admin.0002_logentry_remove_auto_add... OK
Applying contenttypes.0002_remove_content_type_name... OK
Applying auth.0002_alter_permission_name_max_length... OK
Applying auth.0003_alter_user_email_max_length... OK
Applying auth.0004_alter_user_username_opts... OK
Applying auth.0005_alter_user_last_login_null... OK
Applying auth.0006_require_contenttypes_0002... OK
Applying auth.0007_alter_validators_add_error_messages... OK
Applying auth.0008_alter_user_username_max_length... OK
Applying boards.0001_initial... OK
Applying boards.0002_auto_20170917_1618... OK
Applying boards.0003_topic_views... OK
Applying sessions.0001_initial... OKNow the static files:
python manage.py collectstatic

Copying '/home/boards/django-beginners-guide/static/js/jquery-3.2.1.min.js'
Copying '/home/boards/django-beginners-guide/static/js/popper.min.js'
Copying '/home/boards/django-beginners-guide/static/js/bootstrap.min.js'
Copying '/home/boards/django-beginners-guide/static/js/simplemde.min.js'
Copying '/home/boards/django-beginners-guide/static/css/app.css'
Copying '/home/boards/django-beginners-guide/static/css/bootstrap.min.css'
Copying '/home/boards/django-beginners-guide/static/css/accounts.css'
Copying '/home/boards/django-beginners-guide/static/css/simplemde.min.css'
Copying '/home/boards/django-beginners-guide/static/img/avatar.svg'
Copying '/home/boards/django-beginners-guide/static/img/shattered.png'
...
This command copy all the static assets to an external directory where NGINX can serve the files for us. More on that later.
Now create a super user for the application:
python manage.py createsuperuserConfiguring Gunicorn
So, Gunicorn is the one responsible for executing the Django code behind a proxy server.
Create a new file named gunicorn_start inside /home/boards:
#!/bin/bash

NAME="django_boards"
DIR=/home/boards/django-beginners-guide
USER=boards
GROUP=boards
WORKERS=3
BIND=unix:/home/boards/run/gunicorn.sock
DJANGO_SETTINGS_MODULE=myproject.settings
DJANGO_WSGI_MODULE=myproject.wsgi
LOG_LEVEL=error

cd $DIR
source ../venv/bin/activate

export DJANGO_SETTINGS_MODULE=$DJANGO_SETTINGS_MODULE
export PYTHONPATH=$DIR:$PYTHONPATH

exec ../venv/bin/gunicorn ${DJANGO_WSGI_MODULE}:application \
  --name $NAME \
  --workers $WORKERS \
  --user=$USER \
  --group=$GROUP \
  --bind=$BIND \
  --log-level=$LOG_LEVEL \
  --log-file=-
This script will start the application server. We are providing some information such as where the Django project is, which application user to be used to run the server, and so on.
Now make this file executable:
chmod u+x gunicorn_startCreate two empty folders, one for the socket file and one to store the logs:
mkdir run logsRight now the directory structure inside /home/boards should look like this:
django-beginners-guide/
gunicorn_start
logs/
run/
staticfiles/
venv/
The staticfiles folder was created by the collectstatic command.
Configuring Supervisor
First, create an empty log file inside the /home/boards/logs/ folder:
touch logs/gunicorn.logNow create a new supervisor file:
sudo vim /etc/supervisor/conf.d/boards.conf[program:boards]
command=/home/boards/gunicorn_start
user=boards
autostart=true
autorestart=true
redirect_stderr=true
stdout_logfile=/home/boards/logs/gunicorn.logSave the file and run the commands below:
sudo supervisorctl reread
sudo supervisorctl update
Now check the status:
sudo supervisorctl status boardsboards RUNNING pid 308, uptime 0:00:07Configuring NGINX
Next step is to set up the NGINX server to serve the static files and to pass the requests to Gunicorn:
Add a new configuration file named boards inside /etc/nginx/sites-available/:
upstream app_server {
    server unix:/home/boards/run/gunicorn.sock fail_timeout=0;
}

server {
    listen 80;
    server_name www.djangoboards.com;  # here can also be the IP address of the server

    keepalive_timeout 5;
    client_max_body_size 4G;

    access_log /home/boards/logs/nginx-access.log;
    error_log /home/boards/logs/nginx-error.log;

    location /static/ {
        alias /home/boards/staticfiles/;
    }

    # checks for static file, if not found proxy to app
    location / {
        try_files $uri @proxy_to_app;
    }

    location @proxy_to_app {
      proxy_set_header X-Forwarded-For $proxy_add_x_forwarded_for;
      proxy_set_header Host $http_host;
      proxy_redirect off;
      proxy_pass http://app_server;
    }
}
Create a symbolic link to the sites-enabled folder:
sudo ln -s /etc/nginx/sites-available/boards /etc/nginx/sites-enabled/boardsRemove the default NGINX website:
sudo rm /etc/nginx/sites-enabled/defaultRestart the NGINX service:
sudo service nginx restartAt this point, if the DNS have already propagated, the website should be available on the URL www.djangoboards.com.
Configuring an Email Service
One of the best options to get started is Mailgun. It offers a very reliable free plan covering 12,000 emails per month.
Sign up for a free account. Then just follow the steps, it’s very straightforward. You will have to work together with the service you registered your domain. In my case, it was Namecheap.
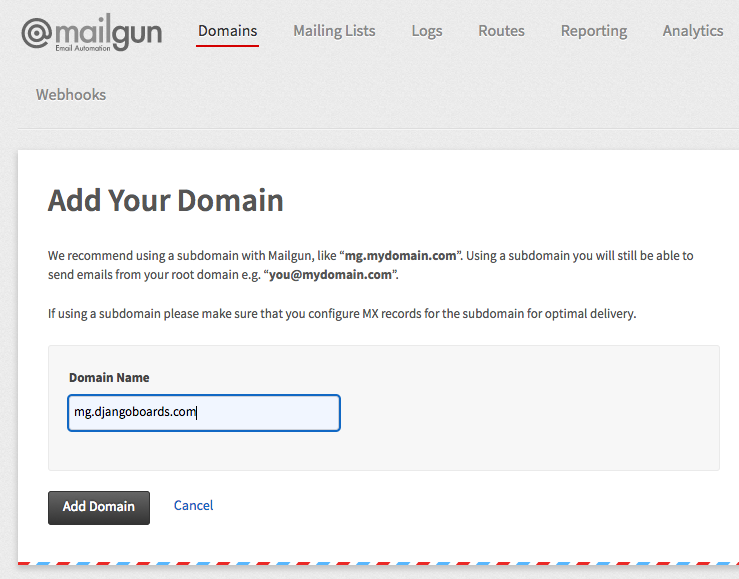
Click on add domain to add a new domain to your account. Follow the instructions and make sure you use “mg.” subdomain:
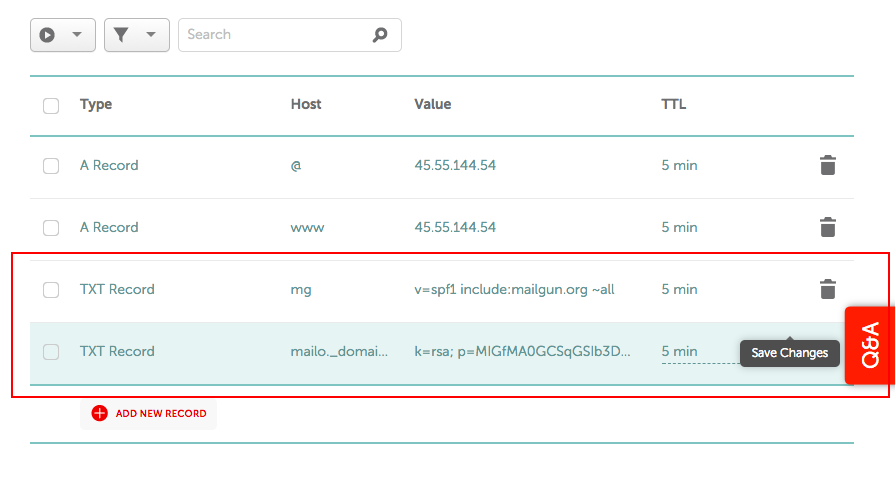
Now grab the first set of DNS records, it’s two TXT records:
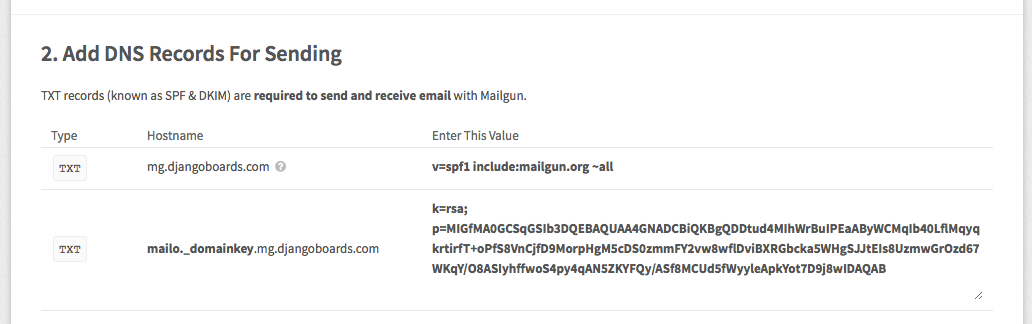
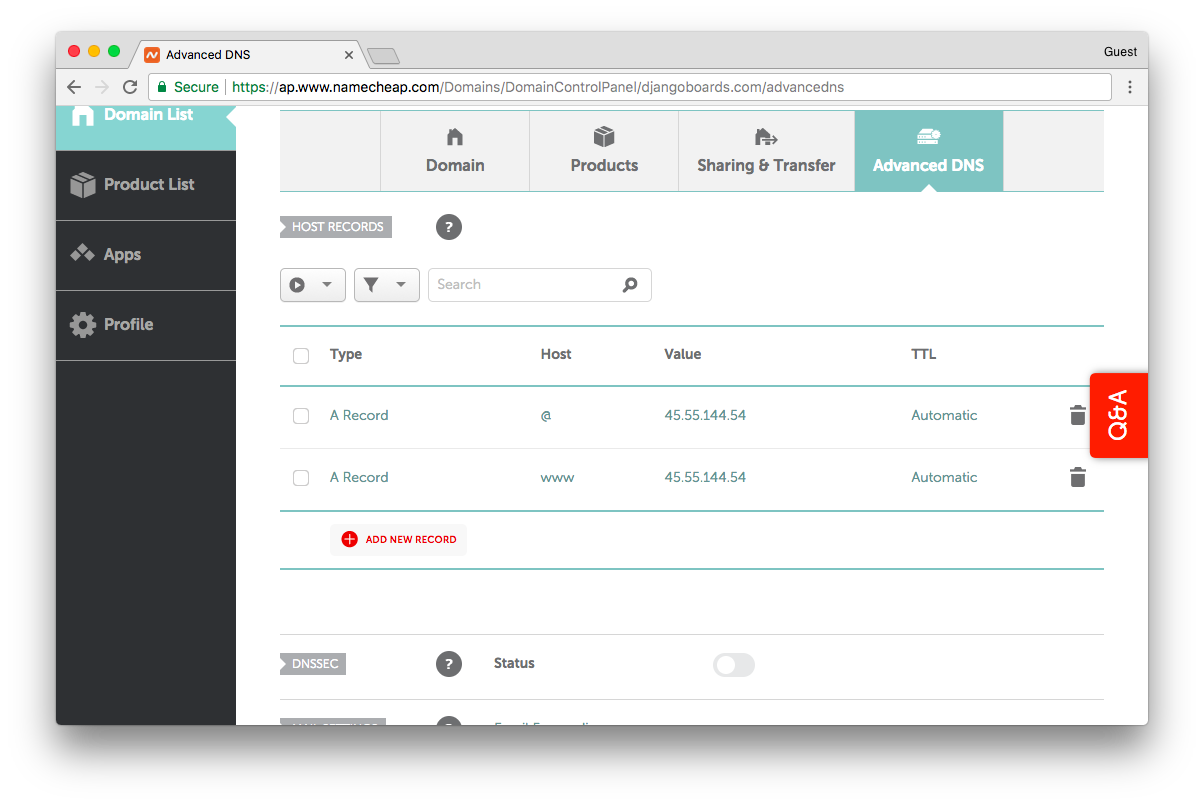
Add it to your domain, using the web interface offered by your registrar:
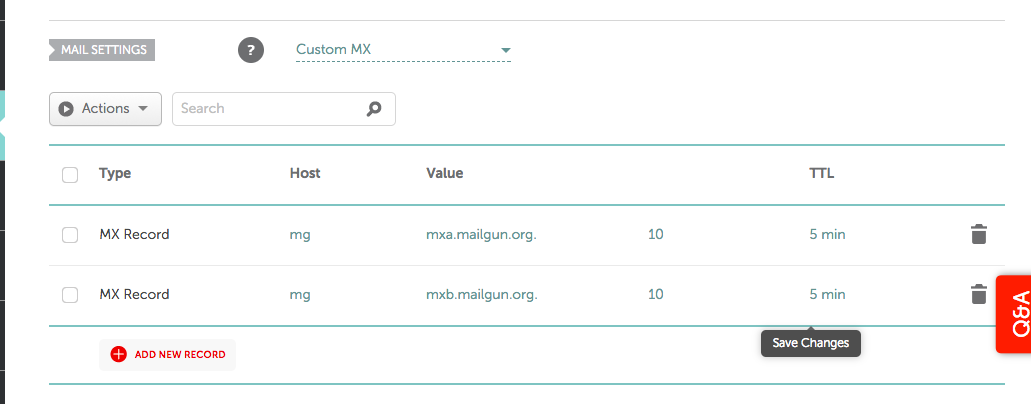
Do the same thing with the MX records:
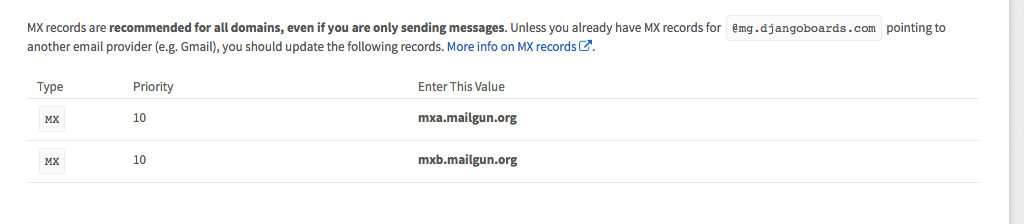
Add them to the domain:
Now this step is not mandatory, but since we are already here, confirm it as well:
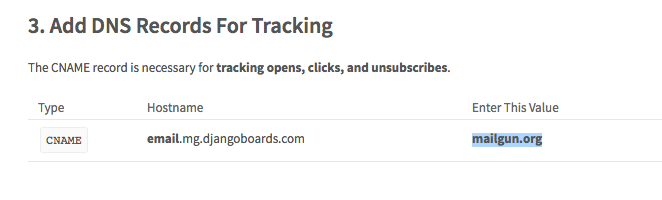
After adding all the DNS records, click in the Check DNS Records Now button:

Now we need to have some patience. Sometimes it takes a while to validate the DNS.
Meanwhile, we can configure the application to receive the connection parameters.
myproject/settings.py
EMAIL_BACKEND = config('EMAIL_BACKEND', default='django.core.mail.backends.smtp.EmailBackend')
EMAIL_HOST = config('EMAIL_HOST', default='')
EMAIL_PORT = config('EMAIL_PORT', default=587, cast=int)
EMAIL_HOST_USER = config('EMAIL_HOST_USER', default='')
EMAIL_HOST_PASSWORD = config('EMAIL_HOST_PASSWORD', default='')
EMAIL_USE_TLS = config('EMAIL_USE_TLS', default=True, cast=bool)

DEFAULT_FROM_EMAIL = 'Django Boards <noreply@djangoboards.com>'
EMAIL_SUBJECT_PREFIX = '[Django Boards] '
Then, my local machine .env file would look like this:
SECRET_KEY=rqr_cjv4igscyu8&&(0ce(=sy=f2)p=f_wn&@0xsp7m$@!kp=d
DEBUG=True
ALLOWED_HOSTS=.localhost,127.0.0.1
DATABASE_URL=sqlite:///db.sqlite3
EMAIL_BACKEND=django.core.mail.backends.console.EmailBackend
And my production .env file would look like this:
SECRET_KEY=rqr_cjv4igscyu8&&(0ce(=sy=f2)p=f_wn&@0xsp7m$@!kp=d
ALLOWED_HOSTS=.djangoboards.com
DATABASE_URL=postgres://u_boards:BcAZoYWsJbvE7RMgBPzxOCexPRVAq@localhost:5432/django_boards
EMAIL_HOST=smtp.mailgun.org
EMAIL_HOST_USER=postmaster@mg.djangoboards.com
EMAIL_HOST_PASSWORD=ED2vmrnGTM1Rdwlhazyhxxcd0F
You can find your credentials in the Domain Information section on Mailgun.
- EMAIL_HOST: SMTP Hostname
- EMAIL_HOST_USER: Default SMTP Login
- EMAIL_HOST_PASSWORD: Default Password
We can test the new settings in the production server. Make the changes in the settings.py file on your local machine, commit the changes to the remote repository. Then, in the server pull the new code and restart the Gunicorn process:
git pullEdit the .env file with the email credentials.
Then restart the Gunicorn process:
sudo supervisorctl restart boardsNow we can try to start the password reset process:
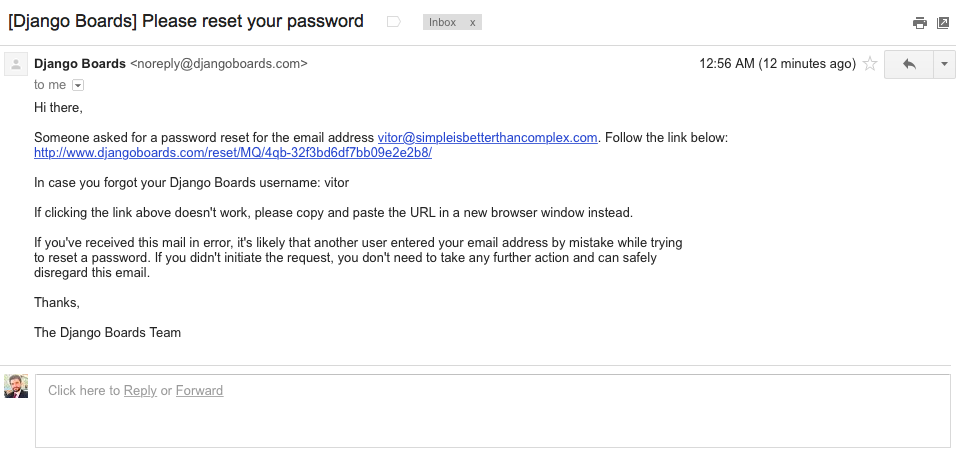
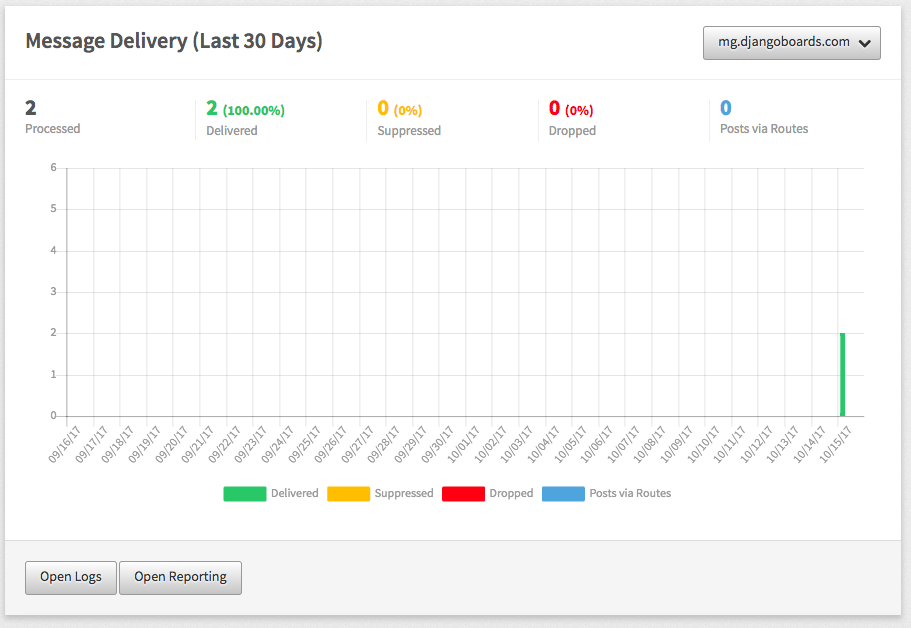
On the Mailgun dashboard you can have some statistics about the email delivery:
Configuring HTTPS Certificate
Now let’s protect our application with a nice HTTPS certificate provided by Let’s Encrypt.
Setting up HTTPS has never been this easy. And better, we can get it for free nowadays. They provide a solution called certbot which takes care of installing and renewing the certificates for us. It’s very straightforward:
sudo apt-get update
sudo apt-get install software-properties-common
sudo add-apt-repository ppa:certbot/certbot
sudo apt-get update
sudo apt-get install python-certbot-nginx
Now install the certs:
sudo certbot --nginxJust follow the prompts. When asked about:
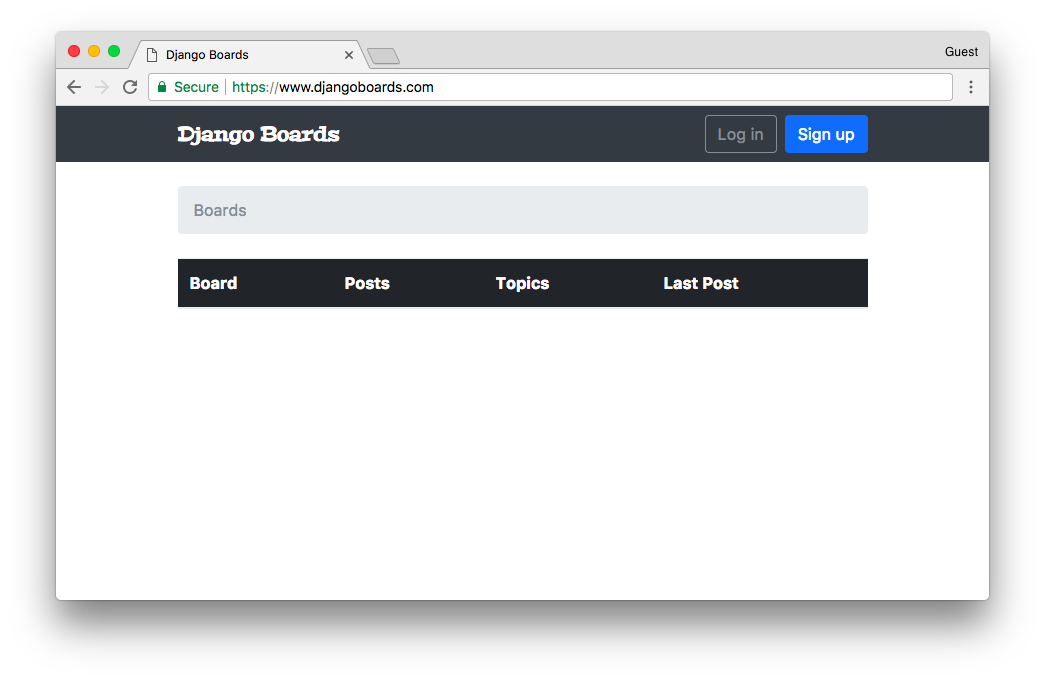
Please choose whether or not to redirect HTTP traffic to HTTPS, removing HTTP access.Choose 2 to redirect all HTTP traffic to HTTPS.
With that the site is already being served over HTTPS:
Setup the auto renew of the certs. Run the command below to edit the crontab file:
sudo crontab -eAdd the following line to the end of the file:
0 4 * * * /usr/bin/certbot renew --quietThis command will run every day at 4 am. All certificates expiring within 30 days will automatically be renewed.
Conclusions
Thanks a lot for all those who followed this tutorial series, giving comments and feedback! I really appreciate! This was the last tutorial of the series. I hope you enjoyed it!
Even though this was the last part of the tutorial series, I plan to write a few follow-up tutorials exploring other interesting topics as well, such as database optimization and adding more features on top of what we have at the moment.
By the way, if you are interested in contributing to the project, few free to submit pull requests! The source code of the project is available on GitHub: https://github.com/sibtc/django-beginners-guide/
And please let me know what else you would like to see next! :-)


 How to Extend Django User Model
 How to Setup a SSL Certificate on Nginx for a Django Application
 How to Deploy a Django Application to Digital Ocean