

 (Picture:
 In this tutorial I will guide you through the steps to implement an AJAX multiple file upload with Django using jQuery. For this tutorial we will be using a specific plug-in called jQuery File Upload, which takes care of the server communication using AJAX and also the compatibility with different browsers.
The plug-in is great, but it have so many features that sometimes it can become challenging for some to get started. You will notice that some of the examples are a little bit redundant, repeating code and so on. That’s on purpose, so to avoid code abstraction and the examples become more clear.
In the end of this post you will also find the link to download all the code used in this tutorial.
Basic Configuration
Before you move forward, if you are not familiar at all with file upload with Django, it is a good a idea to check this post I published while ago: How to Upload Files With Django. It will give you an overview of the basics and some caveats.
To work with file upload you will need to set the MEDIA_URL and MEDIA_ROOT.
settings.py
MEDIA_URL = '/media/'
MEDIA_ROOT = os.path.join(BASE_DIR, 'media')
And to test the uploads in the development environment, add this to the bottom of the root urlconf:
urls.py
from django.conf import settings
from django.conf.urls import url, include
from django.conf.urls.static import static

urlpatterns = [
    # ...
]

if settings.DEBUG:
    urlpatterns += static(settings.MEDIA_URL, document_root=settings.MEDIA_ROOT)
Now the rest are static assets, mostly JavaScript assets. Here’s what we are going to use:
- Bootstrap 3.3.7 Not required. Just so our example looks better.
- jQuery 3.1.1 Base dependency of the plug-in.
- jQuery File Upload 9.14.1 That’s the stuff.
Now you will see that the jQuery File Upload comes with several script files, they all have a purpose and you will only need some of them for certain features.
Here is how my base template looks like:
base.html
{% load static %}<!DOCTYPE html>
<html lang="en">
  <head>
    <meta charset="utf-8">
    <meta http-equiv="X-UA-Compatible" content="IE=edge">
    <meta name="viewport" content="width=device-width, initial-scale=1">
    <title>{% block title %}Photos Library - Simple is Better Than Complex{% endblock %}</title>
    <link href="{% static 'css/bootstrap.min.css' %}" rel="stylesheet">
    <!--[if lt IE 9]>
      <script src="https://oss.maxcdn.com/html5shiv/3.7.3/html5shiv.min.js"></script>
      <script src="https://oss.maxcdn.com/respond/1.4.2/respond.min.js"></script>
    <![endif]-->
  </head>
  <body>
    {% include 'includes/header.html' %}
    <div class="container">
      {% block content %}
      {% endblock %}
    </div>
    <script src="{% static 'js/jquery-3.1.1.min.js' %}"></script>
    <script src="{% static 'js/bootstrap.min.js' %}"></script>
    {% block javascript %}
    {% endblock %}
  </body>
</html>
Bootstrap and jQuery in the base template, and the jQuery File Upload plug-in will be added using the
{% block javascript %}. We will add them as we need.
Working Example
We will be working in a app called photos. Consider the model below for the rest of this tutorial:
models.py
class Photo(models.Model):
    title = models.CharField(max_length=255, blank=True)
    file = models.FileField(upload_to='photos/')
    uploaded_at = models.DateTimeField(auto_now_add=True)
And the form, as simple as:
forms.py
from .models import Photo

class PhotoForm(forms.ModelForm):
    class Meta:
        model = Photo
        fields = ('file', )
PS: Perhaps using a ImageField instead of FileField would be more suitable for the use case, but to avoid the
hustle of installing Pillow locally, let’s just use FileField. So we have an easier to run example.
Basic File Upload
First we need a route:
urls.py
from django.conf.urls import url
from . import views

urlpatterns = [
    url(r'^basic-upload/$', views.BasicUploadView.as_view(), name='basic_upload'),
]
A view to process the upload, nothing special:
views.py
from django.shortcuts import render
from django.http import JsonResponse
from django.views import View

from .forms import PhotoForm
from .models import Photo

class BasicUploadView(View):
    def get(self, request):
        photos_list = Photo.objects.all()
        return render(self.request, 'photos/basic_upload/index.html', {'photos': photos_list})

    def post(self, request):
        form = PhotoForm(self.request.POST, self.request.FILES)
        if form.is_valid():
            photo = form.save()
            data = {'is_valid': True, 'name': photo.file.name, 'url': photo.file.url}
        else:
            data = {'is_valid': False}
        return JsonResponse(data)
We are using a basic Class-Based View, defining two request processing for the GET and POST methods. Essentially when we access the page where we handle the upload, we are going to show the user a list of uploaded photos.
For the POST, it is where the upload handling happens, using Django’s Model Forms. When we call form.save(), Django
will create a Photo instance and save the file in the file system.
We will follow the same strategy for the next examples as well.
Now where the magic happens: the client side. First the required jQuery File Upload scripts:
photos/basic_upload/index.html
{% block javascript %}
  {# JQUERY FILE UPLOAD SCRIPTS #}
  <script src="{% static 'js/jquery-file-upload/vendor/jquery.ui.widget.js' %}"></script>
  <script src="{% static 'js/jquery-file-upload/jquery.iframe-transport.js' %}"></script>
  <script src="{% static 'js/jquery-file-upload/jquery.fileupload.js' %}"></script>

  {# PHOTOS PAGE SCRIPTS #}
  <script src="{% static 'photos/js/basic-upload.js' %}"></script>
{% endblock %}- jquery.ui.widget.js It’s a dependency for the plug-in
- jquery.iframe-transport.js The Iframe Transport is required for browsers without support for XHR file uploads
- jquery.fileupload.js The basic File Upload plug-in
And finally the script basic-upload.js is where we will implement our photo upload.
Now let’s see the rest of our template and explore the meat of the page:
photos/basic_upload/index.html
{# 1. BUTTON TO TRIGGER THE ACTION #}
<button type="button" class="btn btn-primary js-upload-photos">
  <span class="glyphicon glyphicon-cloud-upload"></span> Upload photos
</button>

{# 2. FILE INPUT TO BE USED BY THE PLUG-IN #}
<input id="fileupload" type="file" name="file" multiple
       style="display: none;"
       data-url="{% url 'photos:basic_upload' %}"
       data-form-data='{"csrfmiddlewaretoken": "{{ csrf_token }}"}'>

{# 3. TABLE TO DISPLAY THE UPLOADED PHOTOS #}
<table id="gallery" class="table table-bordered">
  <thead>
    <tr>
      <th>Photo</th>
    </tr>
  </thead>
  <tbody>
    {% for photo in photos %}
      <tr>
        <td><a href="{{ photo.file.url }}">{{ photo.file.name }}</a></td>
      </tr>
    {% endfor %}
  </tbody>
</table>
First, block 1 of the snippet, is the button to start the workflow. We will hook into the css class .js-upload-photos to open the file explorer window.
Block 2 is the most important part of the page. It’s the the file input that will be used to load the jQuery File Upload component. A few things to note:
- The name of the input must match with the Model Form Field. That is, if the
FileFieldis called document, the input must be namedname="document"instead. Otherwise the processing of the file will fail. - The
multipleattribute will enable multiple file selection in the file explorer window. - The
data-urlattribute must point to the route/view where the file form will be processed. - The
data-form-dataattribute should be defined exactly this way! Don’t try to swap the"and'of the HTML. It won’t work. This line is important so to instruct the plug-in to send the file along with the csrf middleware token.
Finally, block 3 is just a regular table displaying the photos.
Now let’s explore the page’s script, which is responsible for putting every piece of this puzzle together:
photos/js/basic-upload.js
$(function () {
  /* 1. OPEN THE FILE EXPLORER WINDOW */
  $(".js-upload-photos").click(function () {
    $("#fileupload").click();
  });

  /* 2. INITIALIZE THE FILE UPLOAD COMPONENT */
  $("#fileupload").fileupload({
    dataType: 'json',
    done: function (e, data) {  /* 3. PROCESS THE RESPONSE FROM THE SERVER */
      if (data.result.is_valid) {
        $("#gallery tbody").prepend(
          "<tr><td><a href='" + data.result.url + "'>" + data.result.name + "</a></td></tr>"
        )
      }
    }
  });

});
Remember how we returned the data in the View class?
def post(self, request):
    form = PhotoForm(self.request.POST, self.request.FILES)
    if form.is_valid():
        photo = form.save()
        data = {'is_valid': True, 'name': photo.file.name, 'url': photo.file.url}
    else:
        data = {'is_valid': False}
    return JsonResponse(data)
This JsonResponse will end up in the data parameter, passed to the anonymous function hooked to the done
event of the File Upload component.
See what we are doing here? When we are accessing data.result.name, we are accessing the name we returned in the
JsonResponse. So, let’s say, if we returned:
return JsonResponse({'message': 'Success'})We would be able to catch it inside the done function, this way:
done: function (e, data) {
  if (data.result.message === 'Success') {
    // do something...
  }
}
But, what we are actually doing there is putting some pieces of HTML together and prepending it to the table body.
Let’s look at some screen shots to see how it looks like:
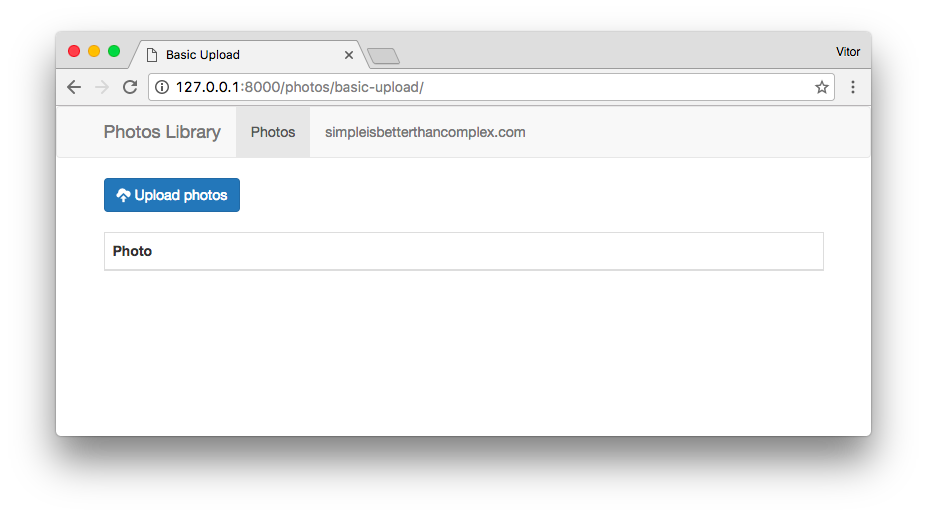
Then when the user clicks in the Upload photos button:
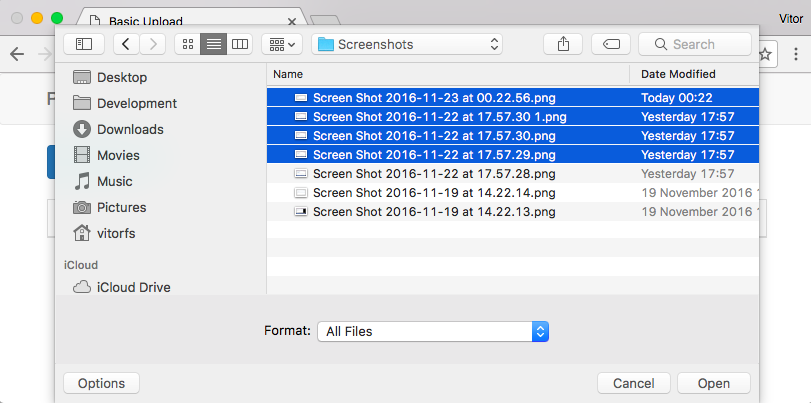
The user selects as may files as he wants and hit the Open button:

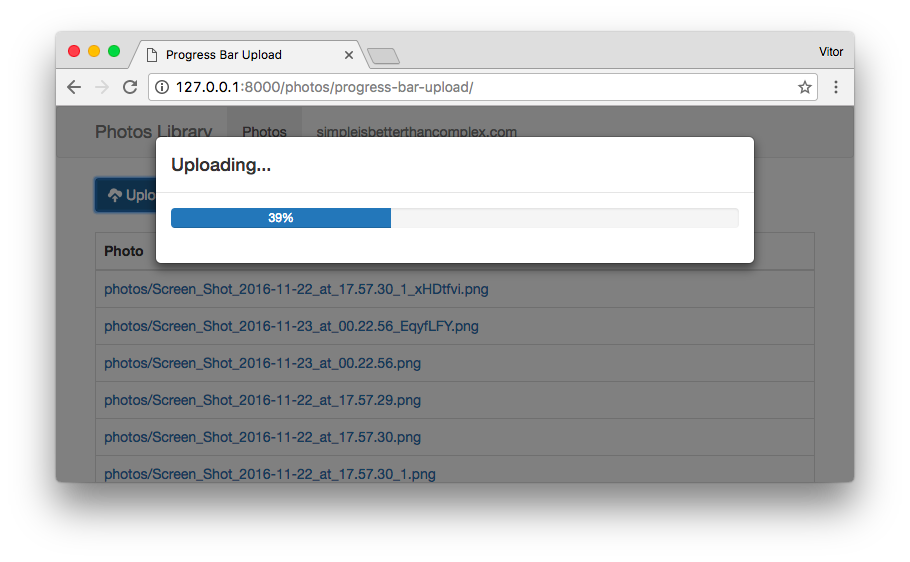
And all the files are uploaded to the server and added to the table, with a valid link! This is a minimum example. When you grab the code you will see it is really easy to reproduce.
It’s great already! Works on most major web browsers (IE 6.0+ for example!). And it is just a matter of what data to return, and what to do with it.
Displaying the Progress
An improvement we can make, is to add a progress bar, to not let the users hanging without knowing what is going on.
In our template, add the following snippet. It’s a Bootstrap modal:
photos/basic_upload/index.html
<div class="modal fade" id="modal-progress" data-backdrop="static" data-keyboard="false">
  <div class="modal-dialog">
    <div class="modal-content">
      <div class="modal-header">
        <h4 class="modal-title">Uploading...</h4>
      </div>
      <div class="modal-body">
        <div class="progress">
          <div class="progress-bar" role="progressbar" style="width: 0%;">0%</div>
        </div>
      </div>
    </div>
  </div>
</div>
Let’s improve the JavaScript part so to calculate the progress:
photos/js/basic-upload.js
$(function () {

  $(".js-upload-photos").click(function () {
    $("#fileupload").click();
  });

  $("#fileupload").fileupload({
    dataType: 'json',
    sequentialUploads: true,  /* 1. SEND THE FILES ONE BY ONE */
    start: function (e) {  /* 2. WHEN THE UPLOADING PROCESS STARTS, SHOW THE MODAL */
      $("#modal-progress").modal("show");
    },
    stop: function (e) {  /* 3. WHEN THE UPLOADING PROCESS FINALIZE, HIDE THE MODAL */
      $("#modal-progress").modal("hide");
    },
    progressall: function (e, data) {  /* 4. UPDATE THE PROGRESS BAR */
      var progress = parseInt(data.loaded / data.total * 100, 10);
      var strProgress = progress + "%";
      $(".progress-bar").css({"width": strProgress});
      $(".progress-bar").text(strProgress);
    },
    done: function (e, data) {
      if (data.result.is_valid) {
        $("#gallery tbody").prepend(
          "<tr><td><a href='" + data.result.url + "'>" + data.result.name + "</a></td></tr>"
        )
      }
    }

  });

});
The sequentialUploads attribute will instruct the component to send one file at a time. What we are doing here basically is showing the loading modal when the upload starts, closing it when it finalizes, meanwhile we update the percentage in the progress bar. The rest is the same from the other example.
Here is how it will look like:
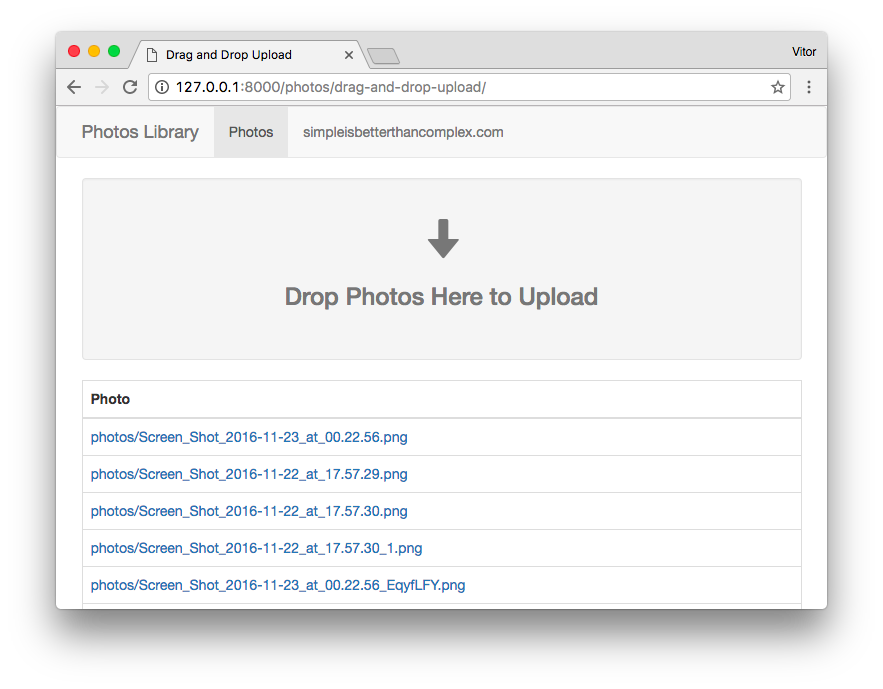
Drag and Drop Upload
Something great about this plug-in, by default you can drop files anywhere in the page to start the upload process! This mean the previous examples will simply work.
What we can do to help the users discover the functionality is just adding this simple HTML, for example:
photos/basic_upload/index.html
<div class="well text-muted text-center" style="padding-top: 4rem; padding-bottom: 4rem;">
  <span class="glyphicon glyphicon-arrow-down" style="font-size: 4rem;"></span>
  <h3>Drop Photos Here to Upload</h3>
</div>
And the result will be something like this:
Conclusions
I wanted to give more tips and examples about the jQuery File Upload usage. But the post was already getting big. I will continue this post next week. So, let me know what you want to see next!
Anyway, the examples shown in this tutorial should cover the Django part. The rest is a matter of configuration and playing with the plug-in. For more details about its API and features, refer to the official documentation: jQuery File Upload Docs
The code used in this tutorial is available on GitHub: github.com/sibtc/multiple-file-upload, so you can try it locally. It’s very straightforward to get it running.
 How to Integrate Highcharts.js with Django
 How to Implement Dependent/Chained Dropdown List with Django
 How to Create Infinite Scroll With Django
 How to Extend Django User Model
 How to Setup a SSL Certificate on Nginx for a Django Application
 How to Deploy a Django Application to Digital Ocean