

There are several ways to extend the the default Django User model. Perhaps one of the most common way (and also less intrusive) is to extend the User model using a one-to-one link. This strategy is also known as User Profile. One of the challenges of this particular strategy, if you are using Django Admin, is how to display the profile data in the User edit page. And that’s what this tutorial is about.
Background
I’ve published a while ago an article about How to Extend Django User Model, describing in great detail all the different strategies. If you are still not familiar with it, I strongly suggest that you have a look in this article.
This tutorial is about the User Profile strategy. So, consider we have an app named core with the following model definition:
models.py
from django.contrib.auth.models import User
from django.db import models
from django.db.models.signals import post_save
from django.dispatch import receiver

class Profile(models.Model):
    STUDENT = 1
    TEACHER = 2
    SUPERVISOR = 3
    ROLE_CHOICES = (
        (STUDENT, 'Student'),
        (TEACHER, 'Teacher'),
        (SUPERVISOR, 'Supervisor'),
    )
    user = models.OneToOneField(User, on_delete=models.CASCADE)
    location = models.CharField(max_length=30, blank=True)
    birthdate = models.DateField(null=True, blank=True)
    role = models.PositiveSmallIntegerField(choices=ROLE_CHOICES, null=True, blank=True)

    def __str__(self):  # __unicode__ for Python 2
        return self.user.username

@receiver(post_save, sender=User)
def create_or_update_user_profile(sender, instance, created, **kwargs):
    if created:
        Profile.objects.create(user=instance)
    instance.profile.save()
What we want to achieve is making the fields location, birthdate and role available to be edited on Django Admin.
Editing The User Profile
The trick is very simple. We will extend the default UserAdmin, add the profile instance as an inline and switch
the UserAdmin Django uses.
admin.py
from django.contrib import admin
from django.contrib.auth.admin import UserAdmin
from django.contrib.auth.models import User

from .models import Profile

class ProfileInline(admin.StackedInline):
    model = Profile
    can_delete = False
    verbose_name_plural = 'Profile'
    fk_name = 'user'

class CustomUserAdmin(UserAdmin):
    inlines = (ProfileInline, )

    def get_inline_instances(self, request, obj=None):
        if not obj:
            return list()
        return super(CustomUserAdmin, self).get_inline_instances(request, obj)


admin.site.unregister(User)
admin.site.register(User, CustomUserAdmin)
A few things here: I intentionally defined the verbose_name_plural as Profile, because each user can have only
one profile, and as the component we are using is an StackedInline (which normally is used for formsets), just to
avoid displaying Profiles in plural when we only have one profile. It’s just a minor thing.
Then a very important thing, we need to override the get_inline_instances method, so to display the inlines only
in the edit form. Otherwise we might get some problems because of how the Signals work. Remember that the Signal is
responsible for creating the Profile instance.
Since by default Django only provides username and password upon user creation, this way we keep the default behavior.
Finally we unregister the old User admin and register the new one, the custom with the Profile model.
It will look like this:
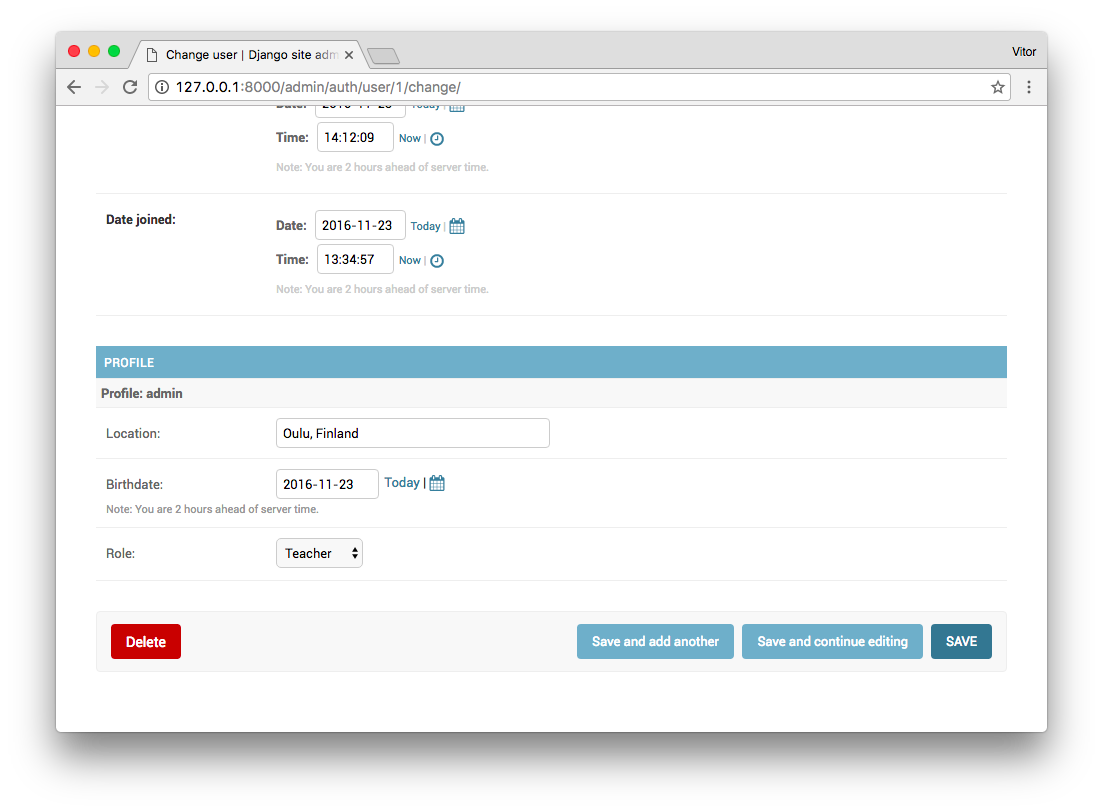
Cool, right? It just works.
Adding Profile Fields to List View
Now what if we want to display the User location (which is defined inside the profile model), in the list view, like this:
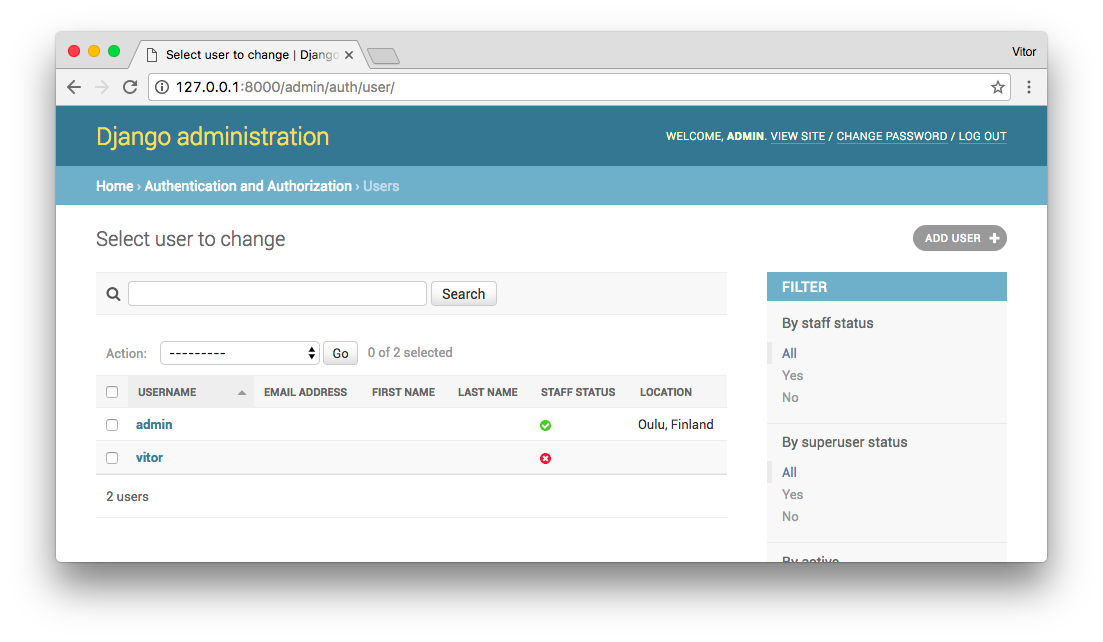
Since we are already extending the UserAdmin, it’s just a matter of overriding the list_display attribute.
class CustomUserAdmin(UserAdmin):
    inlines = (ProfileInline, )
    list_display = ('username', 'email', 'first_name', 'last_name', 'is_staff', 'get_location')
    list_select_related = ('profile', )

    def get_location(self, instance):
        return instance.profile.location
    get_location.short_description = 'Location'

    def get_inline_instances(self, request, obj=None):
        if not obj:
            return list()
        return super(CustomUserAdmin, self).get_inline_instances(request, obj)
We have to define an extra method, get_location and append it to the list_display, because the field is defined in
a external model (the relationship is defined in the Profile model, not in the User model). So for the Django Admin
understand how to display the location attribute, we have to play it this way.
The get_location.short_description is just to display it prettier in the table header. Otherwise Django Admin would
display it as “Get Location” (which is the name of the method).
A very important detail: note the list_select_related. We are adding the profile relationship there, so to avoid
firing hundreds of unnecessary queries in the database. For more on that subject, check this post:
Django Tips #3 Optimize Database Queries.
Conclusions
That’s it! Plain simple. This also open an opportunity to explore more the User model in Django Admin. You can override several attributes and very easily add new list actions for example.
Django’s documentation is awesome. But even better is to explore its the source code. For example, to understand more
on the definitions of the UserAdmin, don’t be afraid to explore the source code and see the class’ attributes and
methods: django.contrib.auth.admin.
Also the source code I used in this tutorial is available on GitHub: sibtc/django-admin-user-profile.
 What You Should Know About The Django User Model
 How to Implement Multiple User Types with Django
 How to Create Django Admin List Actions
 How to Extend Django User Model
 How to Setup a SSL Certificate on Nginx for a Django Application
 How to Deploy a Django Application to Digital Ocean