

 (Picture:
 In this tutorial you will learn how to use the Amazon S3 service to handle static assets and the user uploaded files, that is, the media assets.
First, I will cover the basic concepts, installation and configuration. Then you will find three sections covering:
- Working with static assets only
- Working with static and media assets
- Mixing public assets and private assets
Dependencies
You will need to install two Python libraries:
- boto3
- django-storages
The boto3 library is a public API client to access the Amazon Web Services (AWS) resources, such as the Amazon S3. It’s an official distribution maintained by Amazon.
The django-storages is an open-source library to manage storage backends like Dropbox, OneDrive and Amazon S3. It’s very convenient, as it plugs in the built-in Django storage backend API. In other words, it will make you life easier, as it won’t drastically change how you interact with the static/media assets. We will only need to add a few configuration parameters and it will do all the hard work for us.
Amazon S3 Setup
Before we get to the Django part, let’s set up the S3 part. We will need to create a user that have access to manage our S3 resources.
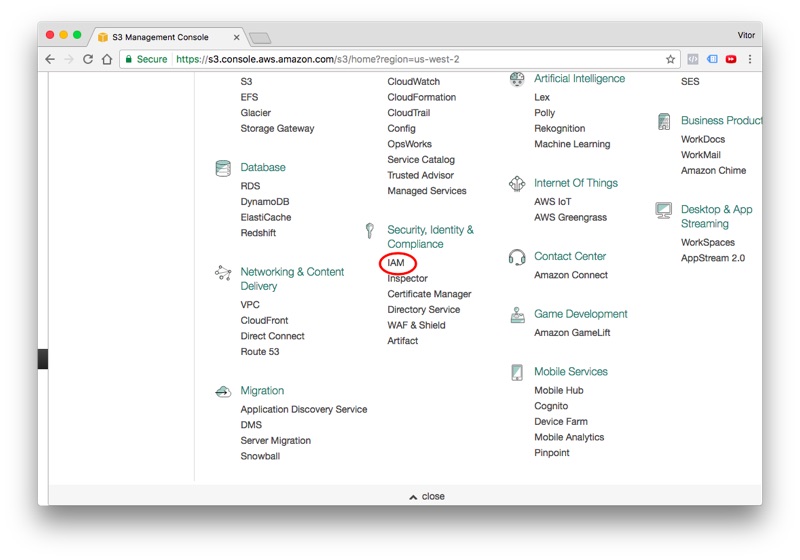
Logged in the AWS web page, find the IAM in the list of services, it’s listed under Security, Identity & Compliance:
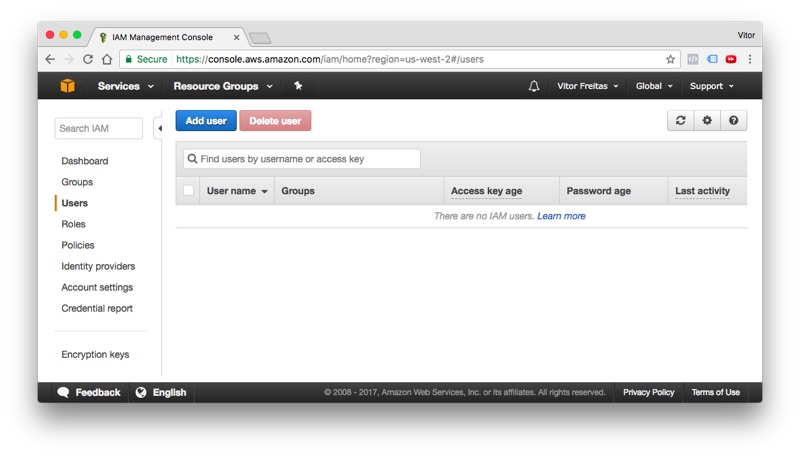
Go to the Users tab and click in the Add user button:
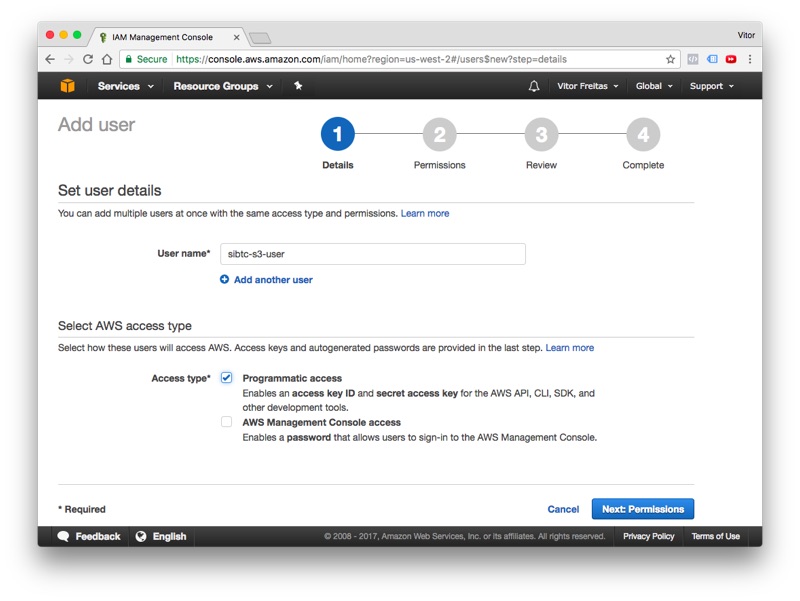
Give a user name and select the programmatic access option:
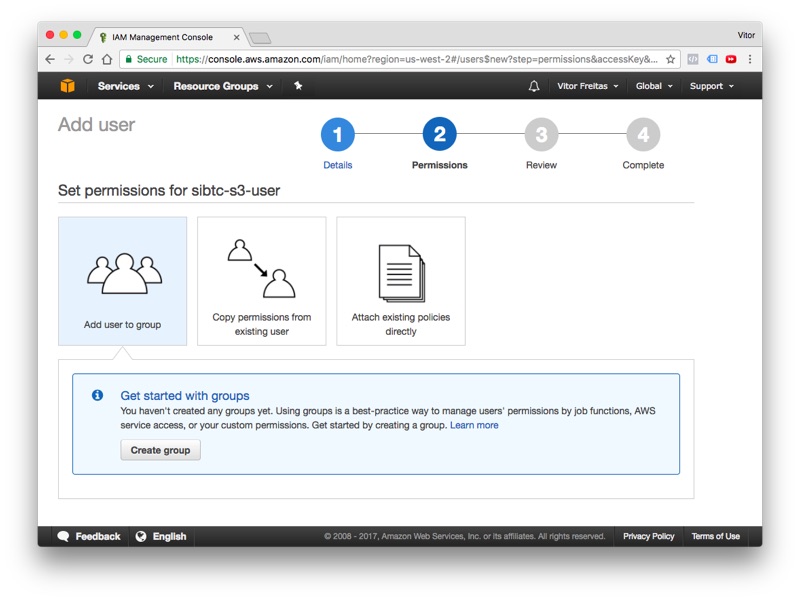
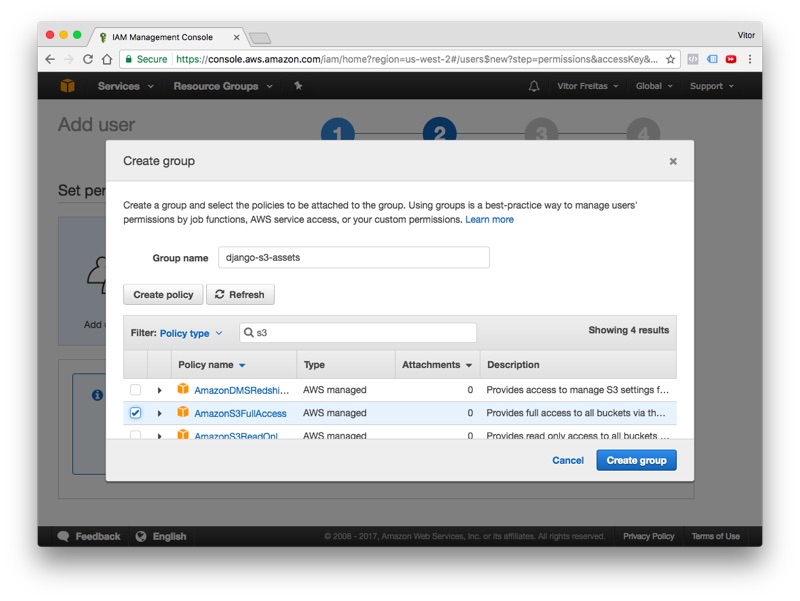
Click next to proceed to permissions. At this point we will need to create a new group with the right S3 permissions, and add our new user to it. Follow the wizard and click in the Create group button:
Define a name for the group and search for the built-in policy AmazonS3FullAccess:
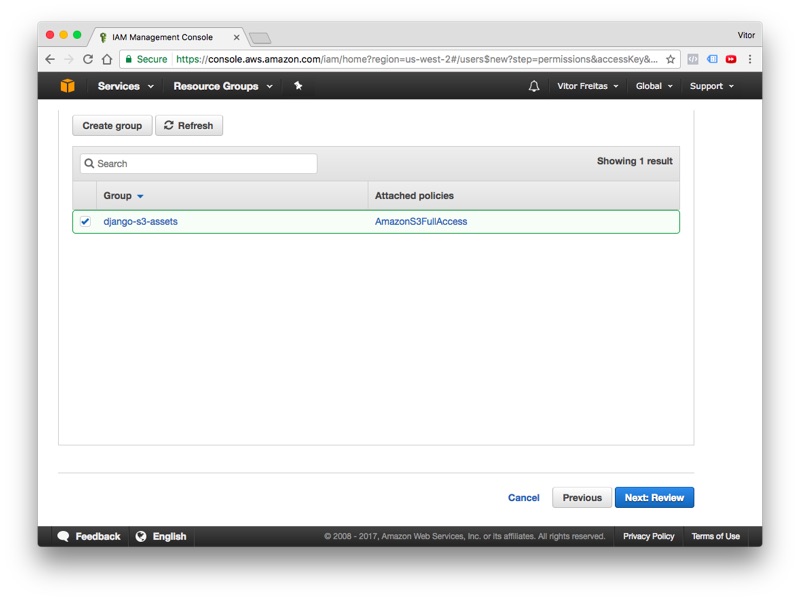
Click in the Create group to finalize the group creation process, in the next screen, the recently created group will show up selected, keep it that way and finally click in the button Next: Review:
Review the information, if everything is correct proceed to create the new user. Next, you should see this information:
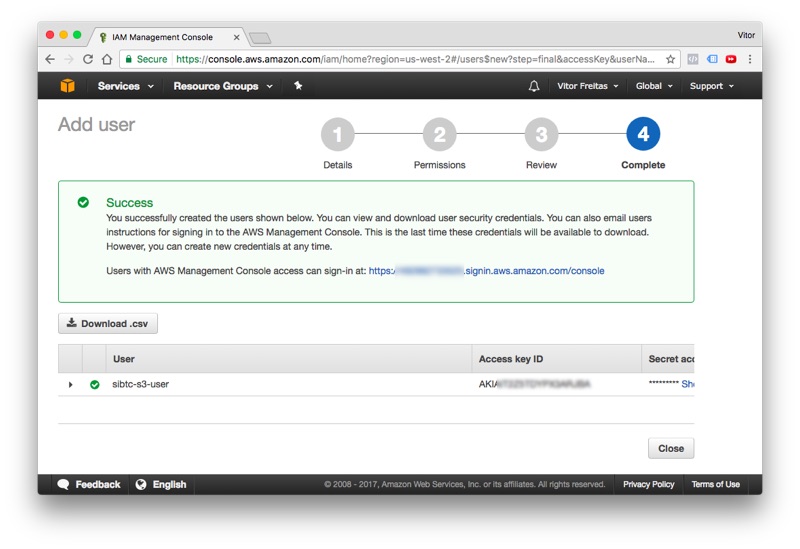
Take note of all the information: User, Access key ID and the Secret access key. Save them for later.
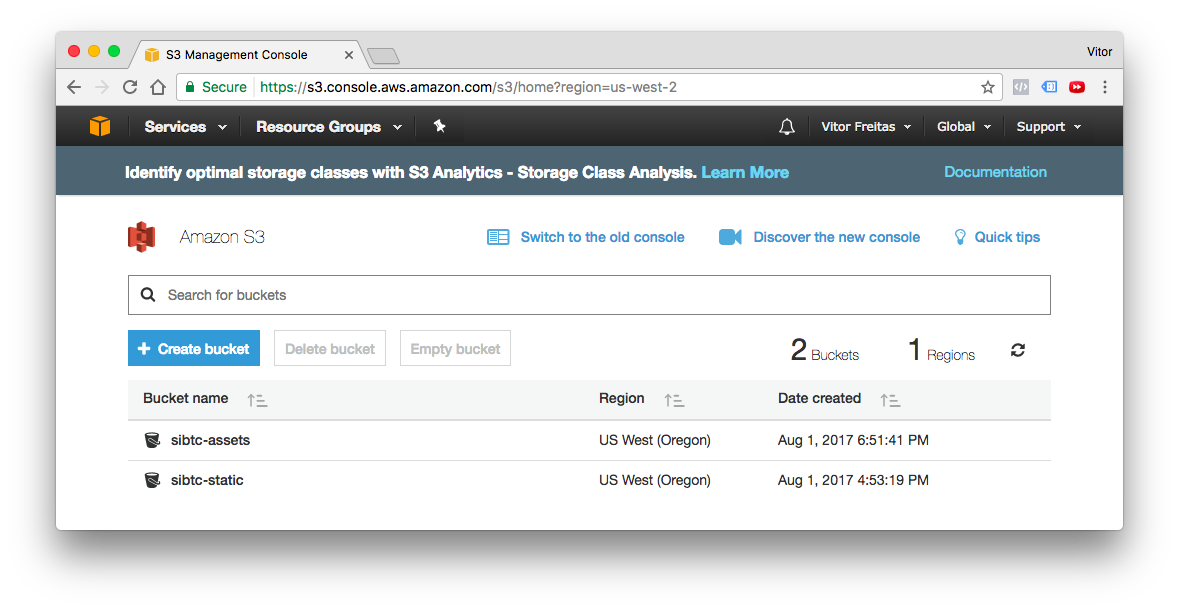
Click in the Close button and let’s proceed. Now, it’s time to create our very first bucket.
Bucket is what we call a storage container in S3. We can work with several buckets within the same Django project. But, for the most part you will only need one bucket per website.
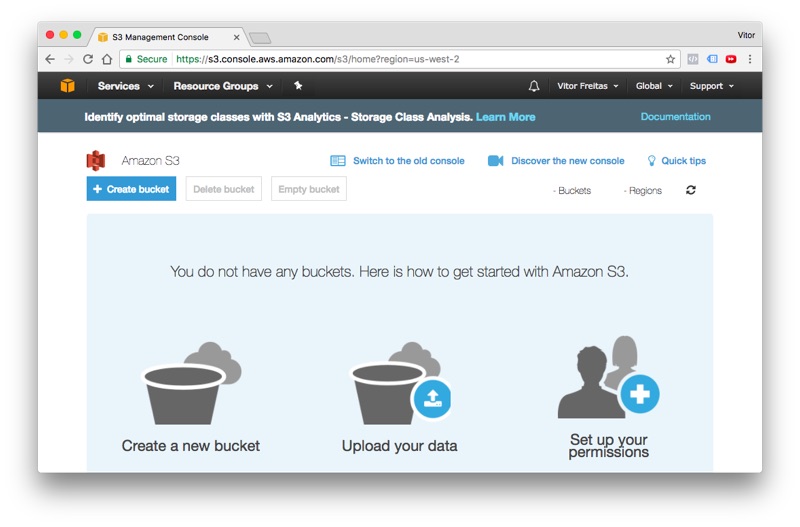
Click in the Services menu and search for S3. It’s located under Storage. If you see the screen below, you are in the right place.
Click in the + Create bucket to start the flow. Set a DNS-compliant name for your bucket. It will be used to identify your assets. In my case, I choose sibtc-static. So the path to my assets will be something like this: https://sibtc-static.s3.amazonaws.com/static/.
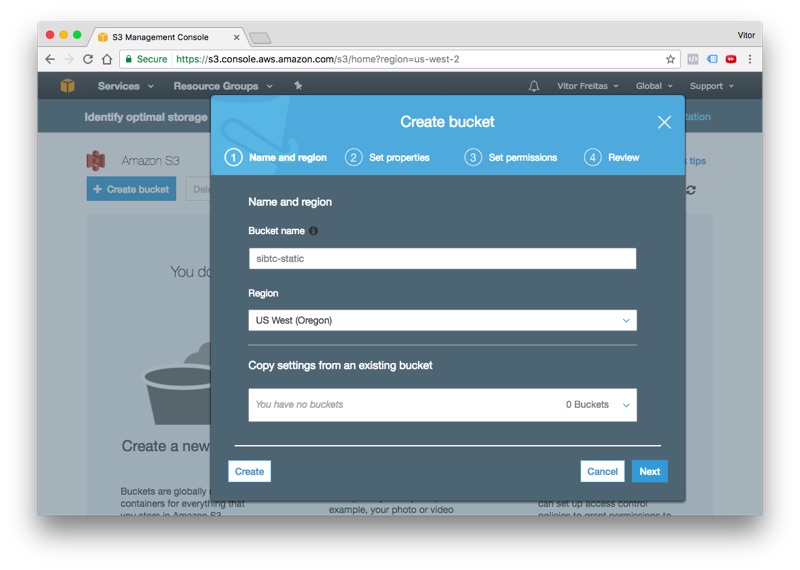
Leave the remaining of the settings as it is, proceed to the next steps just using the defaults and finally hit the Create bucket button. Next you should see the screen below:
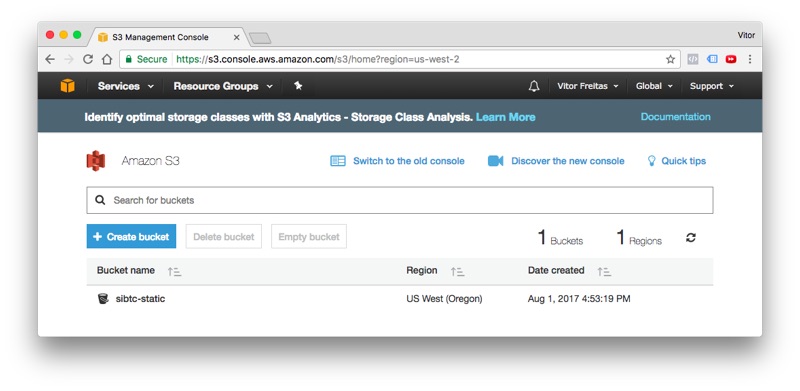
Let’s leave it like this and let’s start working on the Django side.
Installation
The easiest way is to install the libraries using pip:
pip install boto3
pip install django-storages
Now add the storages to your INSTALLED_APPS inside the settings.py module:
settings.py
INSTALLED_APPS = [
    'django.contrib.auth',
    'django.contrib.contenttypes',
    'django.contrib.sessions',
    'django.contrib.messages',
    'django.contrib.staticfiles',

    'storages',
]
Working with static assets only
This is the simplest use case. It works out-of-the-box with minimal configuration. All the configuration below
goes inside the settings.py module:
settings.py
AWS_ACCESS_KEY_ID = 'AKIAIT2Z5TDYPX3ARJBA'
AWS_SECRET_ACCESS_KEY = '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'
AWS_STORAGE_BUCKET_NAME = 'sibtc-static'
AWS_S3_CUSTOM_DOMAIN = '%s.s3.amazonaws.com' % AWS_STORAGE_BUCKET_NAME
AWS_S3_OBJECT_PARAMETERS = {
    'CacheControl': 'max-age=86400',
}
AWS_LOCATION = 'static'

STATICFILES_DIRS = [
    os.path.join(BASE_DIR, 'mysite/static'),
]
STATIC_URL = 'https://%s/%s/' % (AWS_S3_CUSTOM_DOMAIN, AWS_LOCATION)
STATICFILES_STORAGE = 'storages.backends.s3boto3.S3Boto3Storage'
Note that we have some sensitive informations here, such as the AWS_ACCESS_KEY_ID and AWS_SECRET_ACCESS_KEY.
You should not put it directly to your settings.py file or commit it to a public repository. Instead use
environment variables or use the Python library Python Decouple.
I have also written a tutorial on how to use Python Decouple.
To illustrate this use case, I created a minimal Django project:
mysite/
 |-- mysite/
 |    |-- static/
 |    |    |-- css/
 |    |    |    +-- app.css
 |    |    +-- img/
 |    |         +-- thumbs-up.png
 |    |-- templates/
 |    |    +-- home.html
 |    |-- __init__.py
 |    |-- settings.py
 |    |-- urls.py
 |    +-- wsgi.py
 +-- manage.py
As you can see, the handling of the static files should go seamlessly:
home.html
{% load static %}<!DOCTYPE html>
<html>
<head>
  <meta charset="utf-8">
  <title>S3 Example Static Only</title>
  <link rel="stylesheet" type="text/css" href="{% static 'css/app.css' %}">
</head>
<body>
  <header>
    <h1>S3 Example Static Only</h1>
  </header>
  <main>
    <img src="{% static 'img/thumbs-up.png' %}">
    <h2>It's working!</h2>
  </main>
  <footer>
    <a href="https://simpleisbetterthancomplex.com">www.SimpleIsBetterThanComplex.com</a>
  </footer>
</body>
</html>
Even though we are using our local machine, we will need to run the collectstatic command, since our code will refer
to a remote location:
python manage.py collectstatic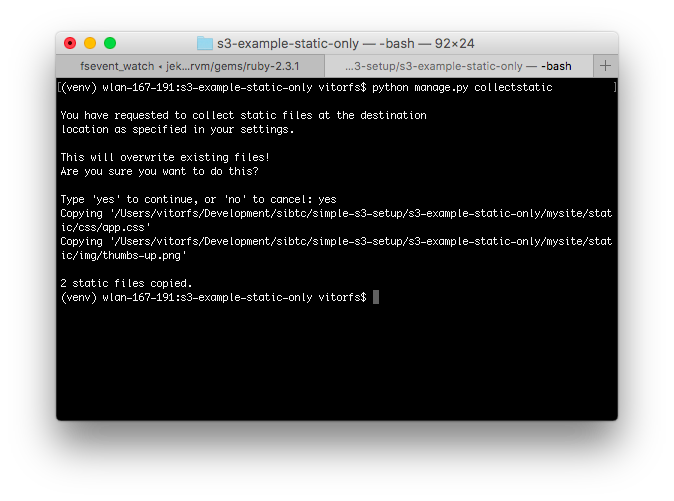
You will notice that the copying process will take longer than usual. It’s expected. I removed the Django Admin from
the INSTALLED_APPS so the example is cleaner. But if you are trying it locally, you will see lot’s of files being
copied to your S3 bucket.
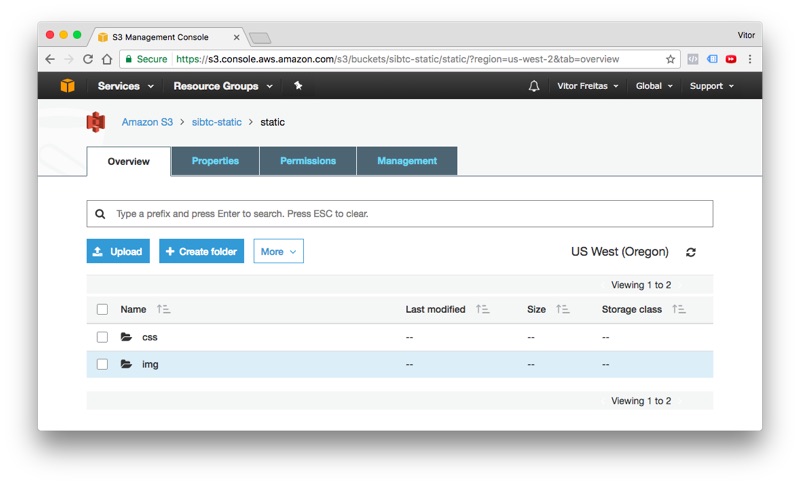
If we check on the AWS website, we will see our static assets there:
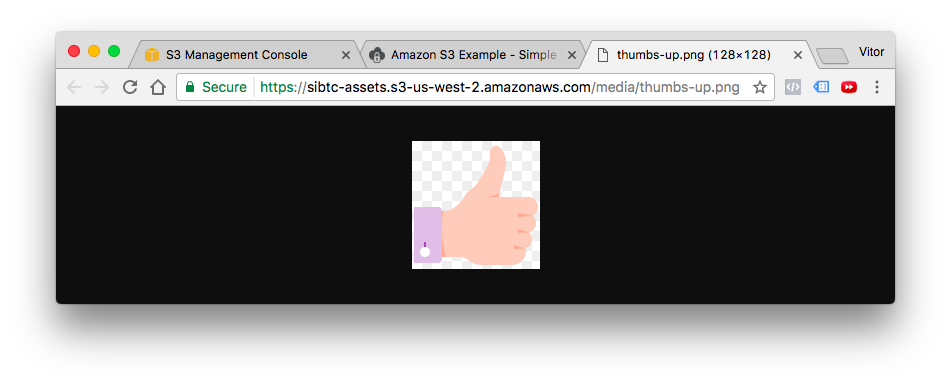
And finally, the result:
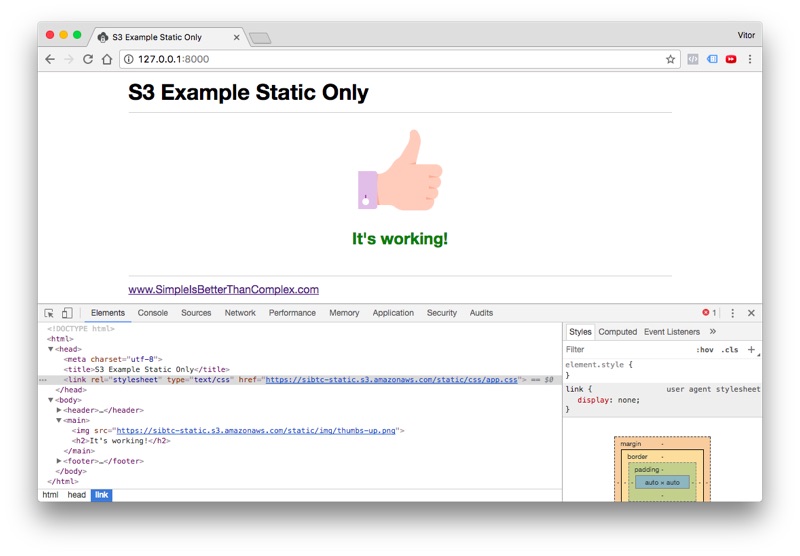
As you can see, the storage backend take care to translate the template tag
{% static 'img/thumbs-up.png' %} into https://sibtc-static.s3.amazonaws.com/static/img/thumbs-up.png
and serve it from the S3 bucket.
In the next example you will learn how to work with both static and media assets.
Working with static and media assets
For this example I created a new bucket named sibtc-assets.
The settings.py configuration will be very similar. Except we will extend the
storages.backends.s3boto3.S3Boto3Storage to add a few custom parameters, in order to be able to store the user
uploaded files, that is, the media assets in a different location and also to tell S3 to not override files with the
same name.
What I usually like to do is create storage_backends.py file in the same directory as my settings.py, and you can
define a new Storage Backend like this:
storage_backends.py
from storages.backends.s3boto3 import S3Boto3Storage

class MediaStorage(S3Boto3Storage):
    location = 'media'
    file_overwrite = False
Now on the settings.py, we need to this new backend to the DEFAULT_FILE_STORAGE option:
settings.py
STATICFILES_DIRS = [
    os.path.join(BASE_DIR, 'mysite/static'),
]

AWS_ACCESS_KEY_ID = 'AKIAIT2Z5TDYPX3ARJBA'
AWS_SECRET_ACCESS_KEY = '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'
AWS_STORAGE_BUCKET_NAME = 'sibtc-assets'
AWS_S3_CUSTOM_DOMAIN = '%s.s3.amazonaws.com' % AWS_STORAGE_BUCKET_NAME

AWS_S3_OBJECT_PARAMETERS = {
    'CacheControl': 'max-age=86400',
}

AWS_LOCATION = 'static'
STATICFILES_STORAGE = 'storages.backends.s3boto3.S3Boto3Storage'
STATIC_URL = "https://%s/%s/" % (AWS_S3_CUSTOM_DOMAIN, AWS_LOCATION)

DEFAULT_FILE_STORAGE = 'mysite.storage_backends.MediaStorage'  # <-- here is where we reference it
To illustrate a file upload, I created an app named core and defined the following model:
models.py
from django.db import models

class Document(models.Model):
    uploaded_at = models.DateTimeField(auto_now_add=True)
    upload = models.FileField()
Then this is what my view looks like:
views.py
from django.contrib.auth.decorators import login_required
from django.views.generic.edit import CreateView
from django.urls import reverse_lazy

from .models import Document


class DocumentCreateView(CreateView):
    model = Document
    fields = ['upload', ]
    success_url = reverse_lazy('home')

    def get_context_data(self, **kwargs):
        context = super().get_context_data(**kwargs)
        documents = Document.objects.all()
        context['documents'] = documents
        return context
The document_form.html template:
<form method="post" enctype="multipart/form-data">
  {% csrf_token %}
  {{ form.as_p }}
  <button type="submit">Submit</button>
</form>

<table>
  <thead>
    <tr>
      <th>Name</th>
      <th>Uploaded at</th>
      <th>Size</th>
    </tr>
  </thead>
  <tbody>
    {% for document in documents %}
      <tr>
        <td><a href="{{ document.upload.url }}" target="_blank">{{ document.upload.name }}</a></td>
        <td>{{ document.uploaded_at }}</td>
        <td>{{ document.upload.size|filesizeformat }}</td>
      </tr>
    {% empty %}
      <tr>
        <td colspan="3">No data.</td>
      </tr>
    {% endfor %}
  </tbody>
</table>
As you can see I’m only using Django’s built-in resources in the template. Here is what this template looks like:
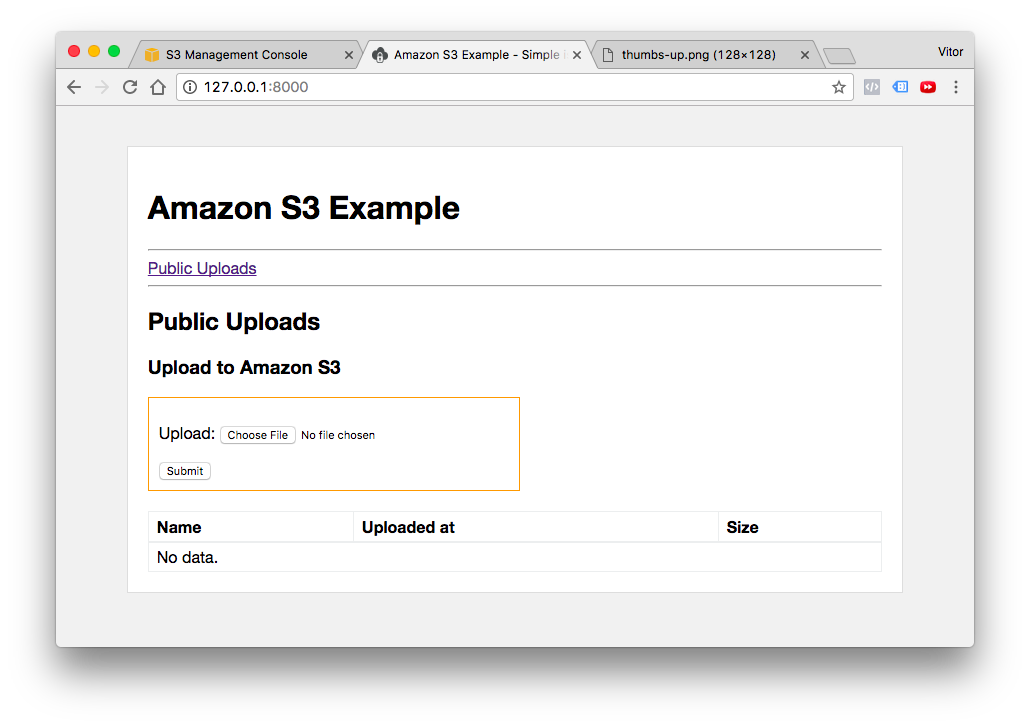
I’m not gonna dig into the details about file upload, you can read a comprehensive guide here in the blog (see the Related Posts in the end of this post for more information).
Now, testing the user uploaded files:
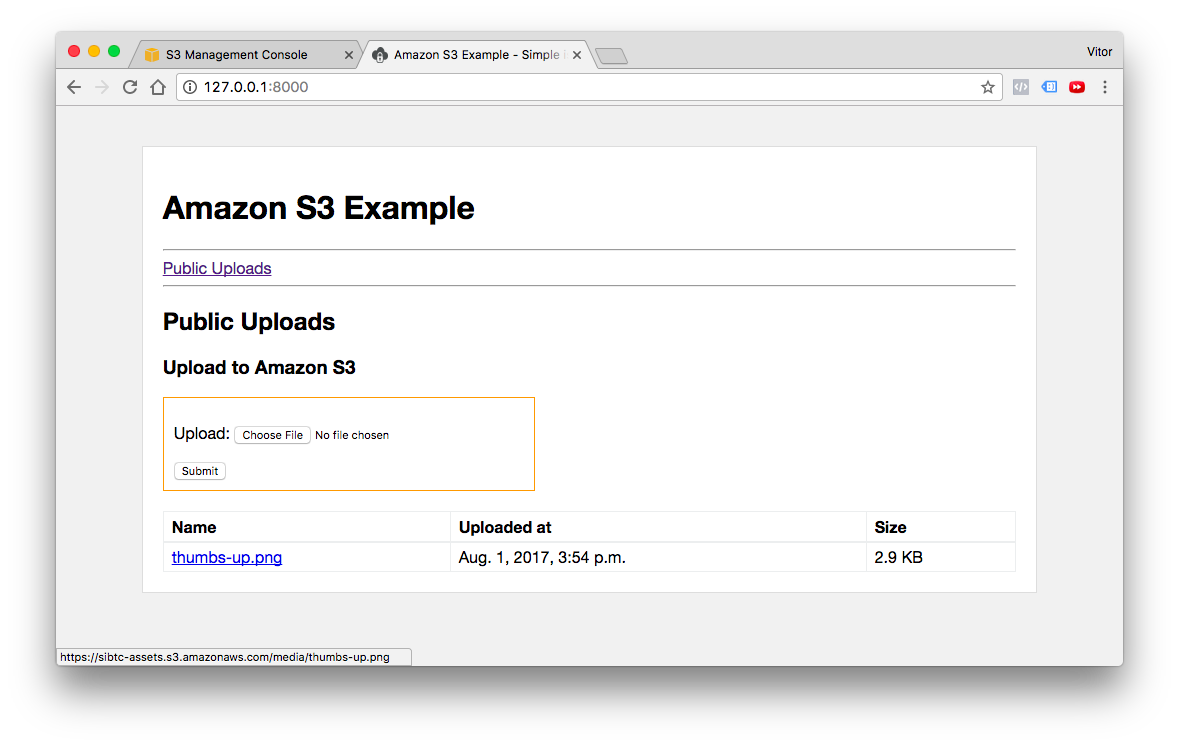
I created my template to list the uploaded files, so after a user upload some image or document it will be listed like in the picture above.
Then if we click in the link, which is the usual {{ document.upload.url }}, managed by Django,
it will render the image from the S3 bucket:
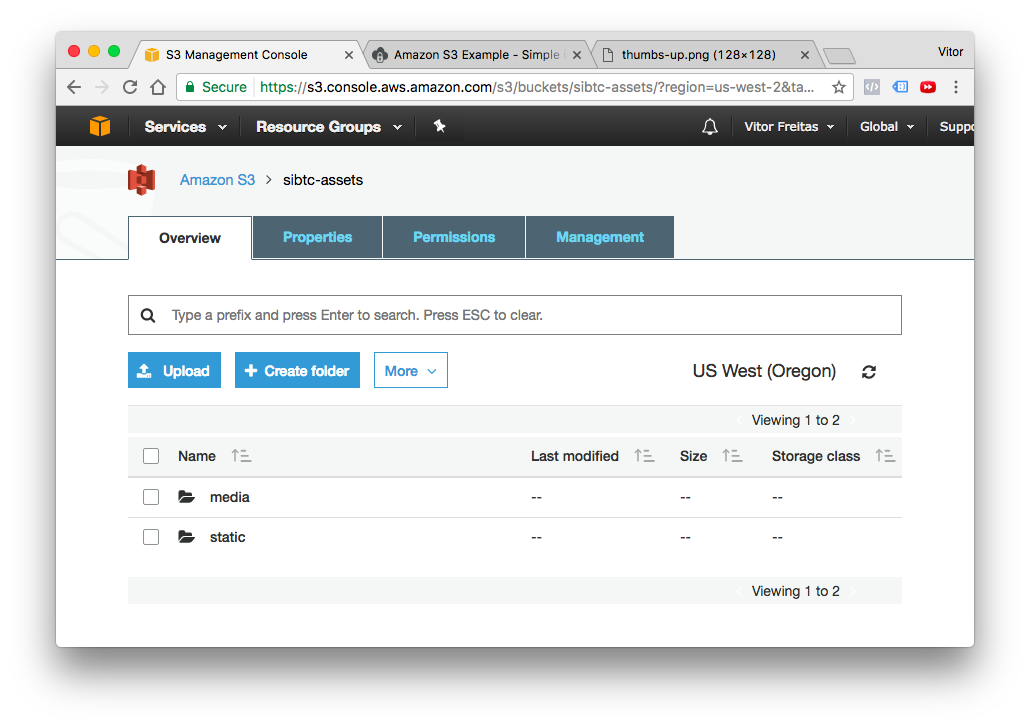
Now if we check our bucket, we can see that there’s a static and a media directory:
Mixing public assets and private assets
Using pretty much the same concepts you define some resources to be privately stored in the S3 bucket. See the configuration below:
storage_backends.py
from django.conf import settings
from storages.backends.s3boto3 import S3Boto3Storage

class StaticStorage(S3Boto3Storage):
    location = settings.AWS_STATIC_LOCATION

class PublicMediaStorage(S3Boto3Storage):
    location = settings.AWS_PUBLIC_MEDIA_LOCATION
    file_overwrite = False

class PrivateMediaStorage(S3Boto3Storage):
    location = settings.AWS_PRIVATE_MEDIA_LOCATION
    default_acl = 'private'
    file_overwrite = False
    custom_domain = False
settings.py
AWS_ACCESS_KEY_ID = 'AKIAIT2Z5TDYPX3ARJBA'
AWS_SECRET_ACCESS_KEY = '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'
AWS_STORAGE_BUCKET_NAME = 'sibtc-assets'
AWS_S3_CUSTOM_DOMAIN = '%s.s3.amazonaws.com' % AWS_STORAGE_BUCKET_NAME

AWS_S3_OBJECT_PARAMETERS = {
    'CacheControl': 'max-age=86400',
}

AWS_STATIC_LOCATION = 'static'
STATICFILES_STORAGE = 'mysite.storage_backends.StaticStorage'
STATIC_URL = "https://%s/%s/" % (AWS_S3_CUSTOM_DOMAIN, AWS_STATIC_LOCATION)

AWS_PUBLIC_MEDIA_LOCATION = 'media/public'
DEFAULT_FILE_STORAGE = 'mysite.storage_backends.PublicMediaStorage'

AWS_PRIVATE_MEDIA_LOCATION = 'media/private'
PRIVATE_FILE_STORAGE = 'mysite.storage_backends.PrivateMediaStorage'
Then we can define this new PrivateMediaStorage directly in the model definition:
models.py
from django.db import models
from django.conf import settings
from django.contrib.auth.models import User
from mysite.storage_backends import PrivateMediaStorage
class Document(models.Model):
uploaded_at = models.DateTimeField(auto_now_add=True)
upload = models.FileField()
class PrivateDocument(models.Model):
uploaded_at = models.DateTimeField(auto_now_add=True)
upload = models.FileField(storage=PrivateMediaStorage())
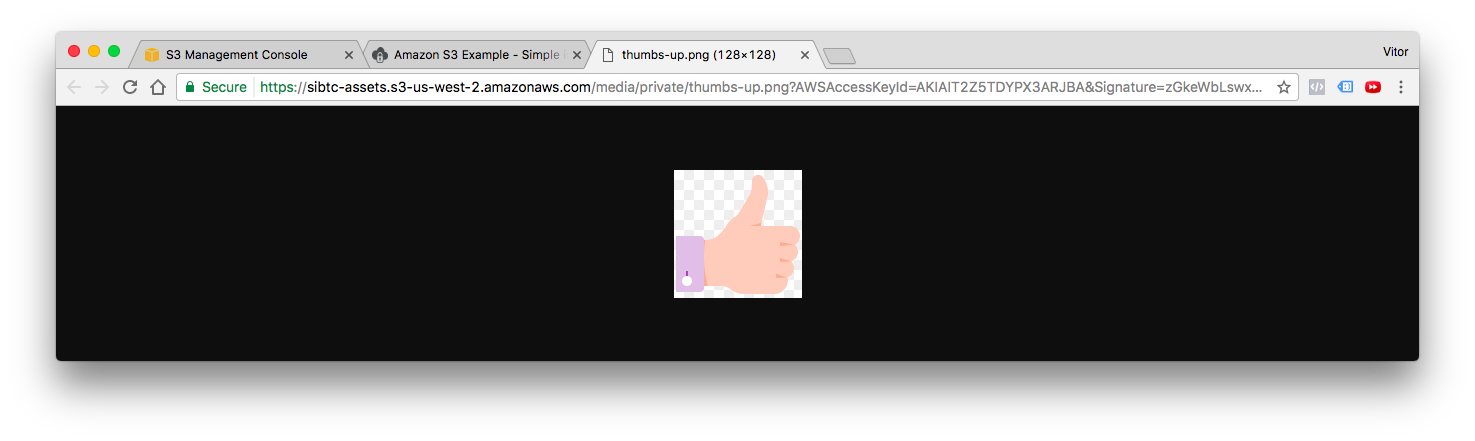
user = models.ForeignKey(User, related_name='documents')After uploading a private file, if you try to retrieve the URL of the content, the API will generate a long URL that expires after a few minutes:
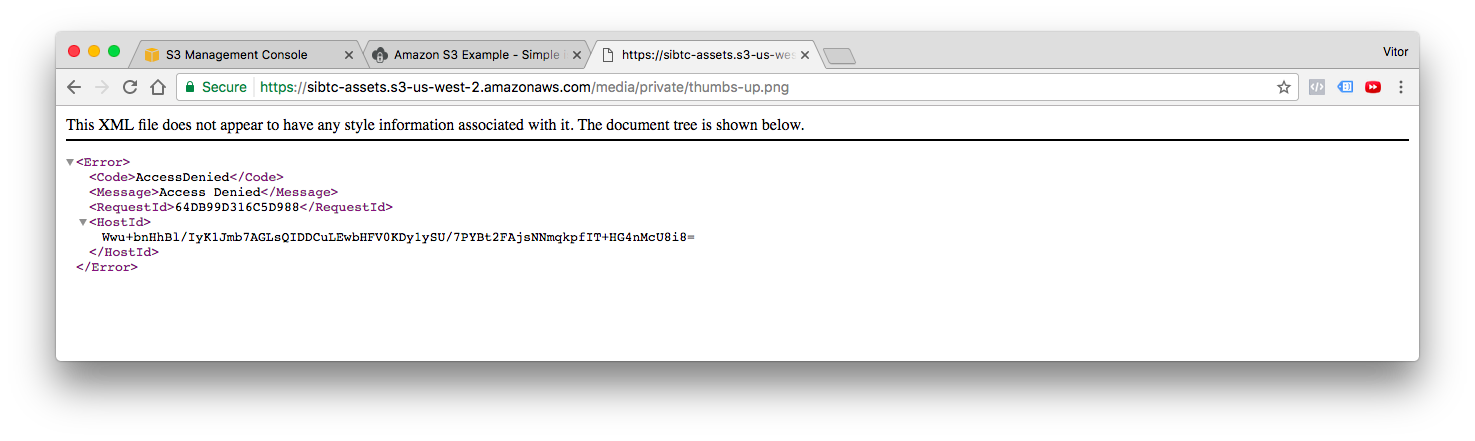
If you try to access it directly, without the parameters, you will get an error message from AWS:
Conclusions
I hope this tutorial helped to clarify a few concepts of the Amazon S3 and helped you at least get started. Don’t be afraid to dig in the official documentation from both boto3 and the django-storages library.
I have also prepared three fully functional examples (the ones that I used in this tutorial), so you can explore and find out more on how I implemented it.
github.com/sibtc/simple-s3-setup
In this repository you will find three Django projects, one for each use case:
- s3-example-public-and-private
- s3-example-static-and-media
- s3-example-static-only
Don’t forget to add your own credentials to make it work! I Left them empty on purpose.
 How to Upload Files With Django
 How to Extend Django User Model
 How to Setup a SSL Certificate on Nginx for a Django Application
 How to Deploy a Django Application to Digital Ocean