

 (Picture:
 This is a quick tutorial to get you start with django-crispy-forms and never look back. Crispy-forms is a great application that gives you control over how you render Django forms, without breaking the default behavior. This tutorial is going to be tailored towards Bootstrap 4, but it can also be used with older Bootstrap versions as well as with the Foundation framework.
The main reason why I like to use it on my projects is because you can simply render a Django form using `` and it will be nicely rendered with Bootstrap 4, with very minimal setup. It’s a really life saver.
Installation
Install it using pip:
pip install django-crispy-formsAdd it to your INSTALLED_APPS and select which styles to use:
settings.py
INSTALLED_APPS = [
    ...

    'crispy_forms',
]

CRISPY_TEMPLATE_PACK = 'bootstrap4'
Setup Bootstrap
You can either download the latest Bootstrap 4 version at getbootstrap.com. In that case, go to download page and get the Compiled CSS and JS version.
Or you can use the hosted Bootstrap CDN:
<link rel="stylesheet" href="https://stackpath.bootstrapcdn.com/bootstrap/4.1.3/css/bootstrap.min.css" integrity="sha384-MCw98/SFnGE8fJT3GXwEOngsV7Zt27NXFoaoApmYm81iuXoPkFOJwJ8ERdknLPMO" crossorigin="anonymous">
<script src="https://stackpath.bootstrapcdn.com/bootstrap/4.1.3/js/bootstrap.min.js" integrity="sha384-ChfqqxuZUCnJSK3+MXmPNIyE6ZbWh2IMqE241rYiqJxyMiZ6OW/JmZQ5stwEULTy" crossorigin="anonymous"></script>
For simplicity, I will be using the CDN version. Here is my base.html template that will be referenced in the following examples:
<!doctype html>
<html lang="en">
  <head>
    <meta charset="utf-8">
    <meta name="viewport" content="width=device-width, initial-scale=1, shrink-to-fit=no">
    <link rel="stylesheet" href="https://stackpath.bootstrapcdn.com/bootstrap/4.1.3/css/bootstrap.min.css" integrity="sha384-MCw98/SFnGE8fJT3GXwEOngsV7Zt27NXFoaoApmYm81iuXoPkFOJwJ8ERdknLPMO" crossorigin="anonymous">
    <title>Django People</title>
  </head>
  <body>
    <div class="container">
      <div class="row justify-content-center">
        <div class="col-8">
          <h1 class="mt-2">Django People</h1>
          <hr class="mt-0 mb-4">
          {% block content %}
          {% endblock %}
        </div>
      </div>
    </div>
  </body>
</html>
I only added the CSS file because we won’t be using any JavaScript feature.
Basic Usage
Suppose we have a model named Person as follows:
models.py
from django.db import models

class Person(models.Model):
    name = models.CharField(max_length=130)
    email = models.EmailField(blank=True)
    job_title = models.CharField(max_length=30, blank=True)
    bio = models.TextField(blank=True)
Let’s say we wanted to create a view to add new Person objects. In that case we could use the built-in CreateView:
views.py
from django.views.generic import CreateView
from .models import Person

class PersonCreateView(CreateView):
    model = Person
    fields = ('name', 'email', 'job_title', 'bio')
Without any further change, Django will try to use a template named people/person_form.html. In that case “people”
is the name of my Django app:
people/person_form.html
{% extends 'base.html' %}
{% block content %}
<form method="post">
{% csrf_token %}
{{ form }}
<button type="submit" class="btn btn-success">Save person</button>
</form>
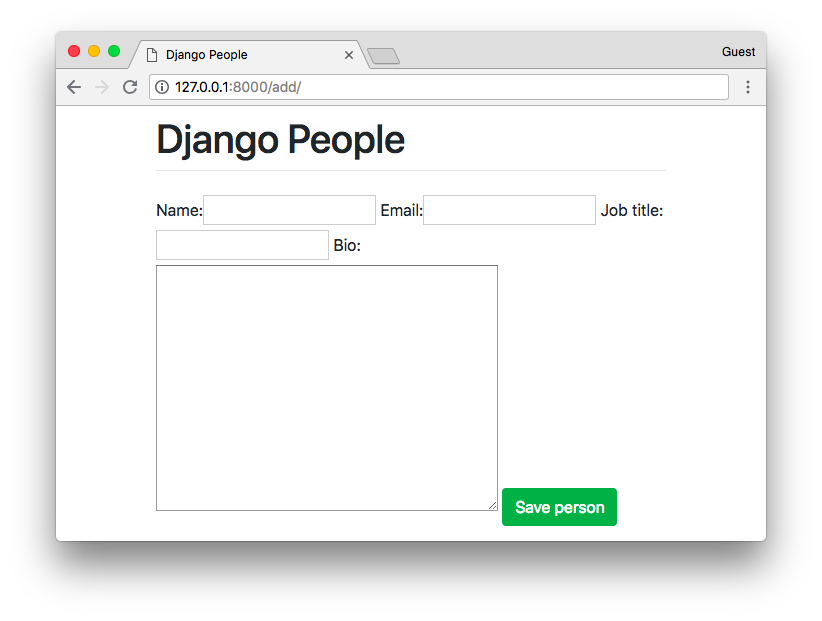
{% endblock %}This is a very basic form rendering, and as it is, Django will render it like this, with no style, just plain form fields:
To render the same form using Bootstrap 4 CSS classes you can do the following:
people/person_form.html
{% extends 'base.html' %}
{% load crispy_forms_tags %}
{% block content %}
<form method="post" novalidate>
{% csrf_token %}
{{ form|crispy }}
<button type="submit" class="btn btn-success">Save person</button>
</form>
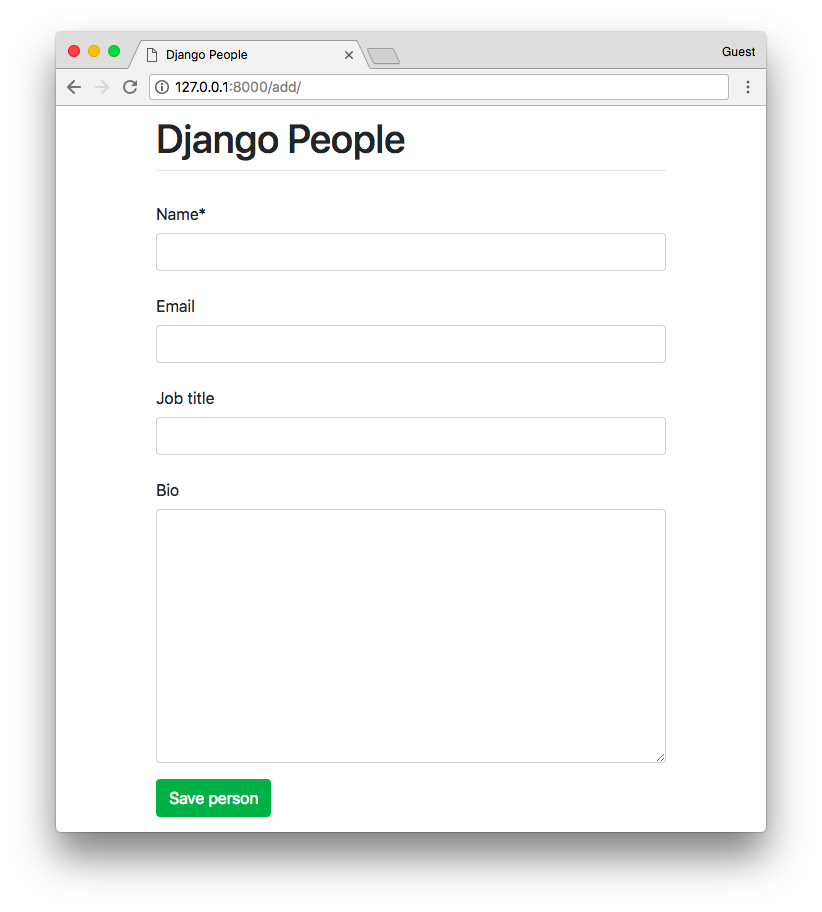
{% endblock %}Now the result, much better:
There are some cases where you may want more freedom to render your fields. You can do so by rendering the fields
manually and using the as_crispy_field template filter:
{% extends 'base.html' %}
{% load crispy_forms_tags %}
**people/person_form.html**
{% block content %}
<form method="post" novalidate>
{% csrf_token %}
<div class="row">
<div class="col-6">
{{ form.name|as_crispy_field }}
</div>
<div class="col-6">
{{ form.email|as_crispy_field }}
</div>
</div>
{{ form.job_title|as_crispy_field }}
{{ form.bio|as_crispy_field }}
<button type="submit" class="btn btn-success">Save person</button>
</form>
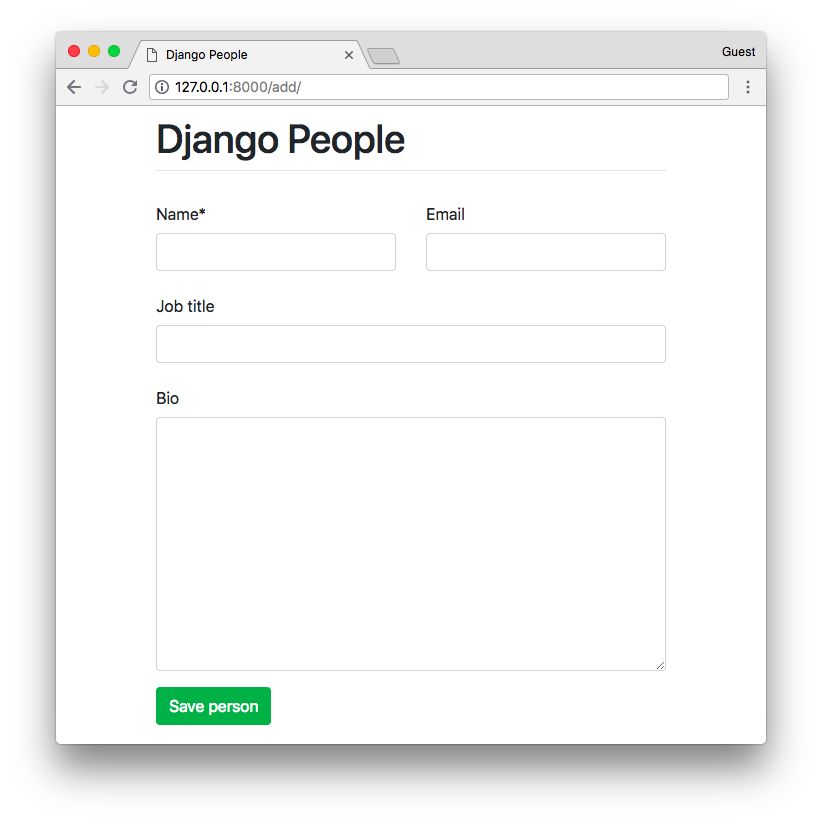
{% endblock %}And the result is something like the screen shot below:
Form Helpers
The django-crispy-forms app have a special class named FormHelper to make your life easier and to give you complete
control over how you want to render your forms.
Here is an example of an update view:
forms.py
from django import forms
from crispy_forms.helper import FormHelper
from crispy_forms.layout import Submit
from people.models import Person

class PersonForm(forms.ModelForm):
    class Meta:
        model = Person
        fields = ('name', 'email', 'job_title', 'bio')

    def __init__(self, *args, **kwargs):
        super().__init__(*args, **kwargs)
        self.helper = FormHelper()
        self.helper.form_method = 'post'
        self.helper.add_input(Submit('submit', 'Save person'))
The job is done inside the __init__() method. The rest is just a regular Django model form. Here I’m defining that
this form should handle the request using the POST method and the form should have an submit button with label
“Save person”.
Now our view, just regular Django code:
views.py
from django.views.generic import UpdateView
from people.models import Person
from people.forms import PersonForm

class PersonUpdateView(UpdateView):
    model = Person
    form_class = PersonForm
    template_name = 'people/person_update_form.html'
Then in our template:
people/person_update_form.html
{% extends 'base.html' %}
{% load crispy_forms_tags %}
{% block content %}
{% crispy form %}
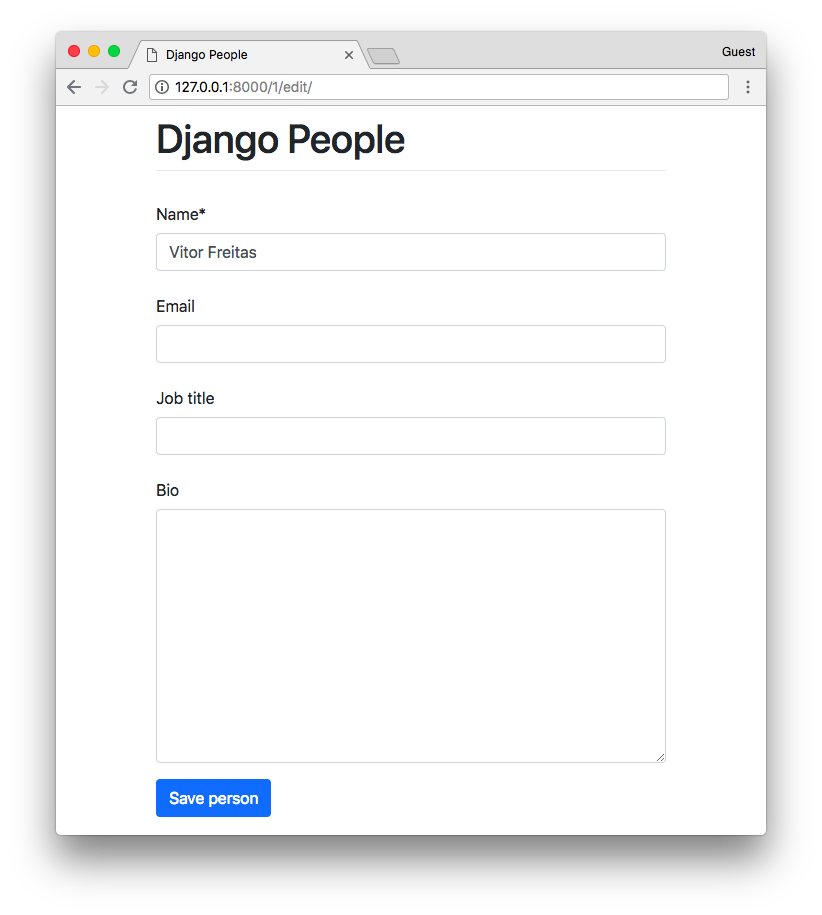
{% endblock %}Here we can simply call the {% crispy %} template tag and pass our form instance as parameter.
And that’s all you need to render the form:
Conclusions
That’s pretty much it for the basics. Honestly that’s about all that I use. Usually I don’t even go for the
FormHelper objects. But there are much more about it. If you are interested, you can check their official
documentation: django-crispy-forms.readthedocs.io.
If you are not sure about where you should create a certain file, or want to explore the sample project I created for this tutorial, you can grab the source code on GitHub at github.com/sibtc/bootstrap-forms-example.
 How to Use Date Picker with Django
 How to Implement Grouped Model Choice Field
 Advanced Form Rendering with Django Crispy Forms
 How to Extend Django User Model
 How to Setup a SSL Certificate on Nginx for a Django Application
 How to Deploy a Django Application to Digital Ocean