

 (Picture:
 [Django 2.1.3 / Python 3.6.5 / Bootstrap 4.1.3]
In this tutorial we are going to explore some of the Django Crispy Forms features to handle advanced/custom forms rendering. This blog post started as a discussion in our community forum, so I decided to compile the insights and solutions in a blog post to benefit a wider audience.
Table of Contents
- Introduction
- Installation
- Basic Form Rendering
- Basic Crispy Form Rendering
- Custom Fields Placement with Crispy Forms
- Crispy Forms Layout Helpers
- Custom Crispy Field
- Conclusions
Introduction
Throughout this tutorial we are going to implement the following Bootstrap 4 form using Django APIs:
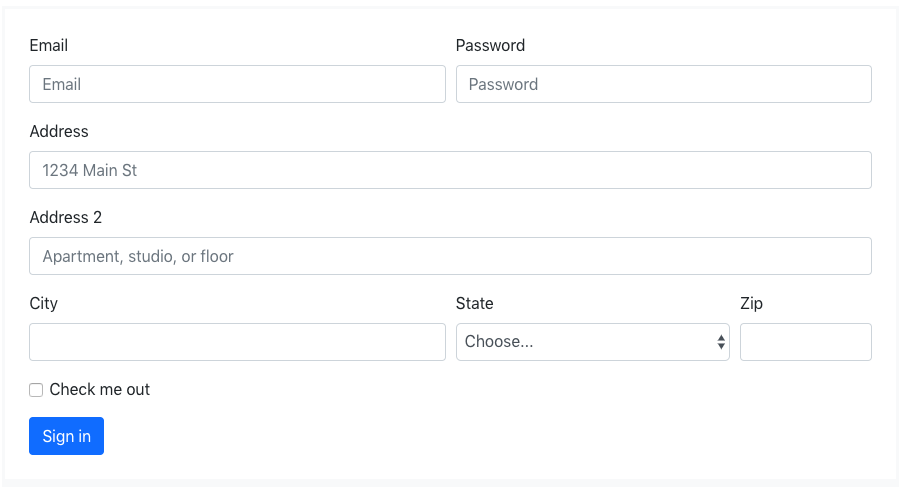
This was taken from Bootstrap 4 official documentation as an example of how to use form rows.
NOTE!
The examples below refer to a base.html template. Consider the code below:
base.html
<!doctype html>
<html lang="en">
<head>
  <meta charset="utf-8">
  <meta name="viewport" content="width=device-width, initial-scale=1, shrink-to-fit=no">
  <link rel="stylesheet" href="https://stackpath.bootstrapcdn.com/bootstrap/4.1.3/css/bootstrap.min.css" integrity="sha384-MCw98/SFnGE8fJT3GXwEOngsV7Zt27NXFoaoApmYm81iuXoPkFOJwJ8ERdknLPMO" crossorigin="anonymous">
</head>
<body>
  <div class="container">
    {% block content %}
    {% endblock %}
  </div>
</body>
</html>
Installation
Install it using pip:
pip install django-crispy-formsAdd it to your INSTALLED_APPS and select which styles to use:
settings.py
INSTALLED_APPS = [
    ...

    'crispy_forms',
]

CRISPY_TEMPLATE_PACK = 'bootstrap4'
For detailed instructions about how to install django-crispy-forms, please refer to this tutorial:
How to Use Bootstrap 4 Forms With Django
Basic Form Rendering
The Python code required to represent the form above is the following:
from django import forms

STATES = (
    ('', 'Choose...'),
    ('MG', 'Minas Gerais'),
    ('SP', 'Sao Paulo'),
    ('RJ', 'Rio de Janeiro')
)

class AddressForm(forms.Form):
    email = forms.CharField(widget=forms.TextInput(attrs={'placeholder': 'Email'}))
    password = forms.CharField(widget=forms.PasswordInput())
    address_1 = forms.CharField(
        label='Address',
        widget=forms.TextInput(attrs={'placeholder': '1234 Main St'})
    )
    address_2 = forms.CharField(
        widget=forms.TextInput(attrs={'placeholder': 'Apartment, studio, or floor'})
    )
    city = forms.CharField()
    state = forms.ChoiceField(choices=STATES)
    zip_code = forms.CharField(label='Zip')
    check_me_out = forms.BooleanField(required=False)
In this case I’m using a regular Form, but it could also be a ModelForm based on a Django model with similar
fields. The state field and the STATES choices could be either a foreign key or anything else. Here I’m just using
a simple static example with three Brazilian states.
Template:
{% extends 'base.html' %}
{% block content %}
<form method="post">
{% csrf_token %}
<table>{{ form.as_table }}</table>
<button type="submit">Sign in</button>
</form>
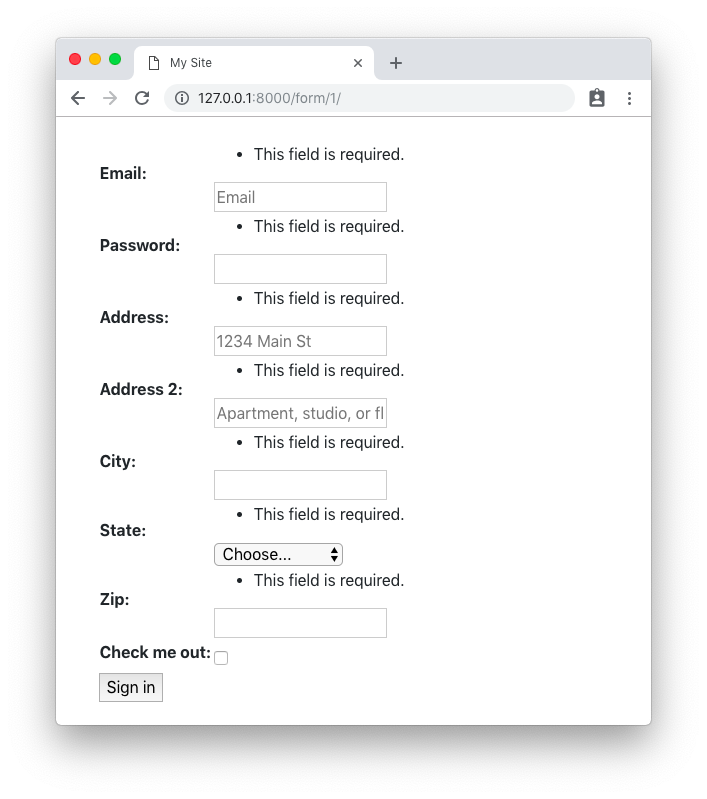
{% endblock %}Rendered HTML:

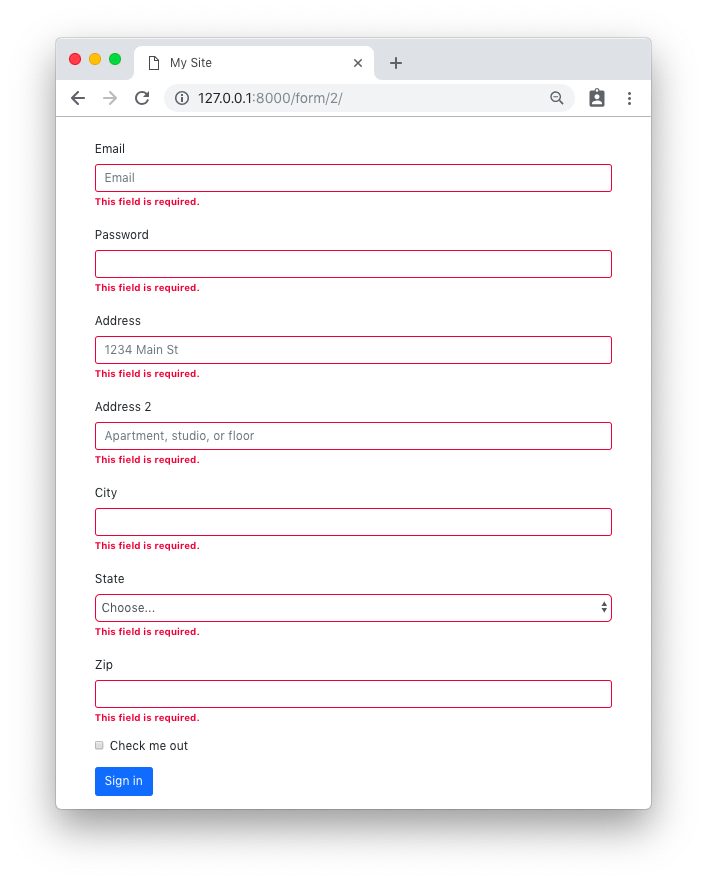
Rendered HTML with validation state:
Basic Crispy Form Rendering
Same form code as in the example before.
Template:
{% extends 'base.html' %}
{% load crispy_forms_tags %}
{% block content %}
<form method="post">
{% csrf_token %}
{{ form|crispy }}
<button type="submit" class="btn btn-primary">Sign in</button>
</form>
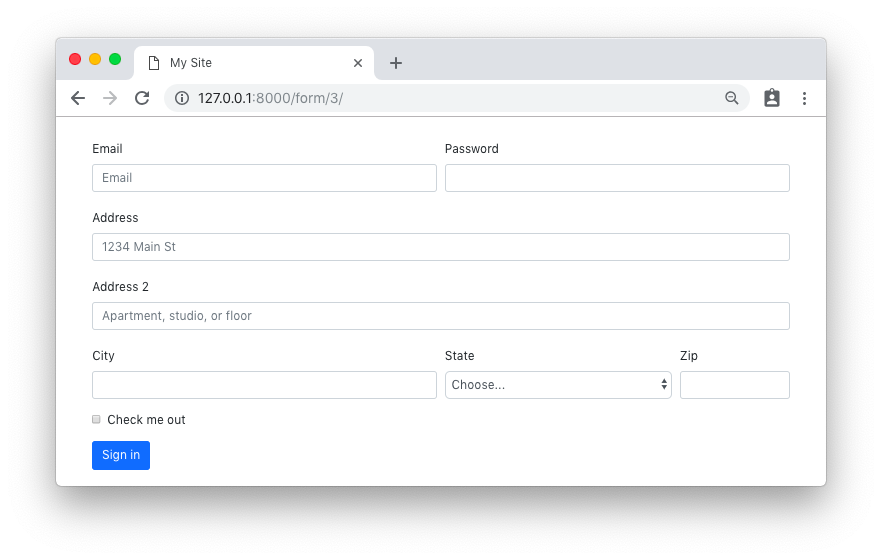
{% endblock %}Rendered HTML:
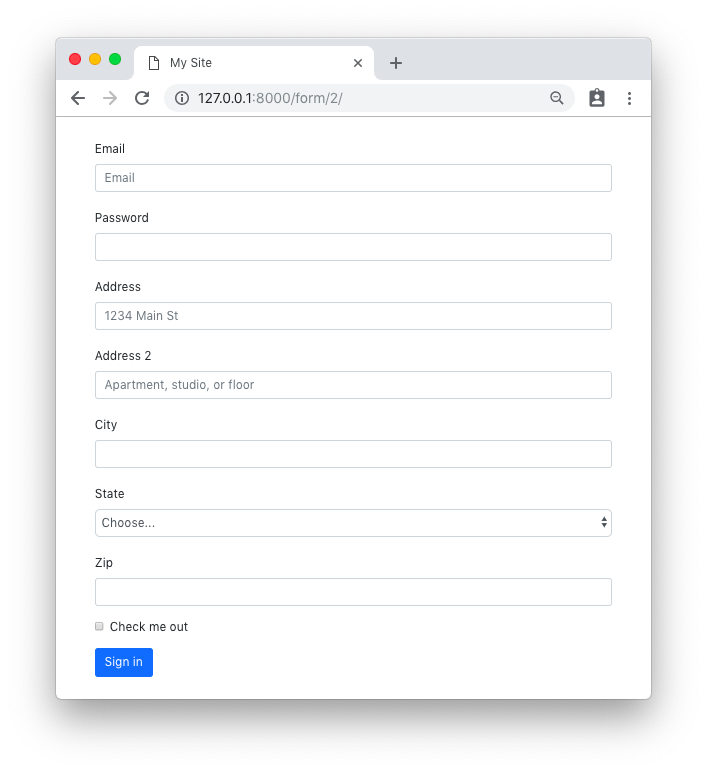
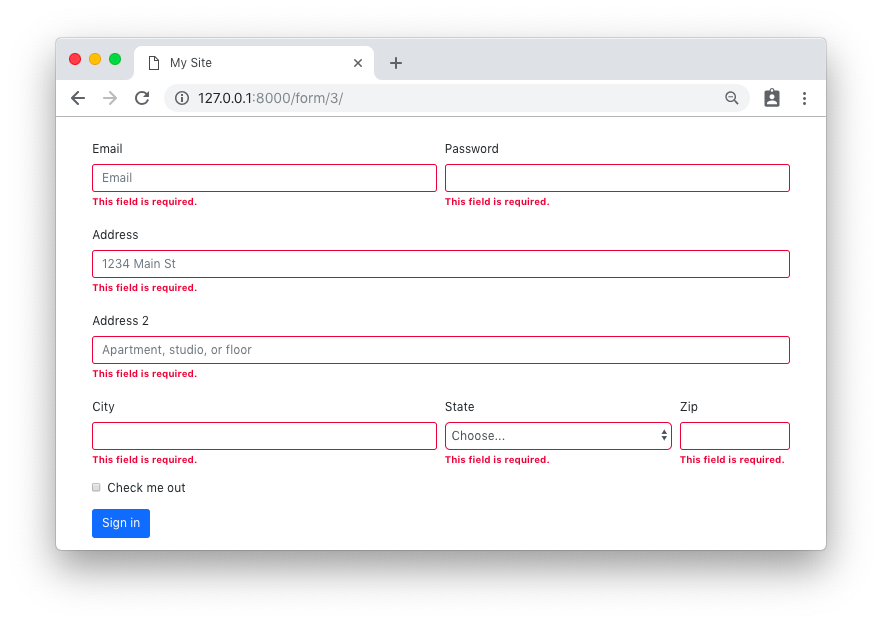
Rendered HTML with validation state:
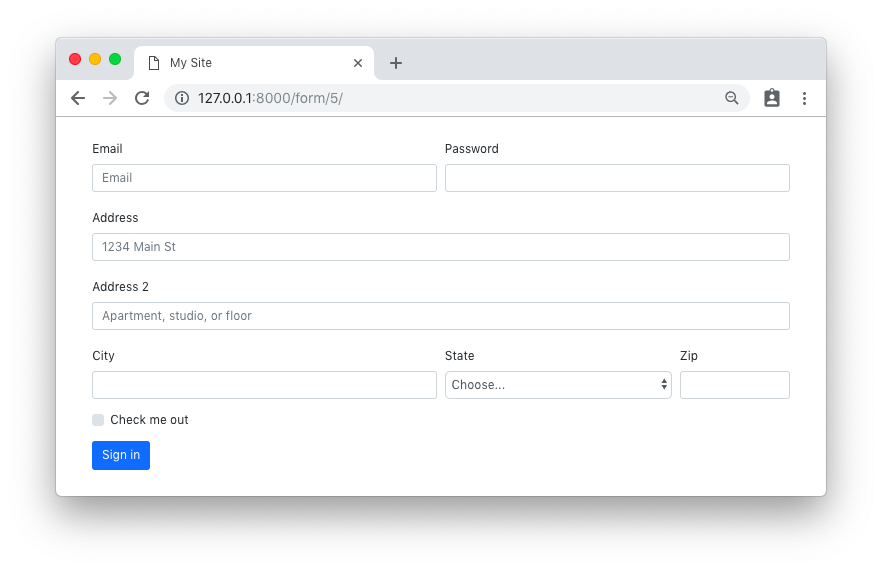
Custom Fields Placement with Crispy Forms
Same form code as in the first example.
Template:
{% extends 'base.html' %}

{% load crispy_forms_tags %}

{% block content %}
  <form method="post">
    {% csrf_token %}
    <div class="form-row">
      <div class="form-group col-md-6 mb-0">
        {{ form.email|as_crispy_field }}
      </div>
      <div class="form-group col-md-6 mb-0">
        {{ form.password|as_crispy_field }}
      </div>
    </div>
    {{ form.address_1|as_crispy_field }}
    {{ form.address_2|as_crispy_field }}
    <div class="form-row">
      <div class="form-group col-md-6 mb-0">
        {{ form.city|as_crispy_field }}
      </div>
      <div class="form-group col-md-4 mb-0">
        {{ form.state|as_crispy_field }}
      </div>
      <div class="form-group col-md-2 mb-0">
        {{ form.zip_code|as_crispy_field }}
      </div>
    </div>
    {{ form.check_me_out|as_crispy_field }}
    <button type="submit" class="btn btn-primary">Sign in</button>
  </form>
{% endblock %}
Rendered HTML:
Rendered HTML with validation state:
Crispy Forms Layout Helpers
We could use the crispy forms layout helpers to achieve the same result as above. The implementation is done inside
the form __init__ method:
forms.py
from django import forms
from crispy_forms.helper import FormHelper
from crispy_forms.layout import Layout, Submit, Row, Column

STATES = (
    ('', 'Choose...'),
    ('MG', 'Minas Gerais'),
    ('SP', 'Sao Paulo'),
    ('RJ', 'Rio de Janeiro')
)

class AddressForm(forms.Form):
    email = forms.CharField(widget=forms.TextInput(attrs={'placeholder': 'Email'}))
    password = forms.CharField(widget=forms.PasswordInput())
    address_1 = forms.CharField(
        label='Address',
        widget=forms.TextInput(attrs={'placeholder': '1234 Main St'})
    )
    address_2 = forms.CharField(
        widget=forms.TextInput(attrs={'placeholder': 'Apartment, studio, or floor'})
    )
    city = forms.CharField()
    state = forms.ChoiceField(choices=STATES)
    zip_code = forms.CharField(label='Zip')
    check_me_out = forms.BooleanField(required=False)

    def __init__(self, *args, **kwargs):
        super().__init__(*args, **kwargs)
        self.helper = FormHelper()
        self.helper.layout = Layout(
            Row(
                Column('email', css_class='form-group col-md-6 mb-0'),
                Column('password', css_class='form-group col-md-6 mb-0'),
                css_class='form-row'
            ),
            'address_1',
            'address_2',
            Row(
                Column('city', css_class='form-group col-md-6 mb-0'),
                Column('state', css_class='form-group col-md-4 mb-0'),
                Column('zip_code', css_class='form-group col-md-2 mb-0'),
                css_class='form-row'
            ),
            'check_me_out',
            Submit('submit', 'Sign in')
        )
The template implementation is very minimal:
{% extends 'base.html' %}

{% load crispy_forms_tags %}

{% block content %}
  {% crispy form %}
{% endblock %}
The end result is the same.
Rendered HTML:
Rendered HTML with validation state:
Custom Crispy Field
You may also customize the field template and easily reuse throughout your application. Let’s say we want to use the custom Bootstrap 4 checkbox:
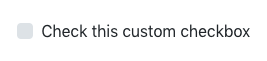
From the official documentation, the necessary HTML to output the input above:
<div class="custom-control custom-checkbox">
  <input type="checkbox" class="custom-control-input" id="customCheck1">
  <label class="custom-control-label" for="customCheck1">Check this custom checkbox</label>
</div>
Using the crispy forms API, we can create a new template for this custom field in our “templates” folder:
custom_checkbox.html
{% load crispy_forms_field %}

<div class="form-group">
  <div class="custom-control custom-checkbox">
    {% crispy_field field 'class' 'custom-control-input' %}
    <label class="custom-control-label" for="{{ field.id_for_label }}">{{ field.label }}</label>
  </div>
</div>
Now we can create a new crispy field, either in our forms.py module or in a new Python module named fields.py or something.
forms.py
from crispy_forms.layout import Field

class CustomCheckbox(Field):
    template = 'custom_checkbox.html'
We can use it now in our form definition:
forms.py
class CustomFieldForm(AddressForm):
    def __init__(self, *args, **kwargs):
        super().__init__(*args, **kwargs)
        self.helper = FormHelper()
        self.helper.layout = Layout(
            Row(
                Column('email', css_class='form-group col-md-6 mb-0'),
                Column('password', css_class='form-group col-md-6 mb-0'),
                css_class='form-row'
            ),
            'address_1',
            'address_2',
            Row(
                Column('city', css_class='form-group col-md-6 mb-0'),
                Column('state', css_class='form-group col-md-4 mb-0'),
                Column('zip_code', css_class='form-group col-md-2 mb-0'),
                css_class='form-row'
            ),
            CustomCheckbox('check_me_out'),  # <-- Here
            Submit('submit', 'Sign in')
        )
(PS: the AddressForm was defined here and is the same as in the previous example.)
The end result:
Conclusions
There is much more Django Crispy Forms can do. Hopefully this tutorial gave you some extra insights on how to use the form helpers and layout classes. As always, the official documentation is the best source of information:
Django Crispy Forms layouts docs
Also, the code used in this tutorial is available on GitHub at github.com/sibtc/advanced-crispy-forms-examples.
 How to Use Date Picker with Django
 How to Implement Grouped Model Choice Field
 How to Use Bootstrap 4 Forms With Django
 How to Extend Django User Model
 How to Setup a SSL Certificate on Nginx for a Django Application
 How to Deploy a Django Application to Digital Ocean