

 (Picture:
 In this tutorial we are going to explore three date/datetime pickers options that you can easily use in a Django project. We are going to explore how to do it manually first, then how to set up a custom widget and finally how to use a third-party Django app with support to datetime pickers.
- Introduction
- Tempus Dominus Bootstrap 4
- XDSoft DateTimePicker
- Fengyuan Chen’s Datepicker
- Conclusions
Introduction
The implementation of a date picker is mostly done on the front-end.
The key part of the implementation is to assure Django will receive the date input value in the correct format, and also that Django will be able to reproduce the format when rendering a form with initial data.
We can also use custom widgets to provide a deeper integration between the front-end and back-end and also to promote better reuse throughout a project.
In the next sections we are going to explore following date pickers:
Tempus Dominus Bootstrap 4 Docs Source
XDSoft DateTimePicker Docs Source
Fengyuan Chen’s Datepicker Docs Source
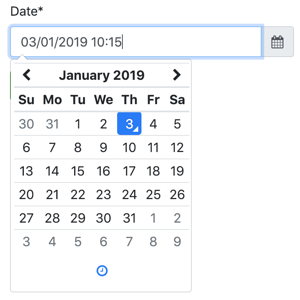
Tempus Dominus Bootstrap 4
This is a great JavaScript library and it integrate well with Bootstrap 4. The downside is that it requires moment.js and sort of need Font-Awesome for the icons.
It only make sense to use this library with you are already using Bootstrap 4 + jQuery, otherwise the list of CSS and JS may look a little bit overwhelming.
To install it you can use their CDN or download the latest release from their GitHub Releases page.
If you downloaded the code from the releases page, grab the processed code from the build/ folder.
Below, a static HTML example of the datepicker:
<!doctype html>
<html lang="en">
  <head>
    <meta charset="utf-8">
    <meta name="viewport" content="width=device-width, initial-scale=1, shrink-to-fit=no">
    <title>Static Example</title>

    <!-- Bootstrap 4 -->
    <link rel="stylesheet" href="https://stackpath.bootstrapcdn.com/bootstrap/4.2.1/css/bootstrap.min.css" integrity="sha384-GJzZqFGwb1QTTN6wy59ffF1BuGJpLSa9DkKMp0DgiMDm4iYMj70gZWKYbI706tWS" crossorigin="anonymous">
    <script src="https://code.jquery.com/jquery-3.3.1.slim.min.js" integrity="sha384-q8i/X+965DzO0rT7abK41JStQIAqVgRVzpbzo5smXKp4YfRvH+8abtTE1Pi6jizo" crossorigin="anonymous"></script>
    <script src="https://cdnjs.cloudflare.com/ajax/libs/popper.js/1.14.6/umd/popper.min.js" integrity="sha384-wHAiFfRlMFy6i5SRaxvfOCifBUQy1xHdJ/yoi7FRNXMRBu5WHdZYu1hA6ZOblgut" crossorigin="anonymous"></script>
    <script src="https://stackpath.bootstrapcdn.com/bootstrap/4.2.1/js/bootstrap.min.js" integrity="sha384-B0UglyR+jN6CkvvICOB2joaf5I4l3gm9GU6Hc1og6Ls7i6U/mkkaduKaBhlAXv9k" crossorigin="anonymous"></script>

    <!-- Font Awesome -->
    <link href="https://stackpath.bootstrapcdn.com/font-awesome/4.7.0/css/font-awesome.min.css" rel="stylesheet" integrity="sha384-wvfXpqpZZVQGK6TAh5PVlGOfQNHSoD2xbE+QkPxCAFlNEevoEH3Sl0sibVcOQVnN" crossorigin="anonymous">

    <!-- Moment.js -->
    <script src="https://cdnjs.cloudflare.com/ajax/libs/moment.js/2.23.0/moment.min.js" integrity="sha256-VBLiveTKyUZMEzJd6z2mhfxIqz3ZATCuVMawPZGzIfA=" crossorigin="anonymous"></script>

    <!-- Tempus Dominus Bootstrap 4 -->
    <link rel="stylesheet" href="https://cdnjs.cloudflare.com/ajax/libs/tempusdominus-bootstrap-4/5.1.2/css/tempusdominus-bootstrap-4.min.css" integrity="sha256-XPTBwC3SBoWHSmKasAk01c08M6sIA5gF5+sRxqak2Qs=" crossorigin="anonymous" />
    <script src="https://cdnjs.cloudflare.com/ajax/libs/tempusdominus-bootstrap-4/5.1.2/js/tempusdominus-bootstrap-4.min.js" integrity="sha256-z0oKYg6xiLq3yJGsp/LsY9XykbweQlHl42jHv2XTBz4=" crossorigin="anonymous"></script>

  </head>
  <body>

    <div class="input-group date" id="datetimepicker1" data-target-input="nearest">
      <input type="text" class="form-control datetimepicker-input" data-target="#datetimepicker1"/>
      <div class="input-group-append" data-target="#datetimepicker1" data-toggle="datetimepicker">
        <div class="input-group-text"><i class="fa fa-calendar"></i></div>
      </div>
    </div>

    <script>
      $(function () {
        $("#datetimepicker1").datetimepicker();
      });
    </script>

  </body>
</html>
Direct Usage
The challenge now is to have this input snippet integrated with a Django form.
forms.py
from django import forms

class DateForm(forms.Form):
    date = forms.DateTimeField(
        input_formats=['%d/%m/%Y %H:%M'],
        widget=forms.DateTimeInput(attrs={
            'class': 'form-control datetimepicker-input',
            'data-target': '#datetimepicker1'
        })
    )
template
<div class="input-group date" id="datetimepicker1" data-target-input="nearest">
  {{ form.date }}
  <div class="input-group-append" data-target="#datetimepicker1" data-toggle="datetimepicker">
    <div class="input-group-text"><i class="fa fa-calendar"></i></div>
  </div>
</div>

<script>
  $(function () {
    $("#datetimepicker1").datetimepicker({
      format: 'DD/MM/YYYY HH:mm',
    });
  });
</script>
The script tag can be placed anywhere because the snippet $(function () { ... }); will run the datetimepicker
initialization when the page is ready. The only requirement is that this script tag is placed after the jQuery script
tag.
Custom Widget
You can create the widget in any app you want, here I’m going to consider we have a Django app named core.
core/widgets.py
from django.forms import DateTimeInput

class BootstrapDateTimePickerInput(DateTimeInput):
    template_name = 'widgets/bootstrap_datetimepicker.html'

    def get_context(self, name, value, attrs):
        datetimepicker_id = 'datetimepicker_{name}'.format(name=name)
        if attrs is None:
            attrs = dict()
        attrs['data-target'] = '#{id}'.format(id=datetimepicker_id)
        attrs['class'] = 'form-control datetimepicker-input'
        context = super().get_context(name, value, attrs)
        context['widget']['datetimepicker_id'] = datetimepicker_id
        return context
In the implementation above we generate a unique ID datetimepicker_id and also include it in the widget context.
Then the front-end implementation is done inside the widget HTML snippet.
widgets/bootstrap_datetimepicker.html
<div class="input-group date" id="{{ widget.datetimepicker_id }}" data-target-input="nearest">
  {% include "django/forms/widgets/input.html" %}
  <div class="input-group-append" data-target="#{{ widget.datetimepicker_id }}" data-toggle="datetimepicker">
    <div class="input-group-text"><i class="fa fa-calendar"></i></div>
  </div>
</div>

<script>
  $(function () {
    $("#{{ widget.datetimepicker_id }}").datetimepicker({
      format: 'DD/MM/YYYY HH:mm',
    });
  });
</script>
Note how we make use of the built-in django/forms/widgets/input.html template.
Now the usage:
core/forms.py
from .widgets import BootstrapDateTimePickerInput

class DateForm(forms.Form):
    date = forms.DateTimeField(
        input_formats=['%d/%m/%Y %H:%M'],
        widget=BootstrapDateTimePickerInput()
    )
Now simply render the field:
template
{{ form.date }}The good thing about having the widget is that your form could have several date fields using the widget and you could simply render the whole form like:
<form method="post">
{% csrf_token %}
{{ form.as_p }}
<input type="submit" value="Submit">
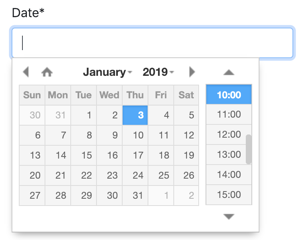
</form>XDSoft DateTimePicker
The XDSoft DateTimePicker is a very versatile date picker and doesn’t rely on moment.js or Bootstrap, although it looks good in a Bootstrap website.
It is easy to use and it is very straightforward.
You can download the source from GitHub releases page.
Below, a static example so you can see the minimum requirements and how all the pieces come together:
<!doctype html>
<html lang="en">
<head>
  <meta charset="utf-8">
  <meta name="viewport" content="width=device-width, initial-scale=1, shrink-to-fit=no">
  <title>Static Example</title>

  <!-- jQuery -->
  <script src="https://code.jquery.com/jquery-3.3.1.slim.min.js" integrity="sha384-q8i/X+965DzO0rT7abK41JStQIAqVgRVzpbzo5smXKp4YfRvH+8abtTE1Pi6jizo" crossorigin="anonymous"></script>

  <!-- XDSoft DateTimePicker -->
  <link rel="stylesheet" href="https://cdnjs.cloudflare.com/ajax/libs/jquery-datetimepicker/2.5.20/jquery.datetimepicker.min.css" integrity="sha256-DOS9W6NR+NFe1fUhEE0PGKY/fubbUCnOfTje2JMDw3Y=" crossorigin="anonymous" />
  <script src="https://cdnjs.cloudflare.com/ajax/libs/jquery-datetimepicker/2.5.20/jquery.datetimepicker.full.min.js" integrity="sha256-FEqEelWI3WouFOo2VWP/uJfs1y8KJ++FLh2Lbqc8SJk=" crossorigin="anonymous"></script>
</head>
<body>

  <input id="datetimepicker" type="text">

  <script>
    $(function () {
      $("#datetimepicker").datetimepicker();
    });
  </script>

</body>
</html>
Direct Usage
A basic integration with Django would look like this:
forms.py
from django import forms

class DateForm(forms.Form):
    date = forms.DateTimeField(input_formats=['%d/%m/%Y %H:%M'])
Simple form, default widget, nothing special.
Now using it on the template:
template
{{ form.date }}

<script>
  $(function () {
    $("#id_date").datetimepicker({
      format: 'd/m/Y H:i',
    });
  });
</script>
The id_date is the default ID Django generates for the form fields (id_ + name).
Custom Widget
core/widgets.py
from django.forms import DateTimeInput

class XDSoftDateTimePickerInput(DateTimeInput):
    template_name = 'widgets/xdsoft_datetimepicker.html'
widgets/xdsoft_datetimepicker.html
{% include "django/forms/widgets/input.html" %}

<script>
  $(function () {
    $("input[name='{{ widget.name }}']").datetimepicker({
      format: 'd/m/Y H:i',
    });
  });
</script>
To have a more generic implementation, this time we are selecting the field to initialize the component using its name instead of its id, should the user change the id prefix.
Now the usage:
core/forms.py
from django import forms
from .widgets import XDSoftDateTimePickerInput

class DateForm(forms.Form):
    date = forms.DateTimeField(
        input_formats=['%d/%m/%Y %H:%M'],
        widget=XDSoftDateTimePickerInput()
    )
template
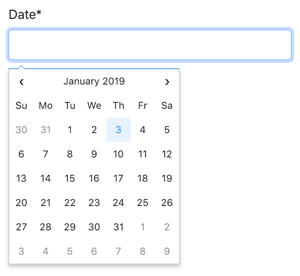
{{ form.date }}Fengyuan Chen’s Datepicker
This is a very beautiful and minimalist date picker. Unfortunately there is no time support. But if you only need dates this is a great choice.
To install this datepicker you can either use their CDN or download the sources from their GitHub releases page. Please note that they do not provide a compiled/processed JavaScript files. But you can download those to your local machine using the CDN.
<!doctype html>
<html lang="en">
<head>
  <meta charset="utf-8">
  <meta name="viewport" content="width=device-width, initial-scale=1, shrink-to-fit=no">
  <title>Static Example</title>
  <style>body {font-family: Arial, sans-serif;}</style>

  <!-- jQuery -->
  <script src="https://code.jquery.com/jquery-3.3.1.slim.min.js" integrity="sha384-q8i/X+965DzO0rT7abK41JStQIAqVgRVzpbzo5smXKp4YfRvH+8abtTE1Pi6jizo" crossorigin="anonymous"></script>

  <!-- Fengyuan Chen's Datepicker -->
  <link rel="stylesheet" href="https://cdnjs.cloudflare.com/ajax/libs/datepicker/0.6.5/datepicker.min.css" integrity="sha256-b88RdwbRJEzRx95nCuuva+hO5ExvXXnpX+78h8DjyOE=" crossorigin="anonymous" />
  <script src="https://cdnjs.cloudflare.com/ajax/libs/datepicker/0.6.5/datepicker.min.js" integrity="sha256-/7FLTdzP6CfC1VBAj/rsp3Rinuuu9leMRGd354hvk0k=" crossorigin="anonymous"></script>
</head>
<body>

  <input id="datepicker">

  <script>
    $(function () {
      $("#datepicker").datepicker();
    });
  </script>

</body>
</html>
Direct Usage
A basic integration with Django (note that we are now using DateField instead of DateTimeField):
forms.py
from django import forms

class DateForm(forms.Form):
    date = forms.DateTimeField(input_formats=['%d/%m/%Y %H:%M'])
template
{{ form.date }}

<script>
  $(function () {
    $("#id_date").datepicker({
      format:'dd/mm/yyyy',
    });
  });
</script>
Custom Widget
core/widgets.py
from django.forms import DateInput

class FengyuanChenDatePickerInput(DateInput):
    template_name = 'widgets/fengyuanchen_datepicker.html'
widgets/fengyuanchen_datepicker.html
{% include "django/forms/widgets/input.html" %}

<script>
  $(function () {
    $("input[name='{{ widget.name }}']").datepicker({
      format:'dd/mm/yyyy',
    });
  });
</script>
Usage:
core/forms.py
from django import forms
from .widgets import FengyuanChenDatePickerInput

class DateForm(forms.Form):
    date = forms.DateTimeField(
        input_formats=['%d/%m/%Y %H:%M'],
        widget=FengyuanChenDatePickerInput()
    )
template
{{ form.date }}Conclusions
The implementation is very similar no matter what date/datetime picker you are using. Hopefully this tutorial provided some insights on how to integrate this kind of frontend library to a Django project.
As always, the best source of information about each of those libraries are their official documentation.
I also created an example project to show the usage and implementation of the widgets for each of the libraries presented in this tutorial. Grab the source code at github.com/sibtc/django-datetimepicker-example.
 Advanced Form Rendering with Django Crispy Forms
 How to Use Bootstrap 4 Forms With Django
 Date Template Filter
 How to Extend Django User Model
 How to Setup a SSL Certificate on Nginx for a Django Application
 How to Deploy a Django Application to Digital Ocean