

 (Picture:
 JWT stand for JSON Web Token and it is an authentication strategy used by client/server applications where the client is a Web application using JavaScript and some frontend framework like Angular, React or VueJS.
In this tutorial we are going to explore the specifics of JWT authentication. If you want to learn more about Token-based authentication using Django REST Framework (DRF), or if you want to know how to start a new DRF project you can read this tutorial: How to Implement Token Authentication using Django REST Framework. The concepts are the same, we are just going to switch the authentication backend.
- How JWT Works?
- Installation & Setup
- Example Code
- Usage
- What’s The Point of The Refresh Token?
- Further Reading
How JWT Works?
The JWT is just an authorization token that should be included in all requests:
curl http://127.0.0.1:8000/hello/ -H 'Authorization: Bearer eyJ0eXAiOiJKV1QiLCJhbGciOiJIUzI1NiJ9.eyJ0b2tlbl90eXBlIjoiYWNjZXNzIiwiZXhwIjoxNTQzODI4NDMxLCJqdGkiOiI3ZjU5OTdiNzE1MGQ0NjU3OWRjMmI0OTE2NzA5N2U3YiIsInVzZXJfaWQiOjF9.Ju70kdcaHKn1Qaz8H42zrOYk0Jx9kIckTn9Xx7vhikY'The JWT is acquired by exchanging an username + password for an access token and an refresh token.
The access token is usually short-lived (expires in 5 min or so, can be customized though).
The refresh token lives a little bit longer (expires in 24 hours, also customizable). It is comparable to an authentication session. After it expires, you need a full login with username + password again.
Why is that?
It’s a security feature and also it’s because the JWT holds a little bit more information. If you look closely the example I gave above, you will see the token is composed by three parts:
xxxxx.yyyyy.zzzzzThose are three distinctive parts that compose a JWT:
header.payload.signatureSo we have here:
header = eyJ0eXAiOiJKV1QiLCJhbGciOiJIUzI1NiJ9
payload = eyJ0b2tlbl90eXBlIjoiYWNjZXNzIiwiZXhwIjoxNTQzODI4NDMxLCJqdGkiOiI3ZjU5OTdiNzE1MGQ0NjU3OWRjMmI0OTE2NzA5N2U3YiIsInVzZXJfaWQiOjF9
signature = Ju70kdcaHKn1Qaz8H42zrOYk0Jx9kIckTn9Xx7vhikY
This information is encoded using Base64. If we decode, we will see something like this:
header
{
  "typ": "JWT",
  "alg": "HS256"
}
payload
{
  "token_type": "access",
  "exp": 1543828431,
  "jti": "7f5997b7150d46579dc2b49167097e7b",
  "user_id": 1
}
signature
The signature is issued by the JWT backend, using the header base64 + payload base64 + SECRET_KEY. Upon each request
this signature is verified. If any information in the header or in the payload was changed by the client it will
invalidate the signature. The only way of checking and validating the signature is by using your application’s
SECRET_KEY. Among other things, that’s why you should always keep your SECRET_KEY secret!
Installation & Setup
For this tutorial we are going to use the djangorestframework_simplejwt
library, recommended by the DRF developers.
pip install djangorestframework_simplejwtsettings.py
REST_FRAMEWORK = {
    'DEFAULT_AUTHENTICATION_CLASSES': [
        'rest_framework_simplejwt.authentication.JWTAuthentication',
    ],
}
urls.py
from django.urls import path
from rest_framework_simplejwt import views as jwt_views

urlpatterns = [
    # Your URLs...
    path('api/token/', jwt_views.TokenObtainPairView.as_view(), name='token_obtain_pair'),
    path('api/token/refresh/', jwt_views.TokenRefreshView.as_view(), name='token_refresh'),
]
Example Code
For this tutorial I will use the following route and API view:
views.py
from rest_framework.views import APIView
from rest_framework.response import Response
from rest_framework.permissions import IsAuthenticated


class HelloView(APIView):
    permission_classes = (IsAuthenticated,)

    def get(self, request):
        content = {'message': 'Hello, World!'}
        return Response(content)
urls.py
from django.urls import path
from myapi.core import views

urlpatterns = [
    path('hello/', views.HelloView.as_view(), name='hello'),
]
Usage
I will be using HTTPie to consume the API endpoints via the terminal. But you can also use cURL (readily available in many OS) to try things out locally.
Or alternatively, use the DRF web interface by accessing the endpoint URLs like this:
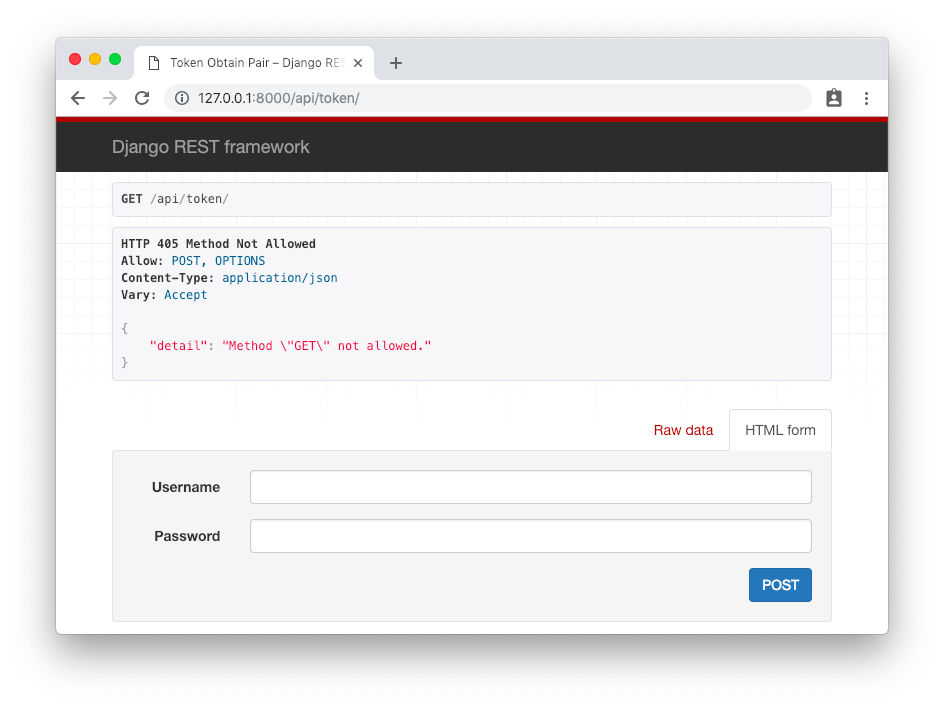
Obtain Token
First step is to authenticate and obtain the token. The endpoint is /api/token/ and it only accepts POST requests.
http post http://127.0.0.1:8000/api/token/ username=vitor password=123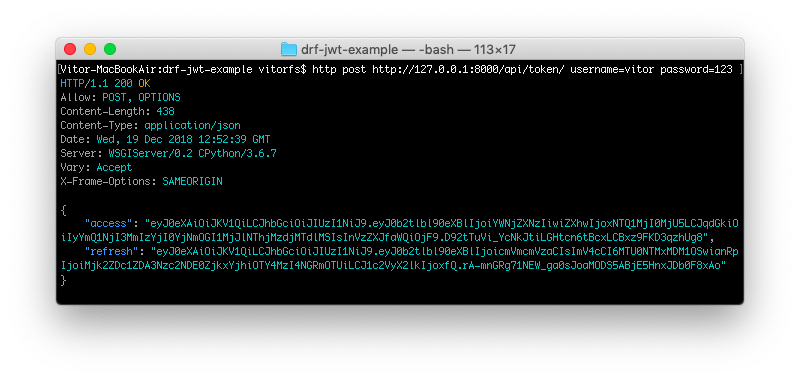
So basically your response body is the two tokens:
{
    "access": "eyJ0eXAiOiJKV1QiLCJhbGciOiJIUzI1NiJ9.eyJ0b2tlbl90eXBlIjoiYWNjZXNzIiwiZXhwIjoxNTQ1MjI0MjU5LCJqdGkiOiIyYmQ1NjI3MmIzYjI0YjNmOGI1MjJlNThjMzdjMTdlMSIsInVzZXJfaWQiOjF9.D92tTuVi_YcNkJtiLGHtcn6tBcxLCBxz9FKD3qzhUg8",
    "refresh": "eyJ0eXAiOiJKV1QiLCJhbGciOiJIUzI1NiJ9.eyJ0b2tlbl90eXBlIjoicmVmcmVzaCIsImV4cCI6MTU0NTMxMDM1OSwianRpIjoiMjk2ZDc1ZDA3Nzc2NDE0ZjkxYjhiOTY4MzI4NGRmOTUiLCJ1c2VyX2lkIjoxfQ.rA-mnGRg71NEW_ga0sJoaMODS5ABjE5HnxJDb0F8xAo"
}
After that you are going to store both the access token and the refresh token on the client side, usually in the localStorage.
In order to access the protected views on the backend (i.e., the API endpoints that require authentication), you should include the access token in the header of all requests, like this:
http http://127.0.0.1:8000/hello/ "Authorization: Bearer eyJ0eXAiOiJKV1QiLCJhbGciOiJIUzI1NiJ9.eyJ0b2tlbl90eXBlIjoiYWNjZXNzIiwiZXhwIjoxNTQ1MjI0MjAwLCJqdGkiOiJlMGQxZDY2MjE5ODc0ZTY3OWY0NjM0ZWU2NTQ2YTIwMCIsInVzZXJfaWQiOjF9.9eHat3CvRQYnb5EdcgYFzUyMobXzxlAVh_IAgqyvzCE"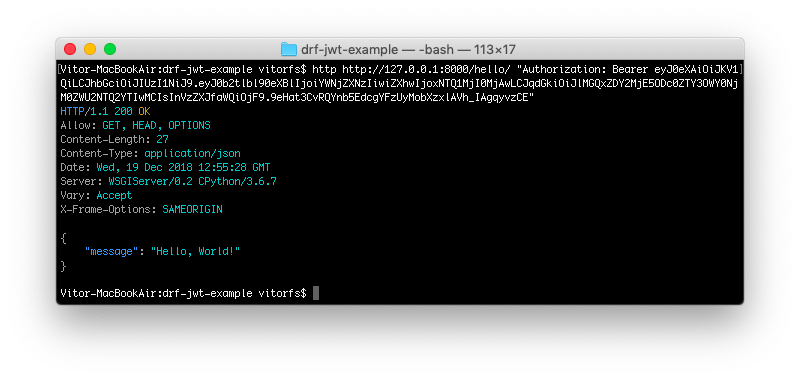
You can use this access token for the next five minutes.
After five min, the token will expire, and if you try to access the view again, you are going to get the following error:
http http://127.0.0.1:8000/hello/ "Authorization: Bearer eyJ0eXAiOiJKV1QiLCJhbGciOiJIUzI1NiJ9.eyJ0b2tlbl90eXBlIjoiYWNjZXNzIiwiZXhwIjoxNTQ1MjI0MjAwLCJqdGkiOiJlMGQxZDY2MjE5ODc0ZTY3OWY0NjM0ZWU2NTQ2YTIwMCIsInVzZXJfaWQiOjF9.9eHat3CvRQYnb5EdcgYFzUyMobXzxlAVh_IAgqyvzCE"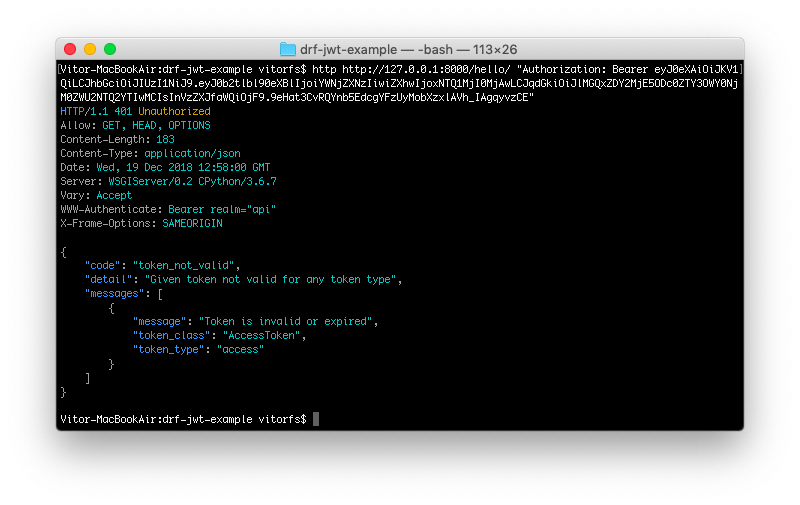
Refresh Token
To get a new access token, you should use the refresh token endpoint /api/token/refresh/ posting the
refresh token:
http post http://127.0.0.1:8000/api/token/refresh/ refresh=eyJ0eXAiOiJKV1QiLCJhbGciOiJIUzI1NiJ9.eyJ0b2tlbl90eXBlIjoicmVmcmVzaCIsImV4cCI6MTU0NTMwODIyMiwianRpIjoiNzAyOGFlNjc0ZTdjNDZlMDlmMzUwYjg3MjU1NGUxODQiLCJ1c2VyX2lkIjoxfQ.Md8AO3dDrQBvWYWeZsd_A1J39z6b6HEwWIUZ7ilOiPE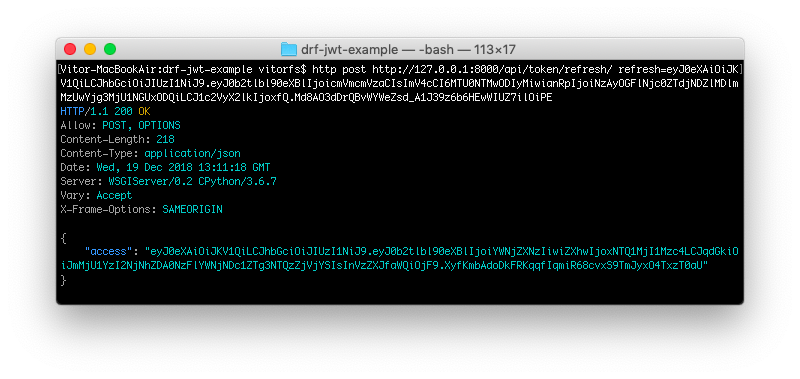
The return is a new access token that you should use in the subsequent requests.
The refresh token is valid for the next 24 hours. When it finally expires too, the user will need to perform a full authentication again using their username and password to get a new set of access token + refresh token.
What’s The Point of The Refresh Token?
At first glance the refresh token may look pointless, but in fact it is necessary to make sure the user still have the correct permissions. If your access token have a long expire time, it may take longer to update the information associated with the token. That’s because the authentication check is done by cryptographic means, instead of querying the database and verifying the data. So some information is sort of cached.
There is also a security aspect, in a sense that the refresh token only travel in the POST data. And the access token is sent via HTTP header, which may be logged along the way. So this also give a short window, should your access token be compromised.
Further Reading
This should cover the basics on the backend implementation. It’s worth checking the djangorestframework_simplejwt settings for further customization and to get a better idea of what the library offers.
The implementation on the frontend depends on what framework/library you are using. Some libraries and articles covering popular frontend frameworks like angular/react/vue.js:
- Angular JWT library
- Angular 2 JWT library
- Secure Your React and Redux App with JWT Authentication
- Authenticating via JWT using Django, Axios, and Vue
The code used in this tutorial is available at github.com/sibtc/drf-jwt-example.
 How to Save Extra Data to a Django REST Framework Serializer
 How to Implement Token Authentication using Django REST Framework
 Django Authentication Video Tutorial
 How to Extend Django User Model
 How to Setup a SSL Certificate on Nginx for a Django Application
 How to Deploy a Django Application to Digital Ocean