

 (Picture:
 Dealing with user input is a very common task in any Web application or Web site. The standard way to do it is through HTML forms, where the user input some data, submit it to the server, and then the server does something with it. Now, the chances are that you might have already heard that quote: “All input is evil!” I don’t know who said that first, but it was very well said. Truth is, every input in your application is a door, a potential attack vector. So you better secure all doors! To make your life easier, and to give you some peace of mind, Django offers a very rich, reliable and secure forms API. And you should definitely use it, no matter how simple your HTML form is.
Managing user input, form processing is a fairly complex task, because it involves interacting with many layers of your application. It have to access the database; clean, validate, transform, and guarantee the integrity of the data; sometimes it needs to interact with multiple models, communicate human readable error messages, and then finally it also have to translate all the Python code that represents your models into HTML inputs. In some cases, those HTML inputs may involve JavaScript and CSS code (a custom date picker, or an auto-complete field for example).
The thing is, Django does very well the server-side part. But it doesn’t mess much with the client-side part. The HTML forms automatically generated by Django is fully functional and can be used as it is. But it’s very crude, it’s just plain HTML, no CSS and no JavaScripts. It was done that way so you can have total control on how to present the forms so to match with your application’s Web design. On the server-side is a little bit different, as thing are more standardized, so most of the functionalities offered by the forms API works out-of-the-box. And for the special cases, it provide many ways to customize it.
In this tutorial I will show you how to work with the rendering part, using custom CSS and making your forms prettier.
Here is the table of contents of this article:
- Working Example
- Understanding the Rendering Process
- Accessing the Form Fields Individually
- Expanding the Form Fields
- Using Custom HTML Attributes
- Using Django Widget Tweaks
- Rendering Bootstrap 4 Forms
- Reusing Form Components
- Conclusions
Working Example
Throughout the whole tutorial I will be using the following form definition to illustrate the examples:
forms.py
from django import forms

class ContactForm(forms.Form):
    name = forms.CharField(max_length=30)
    email = forms.EmailField(max_length=254)
    message = forms.CharField(
        max_length=2000,
        widget=forms.Textarea(),
        help_text='Write here your message!'
    )
    source = forms.CharField(       # A hidden input for internal use
        max_length=50,              # tell from which page the user sent the message
        widget=forms.HiddenInput()
    )

    def clean(self):
        cleaned_data = super(ContactForm, self).clean()
        name = cleaned_data.get('name')
        email = cleaned_data.get('email')
        message = cleaned_data.get('message')
        if not name and not email and not message:
            raise forms.ValidationError('You have to write something!')
And the following view just to load the form and trigger the validation process so we can have the form in different states:
views.py
from django.shortcuts import render
from .forms import ContactForm

def home(request):
    if request.method == 'POST':
        form = ContactForm(request.POST)
        if form.is_valid():
            pass  # does nothing, just trigger the validation
    else:
        form = ContactForm()
    return render(request, 'home.html', {'form': form})
Understanding the Rendering Process
In many tutorials or in the official Django documentation, it’s very common to see form templates like this:
<form method="post" novalidate>
  {% csrf_token %}
  {{ form }}
  <button type="submit">Submit</button>
</form>novalidate attribute in the form. In a real case you probably won't
want to use it. It prevents the browser from "validating" the data before submitting to the server. As in the
examples we are going to explore I only have "required" field errors, it would prevent us from seeing the server-side
actual data validation and exploring the error states of the form rendering.
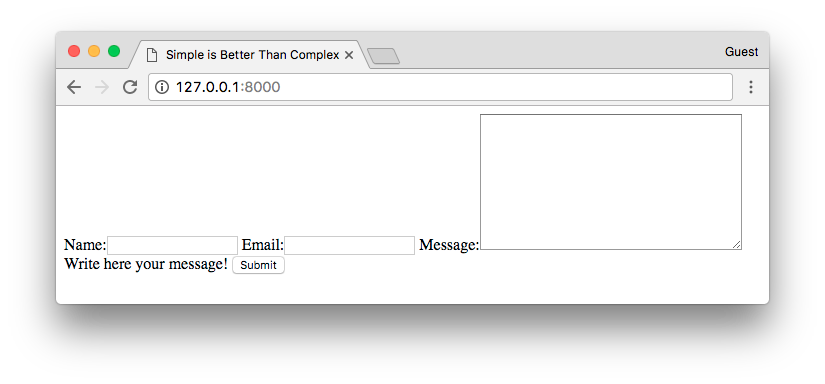
It looks like magic, right? Because this particular form may contain 50 fields, and the simple command
{{ form }} will render them all in the template.
When we write {{ form }} in a template, it’s actually accessing the
__str__ method from the BaseForm class. The __str__ method is used to provide
a string representation of an object. If you have a look in the source code, you will see that it returns the
as_table() method. So, basically {{ form }} and {{ form.as_table }} is
the same thing.
The forms API offer three methods to automatically render the HTML form:
They all work more or less in the same way, the difference is the HTML code that wraps the inputs.
Below is the result of the previous code snippet:
But, if {{ form }} and {{ form.as_table }} is the same thing, the output
definitively doesn’t look like a table, right? That’s because the as_table() and as_ul() doesn’t create the
<table> and the <ul> tags, so we have to add it by ourselves.
So, the correct way to do it would be:
<form method="post" novalidate>
  {% csrf_token %}
  <table border="1">
    {{ form }}
  </table>
  <button type="submit">Submit</button>
</form>
Now it makes sense right? Without the <table> tag the browser doesn’t really know how to render
the HTML output, so it just present all the visible fields in line, as we don’t have any CSS yet.
If you have a look in the _html_output private method defined in the
BaseForm, which is used by all the as_*() methods, you will see that it’s a fairly complex method with 76 lines of
code and it does lots of things. It’s okay because this method is well tested and it’s part of the core of the forms
API, the underlying mechanics that make things work. When working on your own form rendering logic you won’t need to
write Python code to do the job. It’s much better to do it using the Django Templates engine, as you can achieve a more
clean and easier to maintain code.
I’m mentioning the _html_output method here because we can use it to analyze what kind of code it’s generating, what
it’s really doing, so we can mimic it using the template engine. It’s also a very good exercise to read the source
code and get more comfortable with it. It’s a great source of information. Even though Django’s documentation is very
detailed and extensive, there are always some hidden bits here and there. You also get the chance to see by examples
how smart coders solved specific problems. After all, it’s an open source project with a mature development process
that many have contributed, so the chances are you are reading an optimal code.
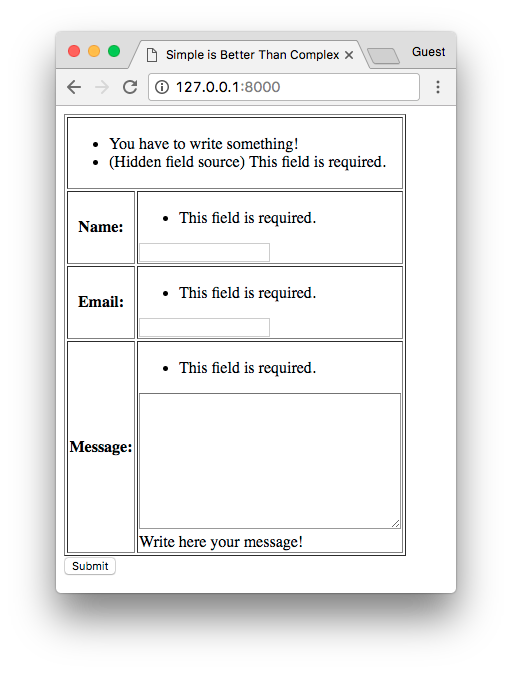
Anyway, here it is, in a nutshell, what the _html_output does:
- Aggregate the errors that are not attached to specific fields (non field errors) and errors from hidden fields;
- Place the non field errors and hidden field errors on top of the form;
- Iterate through all the form fields;
- Render the form fields one by one;
- Render the field name in a label tag;
- If there are field errors, render a HTML list with errors first;
- Render the HTML input for the field;
- If there is a help text, render it after the field.
Here is what the second state of the form looks like, triggering all the validation errors:
Now that we know what it’s doing, we can try to mimic the same behavior using the template engine. This way, we will have much more control over the rendering process:
<form method="post" novalidate>
  {% csrf_token %}

  {{ form.non_field_errors }}

  {% for hidden_field in form.hidden_fields %}
    {{ hidden_field.errors }}
    {{ hidden_field }}
  {% endfor %}

  <table border="1">
    {% for field in form.visible_fields %}
      <tr>
        <th>{{ field.label_tag }}</th>
        <td>
          {{ field.errors }}
          {{ field }}
          {{ field.help_text }}
        </td>
      </tr>
    {% endfor %}
  </table>

  <button type="submit">Submit</button>
</form>
You will notice that the result is slightly different, but all the elements are there. The thing is, the automatic
generation of the HTML just using the {{ form }} takes advantage of the Python language, so it
can play with string concatenation, joining lists (non field errors + hidden field errors), and this sort of things.
The template engine is more limited and restrict, but that’s not an issue. I like the Django Template engine because
it doesn’t let you do much code logic in the template.
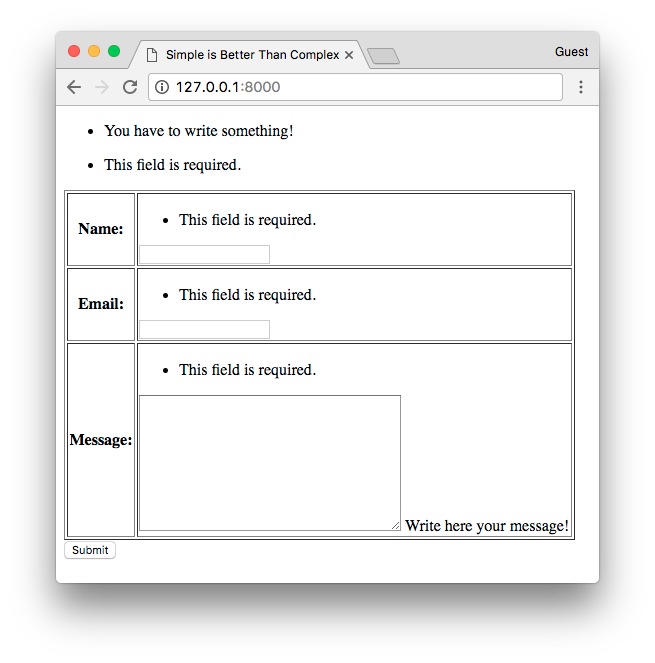
The only real issue is the random “This field is required” on the top, which refers to the source field. But we can improve that. Let’s keep expanding the form rendering, so we can even get more control over it:
<form method="post" novalidate>
  {% csrf_token %}

  {% if form.non_field_errors %}
    <ul>
      {% for error in form.non_field_errors %}
        <li>{{ error }}</li>
      {% endfor %}
    </ul>
  {% endif %}

  {% for hidden_field in form.hidden_fields %}
    {% if hidden_field.errors %}
      <ul>
        {% for error in hidden_field.errors %}
          <li>(Hidden field {{ hidden_field.name }}) {{ error }}</li>
        {% endfor %}
      </ul>
    {% endif %}
    {{ hidden_field }}
  {% endfor %}

  <table border="1">
    {% for field in form.visible_fields %}
      <tr>
        <th>{{ field.label_tag }}</th>
        <td>
          {% if field.errors %}
            <ul>
              {% for error in field.errors %}
                <li>{{ error }}</li>
              {% endfor %}
            </ul>
          {% endif %}
          {{ field }}
          {% if field.help_text %}
            <br />{{ field.help_text }}
          {% endif %}
        </td>
      </tr>
    {% endfor %}
  </table>

  <button type="submit">Submit</button>
</form>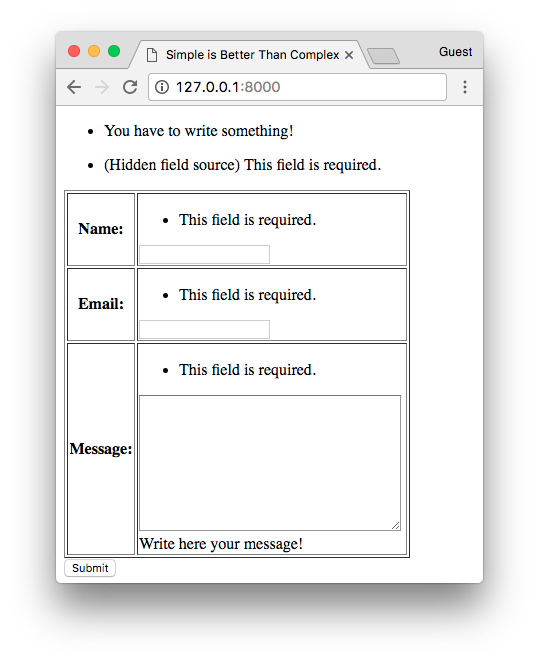
Much closer right?
Now that we know how to “expand” the {{ form }} markup, let’s try to make it look prettier.
Perhaps using the Bootstrap 4 library.
Accessing the Form Fields Individually
We don’t need a for loop to expose the form fields. But it’s a very convenient way to do it, specially if you don’t have any special requirements for the elements positioning.
Here is how we can refer to the form fields one by one:
<form method="post" novalidate>
  {% csrf_token %}

  {{ form.non_field_errors }}

  {{ form.source.errors }}
  {{ form.source }}

  <table border="1">

      <tr>
        <th>{{ form.name.label_tag }}</th>
        <td>
          {{ form.name.errors }}
          {{ form.name }}
        </td>
      </tr>

      <tr>
        <th>{{ form.email.label_tag }}</th>
        <td>
          {{ form.email.errors }}
          {{ form.email }}
        </td>
      </tr>

      <tr>
        <th>{{ form.message.label_tag }}</th>
        <td>
          {{ form.message.errors }}
          {{ form.message }}
          <br />
          {{ form.message.help_text }}
        </td>
      </tr>

  </table>

  <button type="submit">Submit</button>
</form>
It’s not a very DRY solution. But it’s good to know how to do it. Sometimes you may have a very specific use case that you will need to position the fields in the HTML by yourself.
Expanding the Form Fields
We can still dig deeper and expand the {{ field }} markup (or if you are doing it individually,
it would be the {{ form.name }} or {{ form.email }} fields for example).
But now things get a little bit more complex, because we are talking about the widgets. For example, the name field
translates into a <input type="text"> tag, while the email field translates into a
<input type="email"> tag, and even more problematic, the message field translates into a
<textarea></textarea> tag.
At this point, Django makes use of small HTML templates to generate the output HTML of the fields.
So let’s see how Django does it. If we open the text.html or the email.html templates from the widgets folder, we will see it simply includes the input.html template file:
{% include "django/forms/widgets/input.html" %}This suggests the input.html template is probably the most generic one, the specifics of the rendering might be inside it. So, let’s have a look:
<input type="{{ widget.type }}"
       name="{{ widget.name }}"
       {% if widget.value != None %} value="{{ widget.value|stringformat:'s' }}"{% endif %}
       {% include "django/forms/widgets/attrs.html" %} />
Basically this small template sets the input type, it’s name which is used to access the data in the request
object. For example, an input with name “message”, if posted to the server, is accessible via
request.POST['message'].
Still on the input.html template snippet, it also sets the current value of the field, or leave it empty if there is no data. It’s an important bit in the template, because that’s what keeps the state of the form after it’s submitted and wasn’t successfully processed (form was invalid).
Finally, it includes the attrs.html template, which is responsible for setting attributes such as maxlength, required, placeholder, style, or any other HTML attribute. It’s highly customizable in the form definition.
If you are curious about the attrs.html, here is what it looks like:
{% for name, value in widget.attrs.items %}
  {% if value is not False %}
    {{ name }}{% if value is not True %}="{{ value|stringformat:'s' }}"{% endif %}
  {% endif %}
{% endfor %}
Now, if you really want to create the inputs by yourself, you can do it like this (just the name field, for brevity):
<input type="text"
       name="name"
       id="id_name"
       {% if form.name.value != None %}value="{{ form.name.value|stringformat:'s' }}"{% endif %}
       maxlength="30"
       required>
Or a little bit better:
<input type="text"
       name="{{ form.name.name }}"
       id="{{ form.name.id_for_label }}"
       {% if form.name.value != None %}value="{{ form.name.value|stringformat:'s' }}"{% endif %}
       maxlength="{{ form.name.field.max_length }}"
       {% if form.name.field.required %}required{% endif %}>
Probably you already figured out that’s not the best way to work with forms. And maybe you are also asking yourself
why sometimes we refer to a certain attribute as {{ form.name.<something> }} and in other situations
we use {{ form.name.field.<something> }}.
I don’t want to go into much detail about it right now, but basically form.name is a BoundField (field + data)
instance, and then, the form.name.field is the field definition, which is an instance of forms.CharField. That’s
why some values are available in the bound field instance, and others are in the char field definition.
In any form definition, the form’s __iter__ returns a list of BoundField instances, in a similar way, the
visible_fields() and hidden_fields() methods also return BoundField instances. Now, if you access the
form.fields, it refers to a list of CharField, EmailField, and all other field definitions etc. If that’s too
much information for you right now, it’s okay, you don’t have to bother about it right now.
Using Custom HTML Attributes
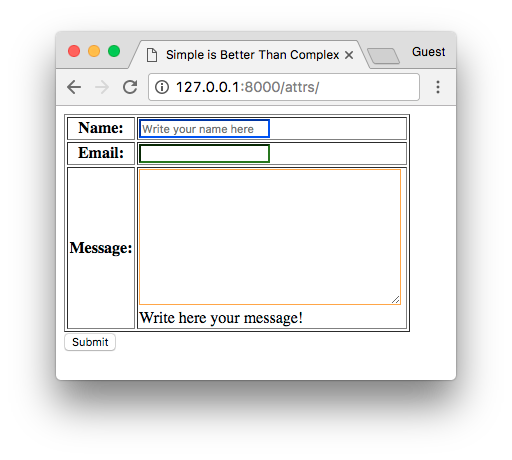
There are some cases that you only want to add an extra HTML attribute, like a class, a style, or a placeholder. You don’t need to expand the input field like we did in the previous example. You can do it directly in the form definition:
forms.py
class ColorfulContactForm(forms.Form):
    name = forms.CharField(
        max_length=30,
        widget=forms.TextInput(
            attrs={
                'style': 'border-color: blue;',
                'placeholder': 'Write your name here'
            }
        )
    )
    email = forms.EmailField(
        max_length=254,
        widget=forms.EmailInput(attrs={'style': 'border-color: green;'})
    )
    message = forms.CharField(
        max_length=2000,
        widget=forms.Textarea(attrs={'style': 'border-color: orange;'}),
        help_text='Write here your message!'
    )
Next, we are going to explore a third-party library that can make your life easier.
Using Django Widget Tweaks
Even though we can control the custom HTML attributes in the form definition, it would be much better if we could set them directly in the template. After all, the HTML attributes refer to the presentation of the inputs.
The django-widget-tweaks library is the right tool for the job. It let you keep the form defaults and just add what you need. It’s very convenient, specially when working with ModelForms, as it will reduce the amount of code you have to write to accomplish simple tasks.
I’m not going into much detail about the django-widget-tweaks because I have an article dedicated about it: How to use django-widget-tweaks.
Here’s a quick get started guide:
First, install it using pip:
pip install django-widget-tweaksAdd it to the INSTALLED_APPS:
INSTALLED_APPS = [
    'django.contrib.auth',
    'django.contrib.contenttypes',
    'django.contrib.sessions',
    'django.contrib.messages',
    'django.contrib.staticfiles',

    'widget_tweaks',
]
Load it in the template:
{% load widget_tweaks %}
<!DOCTYPE html>
<html>
<head>
  <meta charset="utf-8">
  <title>Simple is Better Than Complex</title>
</head>
<body>
  ...
</body>
And we are ready to use it! Basically we will use the template tag {% render_field %}. You will
see in the next example that we can simply put the attributes just like we would do with raw HTML:
<form method="post" novalidate>
  {% csrf_token %}

  {{ form.non_field_errors }}

  {% for hidden_field in form.hidden_fields %}
    {{ hidden_field.errors }}
    {{ hidden_field }}
  {% endfor %}

  <table border="1">
    {% for field in form.visible_fields %}
      <tr>
        <th>{{ field.label_tag }}</th>
        <td>
          {{ field.errors }}
          {% render_field field style="border: 2px dashed red;" placeholder=field.name %}
          {{ field.help_text }}
        </td>
      </tr>
    {% endfor %}
  </table>

  <button type="submit">Submit</button>
</form>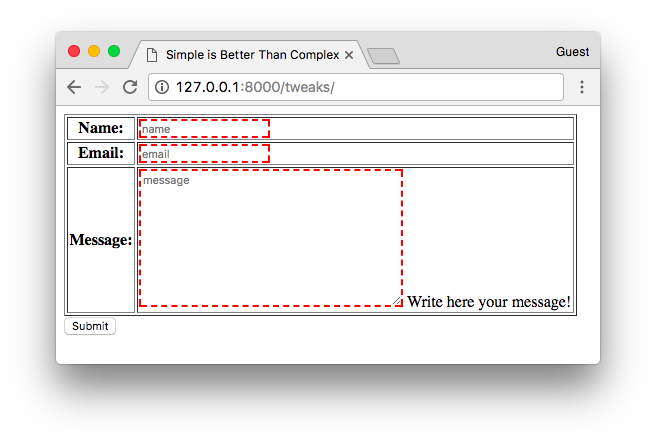
It’s very handy, specially for the cases where you just need to add a CSS class. Which is the case for using the Bootstrap 4 forms templates.
Rendering Bootstrap 4 Forms
Basically to use the Bootstrap 4 library I just included the CDN link they provide in my template:
<head>
  <meta charset="utf-8">
  <meta name="viewport" content="width=device-width, initial-scale=1, shrink-to-fit=no">
  <link rel="stylesheet" href="https://maxcdn.bootstrapcdn.com/bootstrap/4.0.0-beta/css/bootstrap.min.css" integrity="sha384-/Y6pD6FV/Vv2HJnA6t+vslU6fwYXjCFtcEpHbNJ0lyAFsXTsjBbfaDjzALeQsN6M" crossorigin="anonymous">
  <title>Simple is Better Than Complex</title>
</head>
This part of the article will be more to-the-point, as I won’t explore the particularities of the Bootstrap 4 implementation. Their documentation is great and rich in examples. If you are not very familiar, you can jump to the Documentation / Components / Forms section for further information.
Let’s first focus on the presentation of the inputs, we will get to the errors part later. Here is how we can represent the same form using the Bootstrap 4 tags:
<form method="post" novalidate>
  {% csrf_token %}

  {% for hidden_field in form.hidden_fields %}
    {{ hidden_field }}
  {% endfor %}

  {% for field in form.visible_fields %}
    <div class="form-group">
      {{ field.label_tag }}
      {{ field }}
      {% if field.help_text %}
        <small class="form-text text-muted">{{ field.help_text }}</small>
      {% endif %}
    </div>
  {% endfor %}

  <button type="submit" class="btn btn-primary">Submit</button>
</form>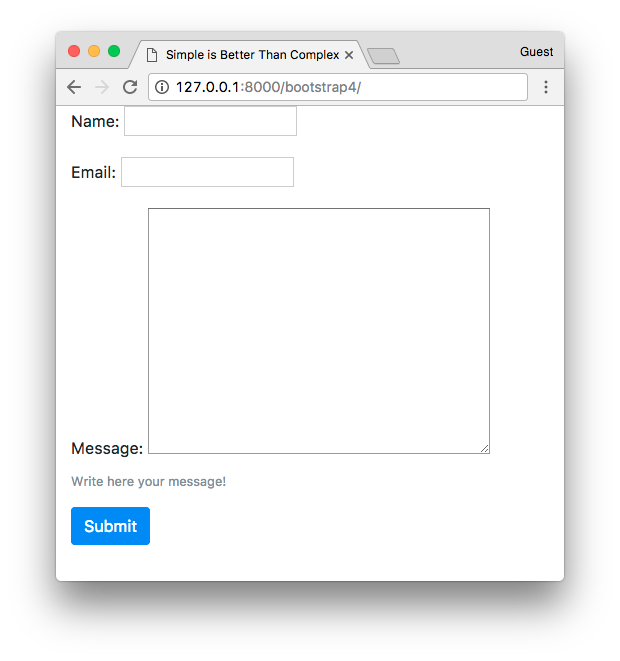
The input fields looks broken though. That’s because the Bootstrap 4 forms expect a CSS class form-control in the
HTML inputs. Let’s fix it with what we learned in the last section of this article:
{% load widget_tweaks %}

<form method="post" novalidate>
  {% csrf_token %}

  {% for hidden_field in form.hidden_fields %}
    {{ hidden_field }}
  {% endfor %}

  {% for field in form.visible_fields %}
    <div class="form-group">
      {{ field.label_tag }}
      {% render_field field class="form-control" %}
      {% if field.help_text %}
        <small class="form-text text-muted">{{ field.help_text }}</small>
      {% endif %}
    </div>
  {% endfor %}

  <button type="submit" class="btn btn-primary">Submit</button>
</form>
Much better. Now let’s see the validation and errors situation. I’m going to use an alert component for the non field errors, and for the fields I will just play with the right CSS classes that Bootstrap 4 provides.
{% load widget_tweaks %}
<form method="post" novalidate>
{% csrf_token %}
{% for hidden_field in form.hidden_fields %}
{{ hidden_field }}
{% endfor %}
{% if form.non_field_errors %}
<div class="alert alert-danger" role="alert">
{% for error in form.non_field_errors %}
{{ error }}
{% endfor %}
</div>
{% endif %}
{% for field in form.visible_fields %}
<div class="form-group">
{{ field.label_tag }}
{% if form.is_bound %}
{% if field.errors %}
{% render_field field class="form-control is-invalid" %}
{% for error in field.errors %}
<div class="invalid-feedback">
{{ error }}
</div>
{% endfor %}
{% else %}
{% render_field field class="form-control is-valid" %}
{% endif %}
{% else %}
{% render_field field class="form-control" %}
{% endif %}
{% if field.help_text %}
<small class="form-text text-muted">{{ field.help_text }}</small>
{% endif %}
</div>
{% endfor %}
<button type="submit" class="btn btn-primary">Submit</button>
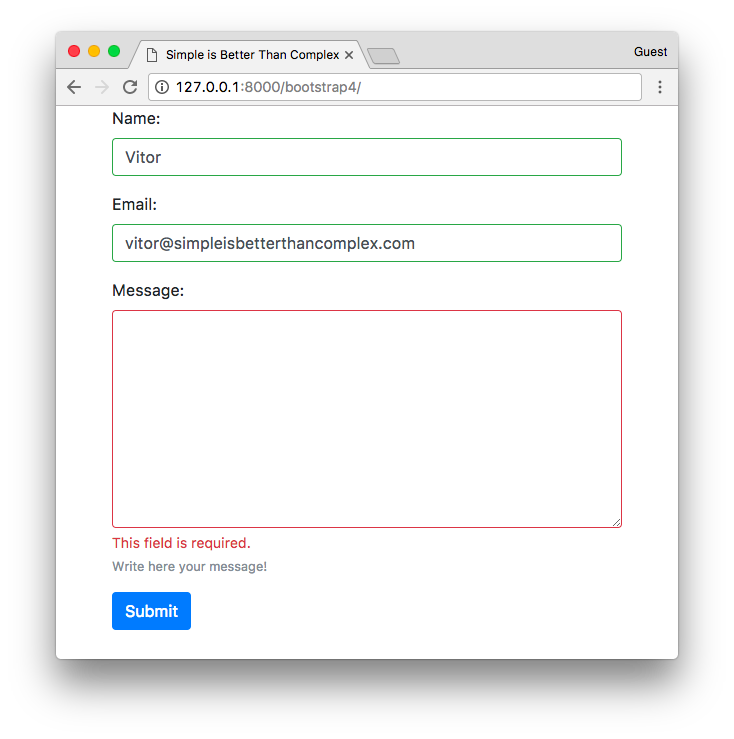
</form>And here is the result:
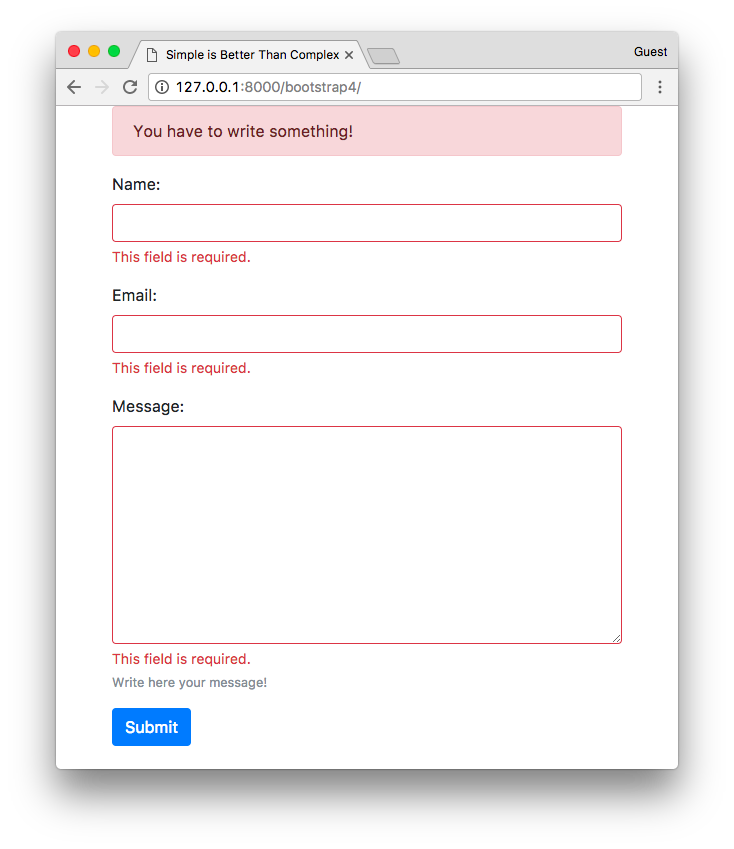
It’s very cool because it marks with green the fields that passed the validation:
Let’s have a close look on what’s going on. We can improve the code snippet but I preferred to keep it that way so you can have a better idea about the template rendering logic.
First, I call the form.is_bound method. It tells us if the form have data or not. When we first initialize the form
form = ContactForm(), the form.is_bound() method will return False. After a submission, the form.is_bound()
will return True. So, we can play with it to know if the validation process already happened or not.
Then, when the validation already occurred, I’m simply marking the field with the CSS class .is-invalid and
.is-valid, depending on the case. They are responsible for painting the form components in red or green.
Reusing Form Components
One thing we can do now, is copy the existing code to an external file, and reuse our code snippet for other forms.
includes/bs4_form.html
{% load widget_tweaks %}

{% for hidden_field in form.hidden_fields %}
  {{ hidden_field }}
{% endfor %}

{% if form.non_field_errors %}
  <div class="alert alert-danger" role="alert">
    {% for error in form.non_field_errors %}
      {{ error }}
    {% endfor %}
  </div>
{% endif %}

{% for field in form.visible_fields %}
  <div class="form-group">
    {{ field.label_tag }}

    {% if form.is_bound %}
      {% if field.errors %}
        {% render_field field class="form-control is-invalid" %}
        {% for error in field.errors %}
          <div class="invalid-feedback">
            {{ error }}
          </div>
        {% endfor %}
      {% else %}
        {% render_field field class="form-control is-valid" %}
      {% endif %}
    {% else %}
      {% render_field field class="form-control" %}
    {% endif %}

    {% if field.help_text %}
      <small class="form-text text-muted">{{ field.help_text }}</small>
    {% endif %}
  </div>
{% endfor %}
Then now, our form definition could be as simple as:
<form method="post" novalidate>
  {% csrf_token %}
  {% include 'includes/bs4_form.html' with form=form %}
  <button type="submit" class="btn btn-primary">Submit</button>
</form>
For example, using the code snippet above, we use it to process the UserCreationForm, which is a built-in form
that lives inside the django.contrib.auth module. Below, the result:

Conclusions
This article become bigger than I anticipated. I first thought about writing just a quick tutorial about form rendering. Then I remembered that I already had a to-the-point tutorial explaining how to use the django-widget-tweaks. So, instead I decided to dive deep into the details and explore some of the mechanics of the forms API.
I will have a follow-up article focusing on complex forms, rendering all together checkboxes, select fields, date picker and also about developing your own custom widgets.
I hope you learned something new or enjoying reading this article. If you may have any questions or want to discuss further about the topic, please leave a comment below!
As usual, you can find the source code and all the examples on GitHub.
 How to Implement Grouped Model Choice Field
 Advanced Form Rendering with Django Crispy Forms
 How to Use Bootstrap 4 Forms With Django
 How to Extend Django User Model
 How to Setup a SSL Certificate on Nginx for a Django Application
 How to Deploy a Django Application to Digital Ocean