

 (Picture:
 First, let’s get those terms out of our way. The REST acronym stands for Representational State Transfer, which is an architectural design. Usually when we use the term RESTful, we are referring to an application that implements the REST architectural design. API stands for Application Programming Interface, which is a software application that we interact programmatically, instead of using a graphical interface. In other words, we interact with it at a lower level at the source code, writing functions and routines.
In the context of Web development, usually when we are talking about a RESTful API we are referring to Web Services (or Web APIs). It’s a common way to expose parts of your application to third-parties (external applications and Websites). It can be data-oriented, in a sense that your Web service (the RESTful API), simply make available the information you store in your databases using a common format, such as XML or JSON. This way, an external application can interact with your application and your data, without having to connect directly into your database. This way, it doesn’t matter if your database is MySQL or PostgreSQL, or if your application was written in Java or Python. But RESTful APIs can also be used to modify data
As developers, we can be at either sides of the equation. We can be both the provider or the consumer of an API. However, in this tutorial we are going to explore the consumption part of the equation. We are going to write some code that consume public APIs. You will see that the process is very similar, and that’s something that once you learn you can apply to many problems.
Now, if you want to provide a REST API, the Django REST Framework is the best option. It make easy to expose parts of your application as a REST API. But, that’s a topic for another tutorial (I will publish it soon!)
Below, an outline of what I’m going to explore in this tutorial:
If you want to have a look on what we are going to build in this tutorial, see the code live at restful-apis-example.herokuapp.com.
Important Concepts
If you are planning to integrate your Django application with a third-party REST API, it’s important to keep a few things in mind:
Consuming an API is slow.
We have to implement them carefully because it’s an extra HTTP request performed in the server side, so it can increase considerably the time consumed during the request/response cycle. Caching is fundamental to assure the performance of the application.
You have no control over the API.
It’s a third-party API, it may stop working without any notice. Something could change, the API server may go down. So be prepare to handle exception cases.
APIs are usually limited by number of requests you can make.
Usually, the API provider only let use do a handful of requests per hour. This limit can vary, but usually it’s there. So, we have to take it into account when implementing the integration. Caching usually is the solution for the rate limits.
Secure your API keys.
Some APIs will required authentication, meaning you will have deal with sensitive data. Never commit this kind of information to public repositories.
There’s probably a Python client for it.
Using a native Python client to access an API is usually a good idea. It makes the authentication process and the usage of its resources easier. Always check first if there is a Python client available. In some cases there will be even multiple options. In such cases, check their repositories first and pick the one with most active development.
Documentation is gold.
APIs are pretty much useless without a proper documentation. It’s about your only guidance when using one. Unless the API server is open source, but then searching for endpoints and services directly in the source code can be very hard time consuming. So, before jumping into the implementation, make sure the provider has a reliable documentation.
Implementation
We are going to explore next a few implementations of public APIs so you can have an idea of how it works under the hoods. In the end of this post you will find the source code of the examples so you can explore and try it yourself.
Basic Example: GEO Location API
The first example is going to be an application that consumes the GEO API freegeoip.net. It’s a simple API that provides geo location information (country, timezone, latitude, longitude, etc) based on IP addresses. It’s a very simple API that doesn’t require a client or authentication.
A nice thing about some RESTful APIs is that we can debug using our browser. Others may need authentication so it is little bit trickier, but can be done in the terminal using tools like cURL for example.
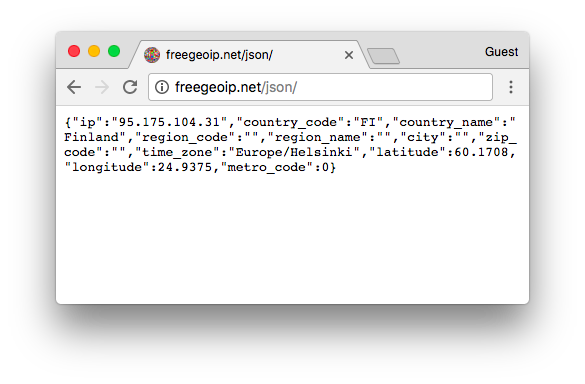
If we access the endpoint http://freegeoip.net/json/ in our browser (without providing any parameter) it will show
the information for your IP address:
Here is a very simple view using the requests Python library. Install it using pip:
pip install requestsBelow, the code:
urls.py
from django.urls import path
from . import views

urlpatterns = [
    path('', views.home, name='home'),
]
views.py
from django.shortcuts import render
import requests

def home(request):
    response = requests.get('http://freegeoip.net/json/')
    geodata = response.json()
    return render(request, 'core/home.html', {
        'ip': geodata['ip'],
        'country': geodata['country_name']
    })
In the view above, we are performing a GET request to this URL (endpoint) and reading the data in JSON format into
the geodata variable. We could have returned it directly to the template, but I opted to just pass the information
that we need, so you can see how to read the data.
You can “debug” it inside the view, adding a print statement inside the view and print the geodata variable so
you can see all the available information we could potentially use.
core/home.html
{% extends 'base.html' %}
{% block content %}
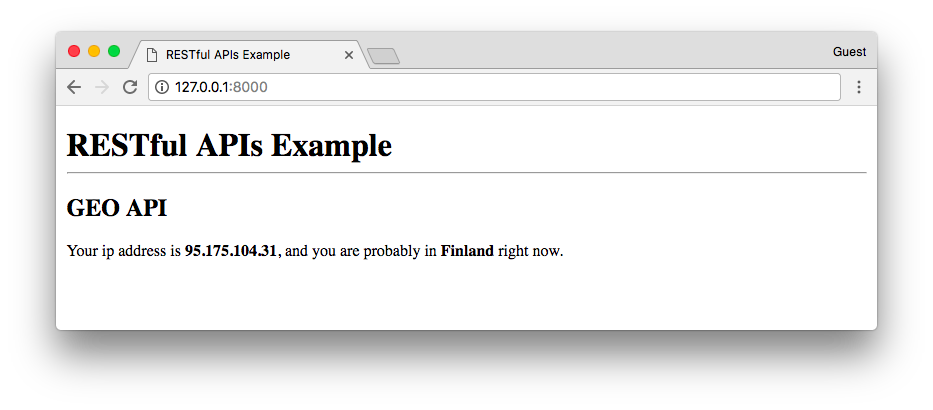
<h2>GEO API</h2>
<p>Your ip address is <strong>{{ ip }}</strong>, and you are probably in <strong>{{ country }}</strong> right now.</p>
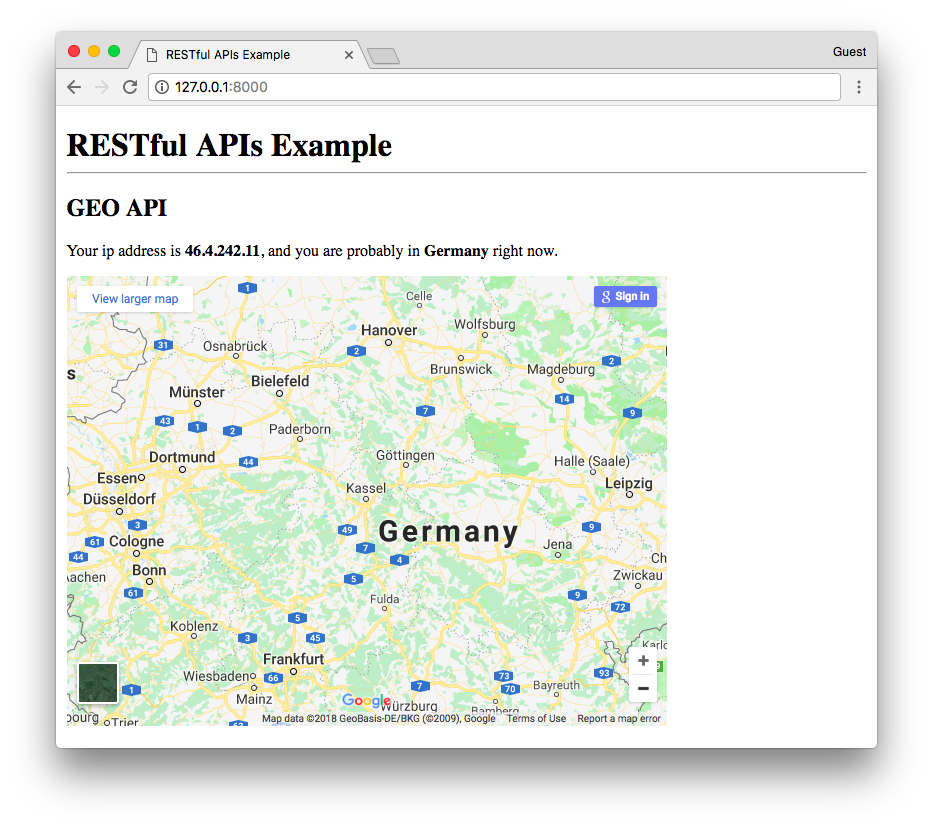
{% endblock %}And here is what the view looks like:
We can use this information in many ways. For example, we can get a Google Maps API key and render the current location using a Google Maps iframe:
Attention: This is just an example! Do NOT store API Keys directly in the source code or commit them to public repositories! To learn more about how to handle sensitive information refer to those articles I published previously: Protecting Sensitive Information and How to Use Python Decouple.
views.py
from django.shortcuts import render
import requests

def home(request):
    ip_address = request.META.get('HTTP_X_FORWARDED_FOR', '')
    response = requests.get('http://freegeoip.net/json/%s' % ip_address)
    geodata = response.json()
    return render(request, 'core/home.html', {
        'ip': geodata['ip'],
        'country': geodata['country_name'],
        'latitude': geodata['latitude'],
        'longitude': geodata['longitude'],
        'api_key': 'AIzaSyC1UpCQp9zHokhNOBK07AvZTiO09icwD8I'  # Don't do this! This is just an example. Secure your keys properly.
    })
Note:
There is a small "hack" in the code above. When we are developing locally, our machine is both the server and the client.
Basically, the HTTP_X_FORWARDED_FOR won't be set on the local machine, causing the request URL to be only http://freegeoip.net/json/
instead of something like http://freegeoip.net/json/95.175.104.31. It will work because as I showed you previously, the http://freegeoip.net/json/
URL return the result for your ip address. BUT! It wouldn't work in production, because it would show the location of the server instead of the visitor location.
The difference is that the HTTP_X_FORWARDED_FOR will be set with the client's IP address so everything will work as expected.
core/home.html
{% extends 'base.html' %}

{% block content %}
  <h2>GEO API</h2>
  <p>Your ip address is <strong>{{ ip }}</strong>, and you are probably in <strong>{{ country }}</strong> right now.</p>

  <iframe width="600"
          height="450"
          frameborder="0"
          style="border:0"
          src="https://www.google.com/maps/embed/v1/view?center={{ latitude }},{{ longitude }}&zoom=8&key={{ api_key }}"
          allowfullscreen></iframe>

{% endblock %}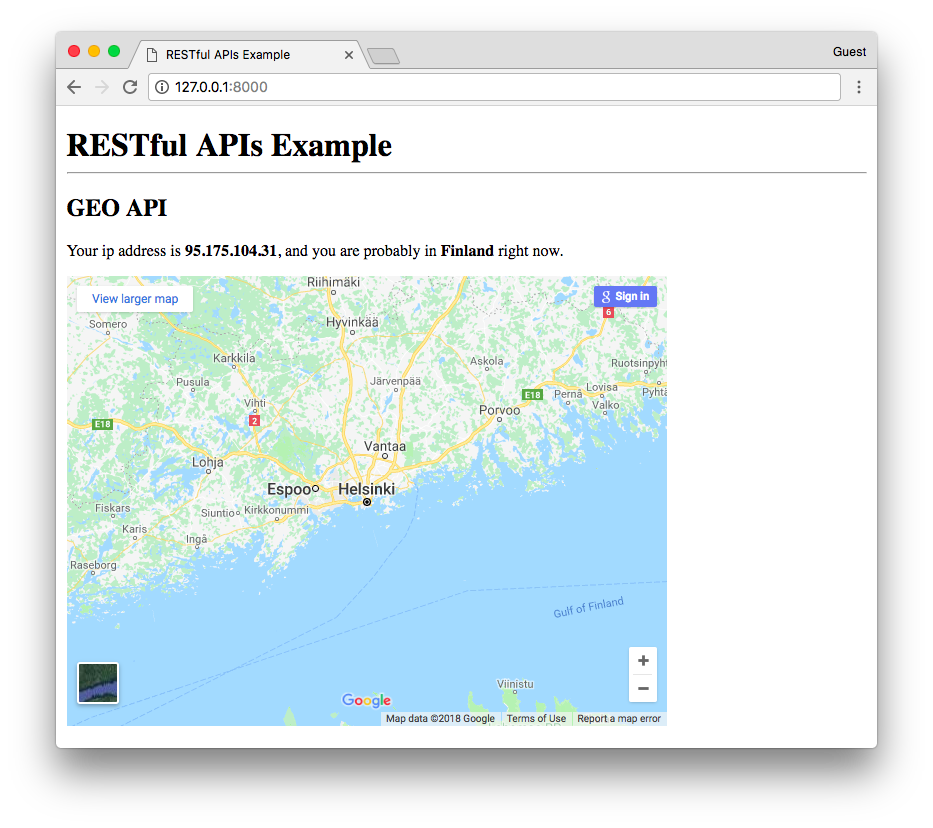
If I change my IP address using a VPN, we can see the changes just by refreshing the browser:
To try it yourself locally, go to developers.google.com/maps/web/ and click on “Get a Key”, generate an API for yourself.
Caching API Result
If you tried it locally probably you noticed it takes a little bit longer for the view to respond. If we reload the page, it will make an additional request to the API server again. But in this case, this information doesn’t generally change that quick (unless you moved geographically or connected to a VPN like I did). So, depending on the use case we can cache the result.
In this case, since every visitor is likely to have a different result, a solution could be to store the result in a session, like this:
views.py
from django.shortcuts import render
import requests

def home(request):
    is_cached = ('geodata' in request.session)

    if not is_cached:
        ip_address = request.META.get('HTTP_X_FORWARDED_FOR', '')
        response = requests.get('http://freegeoip.net/json/%s' % ip_address)
        request.session['geodata'] = response.json()

    geodata = request.session['geodata']

    return render(request, 'core/home.html', {
        'ip': geodata['ip'],
        'country': geodata['country_name'],
        'latitude': geodata['latitude'],
        'longitude': geodata['longitude'],
        'api_key': 'AIzaSyC1UpCQp9zHokhNOBK07AvZTiO09icwD8I',  # Don't do this! This is just an example. Secure your keys properly.
        'is_cached': is_cached
    })
core/home.html
{% extends 'base.html' %}

{% block content %}
  <h2>GEO API</h2>
  <p>Your ip address is <strong>{{ ip }}</strong>, and you are probably in <strong>{{ country }}</strong> right now.</p>
  <p>This information {{ is_cached|yesno:"was,wasn't" }} cached.</p>
  <iframe width="600"
          height="450"
          frameborder="0"
          style="border:0"
          src="https://www.google.com/maps/embed/v1/view?center={{ latitude }},{{ longitude }}&zoom=8&key={{ api_key }}"
          allowfullscreen></iframe>

{% endblock %}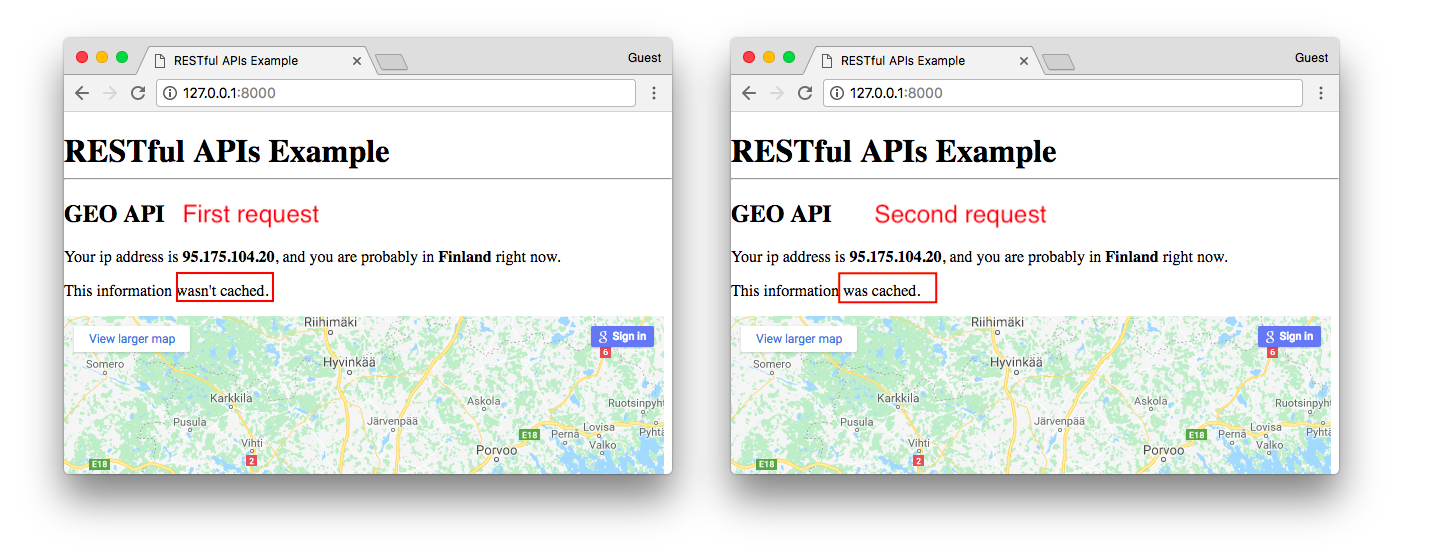
It is worth mentioning that there are several ways to cache an API result. It doesn’t mean you have to use a proper machinery like Memcached or Redis. You can cache it in your database, in a session, in a file. Depends on the use case. There is always a trade-off. Sometimes a simple solution is more than enough.
Passing Parameters to an API: GitHub Public API
Next, we are going to explore GitHub’s Public API. For some resources we won’t need to authenticated. But the limits are very low in those cases.
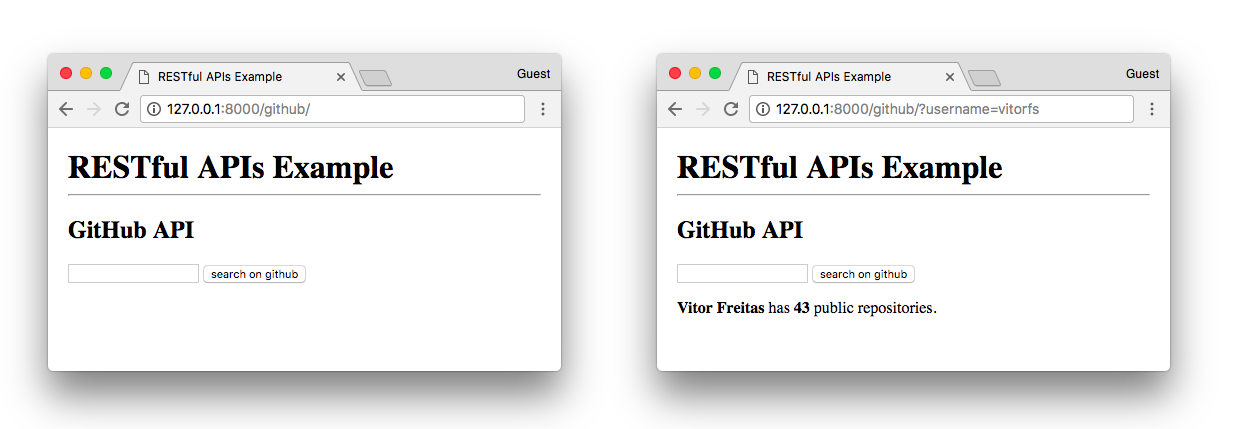
You can find GitHub’s API documentation at developer.github.com Let’s make a simple app that search for a GitHub user and displays their names and the number of open source repositories they have.
First, go to the docs.
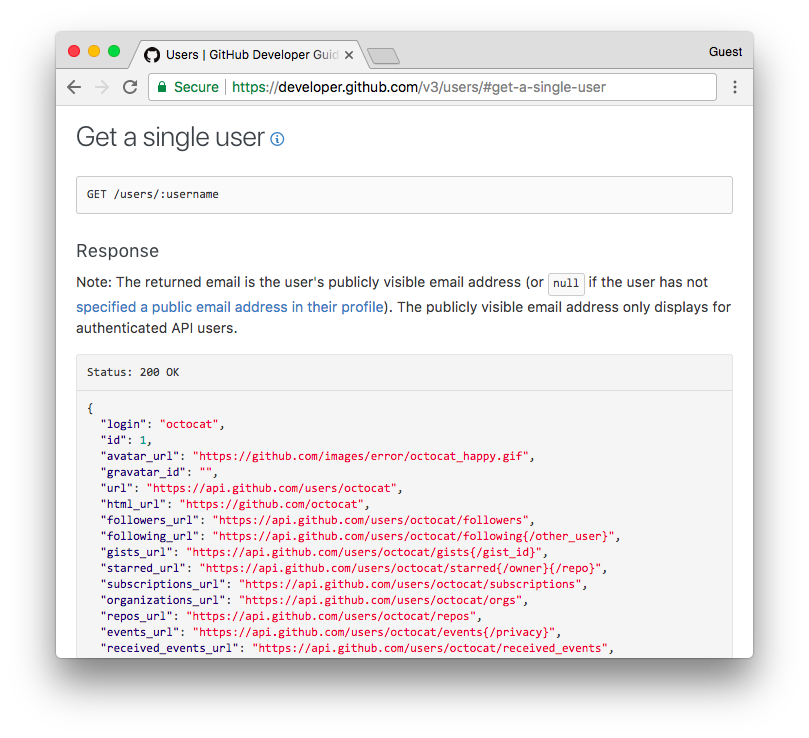
From the documentation we know what is the endpoint of the resource we want to get, which is /users/:username. It
will be used to build the logic of our application.
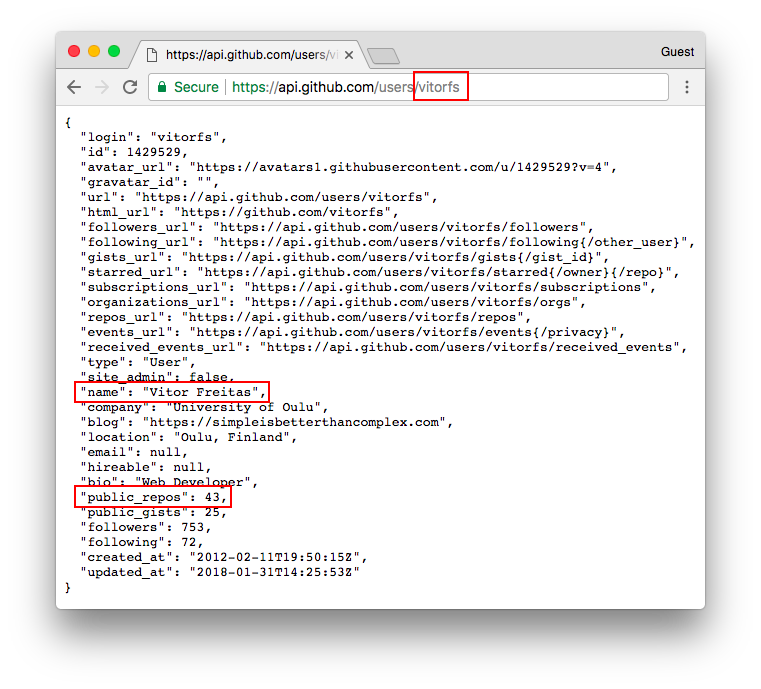
Now, let’s debug the API endpoint using our browser:
views.py
from django.shortcuts import render
import requests

def github(request):
    user = {}
    if 'username' in request.GET:
        username = request.GET['username']
        url = 'https://api.github.com/users/%s' % username
        response = requests.get(url)
        user = response.json()
    return render(request, 'core/github.html', {'user': user})
core/github.html
{% extends 'base.html' %}

{% block content %}
  <h2>GitHub API</h2>
  <form method="get">
    <input type="text" name="username">
    <button type="submit">search on github</button>
  </form>
  {% if user %}
    <p><strong>{{ user.name }}</strong> has <strong>{{ user.public_repos }}</strong> public repositories.</p>
  {% endif %}
{% endblock %}
The result you can see below:
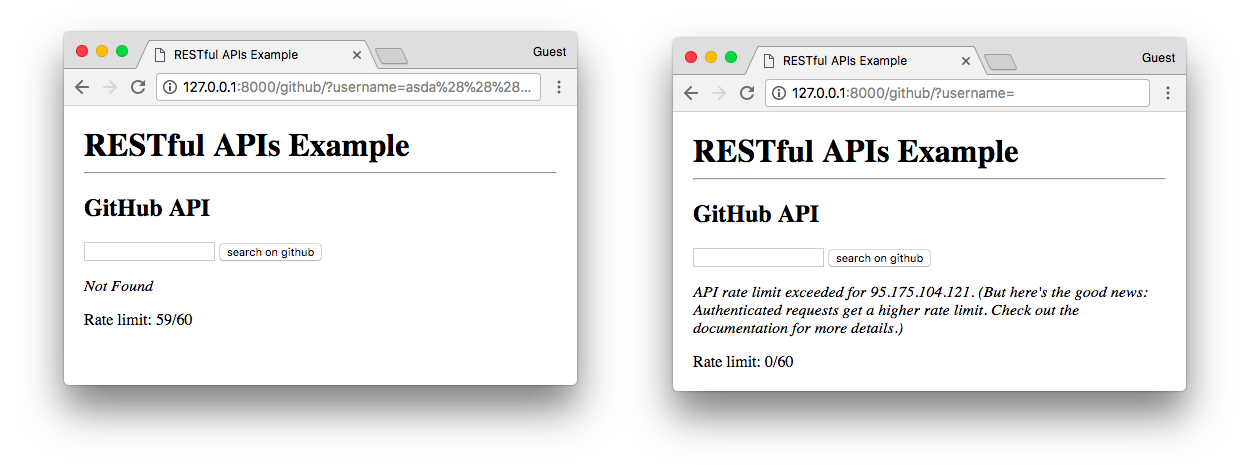
We can improve the code by treating searches for non-existing username (or empty username) by checking the status of the request (also taking the time to check the number of requests left):
views.py
def github(request):
    search_result = {}
    if 'username' in request.GET:
        username = request.GET['username']
        url = 'https://api.github.com/users/%s' % username
        response = requests.get(url)
        search_was_successful = (response.status_code == 200)  # 200 = SUCCESS
        search_result = response.json()
        search_result['success'] = search_was_successful
        search_result['rate'] = {
            'limit': response.headers['X-RateLimit-Limit'],
            'remaining': response.headers['X-RateLimit-Remaining'],
        }
    return render(request, 'core/github.html', {'search_result': search_result})
core/github.html
{% extends 'base.html' %}

{% block content %}
  <h2>GitHub API</h2>
  <form method="get">
    <input type="text" name="username">
    <button type="submit">search on github</button>
  </form>
  {% if search_result %}
    {% if search_result.success %}
      <p>
        <strong>{{ search_result.name|default_if_none:search_result.login }}</strong> has
        <strong>{{ search_result.public_repos }}</strong> public repositories.
      </p>
    {% else %}
      <p><em>{{ search_result.message }}</em></p>
    {% endif %}
    <p>Rate limit: {{ search_result.rate.remaining }}/{{ search_result.rate.limit }}</p>
  {% endif %}
{% endblock %}
A small detail here is that I’m using the default_if_none template filter to fallback to the user “login” when there
is no “name”.
Here is how it looks like now:
Using a Client: GitHub Public API
Another way to interact with GitHub services is through an API client. A client is a library implemented in a specific programming language. It’s the bridge between your application and the third-party application you are integrating. What an API client does under the hood is basically what we did in the previous sections.
A good Python client for the GitHub API is the PyGithub. You can install it using pip:
pip install PyGithubA similar implementation with the same results using the API client:
views.py
from django.shortcuts import render
from github import Github, GithubException

def github_client(request):
    search_result = {}
    if 'username' in request.GET:
        username = request.GET['username']
        client = Github()

        try:
            user = client.get_user(username)
            search_result['name'] = user.name
            search_result['login'] = user.login
            search_result['public_repos'] = user.public_repos
            search_result['success'] = True
        except GithubException as ge:
            search_result['message'] = ge.data['message']
            search_result['success'] = False

        rate_limit = client.get_rate_limit()
        search_result['rate'] = {
            'limit': rate_limit.rate.limit,
            'remaining': rate_limit.rate.remaining,
        }

    return render(request, 'core/github.html', {'search_result': search_result})
The main difference here is that we use the methods get_user() and get_rate_limit() to perform the requests.
Also, it provides an easy interface to authenticate using username and password or an access token:
from github import Github

client = Github('user', 'password')

# or using an access token
client = Github('access_token')
Managing API Keys: Oxford Dictionaries API
The example below is to show how to interact with an API that requires authentication using and API Key. Usually, the API provider will ask you to register your application and provide some information. This can vary a lot from provider to provider.
Here I’m going to use the Oxford Dictionary API. It’s mainly a paid API, but they also offer a free plan that let’s use do a few requests per hour. After you register you will see the information below:
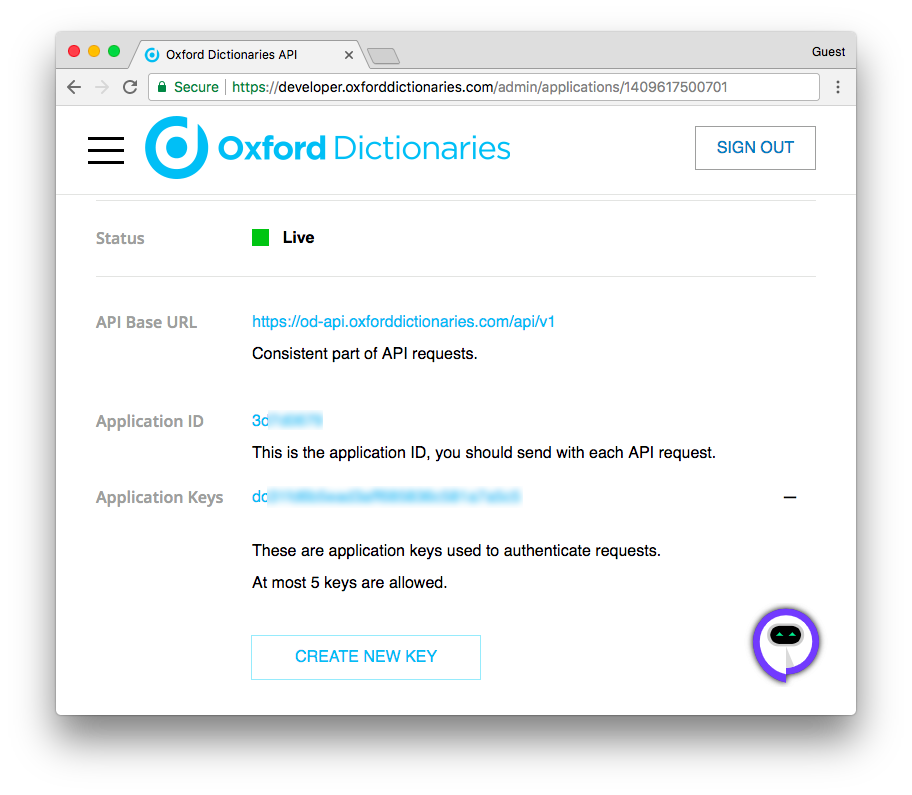
Here we have all the necessary information to connect with their API. To understand better how the authentication process works it’s usually a good idea to refer to their documentation. In this case, we need to provide this information in the header of each request we perform.
There is a slight difference between those keys and the Google Maps API key for example. Even though I recommended several time to protect your keys and everything, fact is the Google Maps API key is a different type of key which is meant to be used in the client side (inside the iframe). But in such cases the provider (Google), give you mechanisms to protect your key (for example whitelisting domains that can use this particular key). But that’s not the case with the Oxford API keys (and majority of the keys you will work). Those are only supposed to be used on the server side.
Here is how I usually protect my keys:
First, install python-decouple:
pip install python-decoupleNow, create a .env file in the project root:

In this file, create two environment variables to store the application ID and the application key:
.env
OXFORD_APP_ID=EIiHAFqo
OXFORD_APP_KEY=nJzxp5Fk21v7D9ASIWd8Vkhs47C0j6cS
Now, in the settings.py module, we import the python-decouple library and create two settings variables to store this information:
settings.py
from decouple import config

# other settings... SECRET_KEY, DEBUG, INSTALLED_APPS etc etc

# at the bottom of the settings.py file:

OXFORD_APP_ID = config('OXFORD_APP_ID', default='')
OXFORD_APP_KEY = config('OXFORD_APP_KEY', default='')
Here the config() function will search for a .env file in the project root, if there is no .env file it will
fallback to the OS environment variables, if there is no environment variable, it will fallback to the default value
in the config() function. In this case the default value is just an empty string to avoid the application breaking
in case you have no API key.
Below, an example implementation of an application that search for words in English and displays its definitions:
forms.py
from django import forms
from django.conf import settings
import requests

class DictionaryForm(forms.Form):
    word = forms.CharField(max_length=100)

    def search(self):
        result = {}
        word = self.cleaned_data['word']
        endpoint = 'https://od-api.oxforddictionaries.com/api/v1/entries/{source_lang}/{word_id}'
        url = endpoint.format(source_lang='en', word_id=word)
        headers = {'app_id': settings.OXFORD_APP_ID, 'app_key': settings.OXFORD_APP_KEY}
        response = requests.get(url, headers=headers)
        if response.status_code == 200:  # SUCCESS
            result = response.json()
            result['success'] = True
        else:
            result['success'] = False
            if response.status_code == 404:  # NOT FOUND
                result['message'] = 'No entry found for "%s"' % word
            else:
                result['message'] = 'The Oxford API is not available at the moment. Please try again later.'
        return result
This time we are working inside a form class, which usually is a good place to move processing from the views. The code
to consume the API is now inside a form class, where this search method will be called only after the form data is
validated.
views.py
from django.shortcuts import render
from .forms import DictionaryForm

def oxford(request):
    search_result = {}
    if 'word' in request.GET:
        form = DictionaryForm(request.GET)
        if form.is_valid():
            search_result = form.search()
    else:
        form = DictionaryForm()
    return render(request, 'core/oxford.html', {'form': form, 'search_result': search_result})
Finally, the template to display the results:
core/oxford.html
{% extends 'base.html' %}
{% block content %}
<h2>Oxford Dictionary</h2>
<form method="get">
{{ form.as_p }}
<button type="submit">search</button>
</form>
{% if search_result %}
<hr>
{% if search_result.success %}
{% for result in search_result.results %}
<h3>{{ result.word }}</h3>
{% for lexicalentry in result.lexicalEntries %}
<h4>{{ lexicalentry.lexicalCategory }}</h4>
<ul>
{% for entry in lexicalentry.entries %}
{% for sense in entry.senses %}
{% for definition in sense.definitions %}
<li>{{ definition }}</li>
{% endfor %}
{% endfor %}
{% endfor %}
</ul>
{% endfor %}
{% endfor %}
{% else %}
<p><em>{{ search_result.message }}</em></p>
{% endif %}
{% endif %}
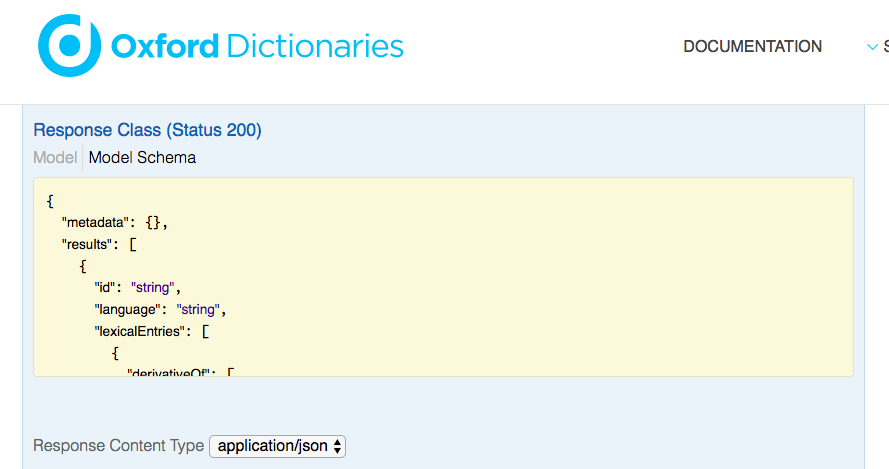
{% endblock %}The template looks complicated but that’s how we work out the data returned by the API. We can check its format in the documentation:
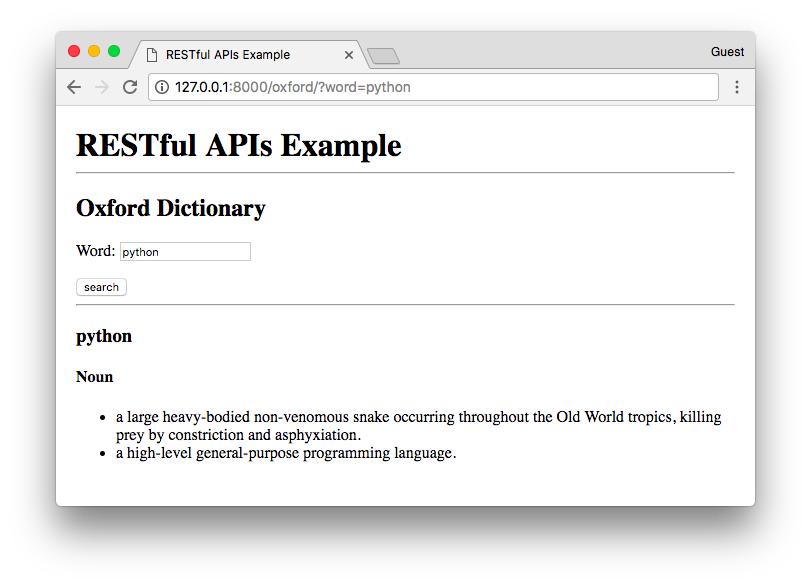
And the final result is this:
Conclusions
In this tutorial we explored a few concepts of consuming third-party APIs in a Django application. I just wanted to share some general advices and show some practical code that integrates with external resources. With small amount of code we can already achieve some fun results.
You can see those examples live at restful-apis-example.herokuapp.com.
For the source code, go to github.com/sibtc/restful-apis-example.
If you want some inspiration, or want to build something using some public API, you can visit this list on GitHub which provides a curated list of public APIs.
Be safe and happy coding!
 How to Use JWT Authentication with Django REST Framework
 How to Implement Token Authentication using Django REST Framework
 A Complete Beginner's Guide to Django - Part 6
 How to Extend Django User Model
 How to Setup a SSL Certificate on Nginx for a Django Application
 How to Deploy a Django Application to Digital Ocean